PrF UG classes editing a class
Editing a Class
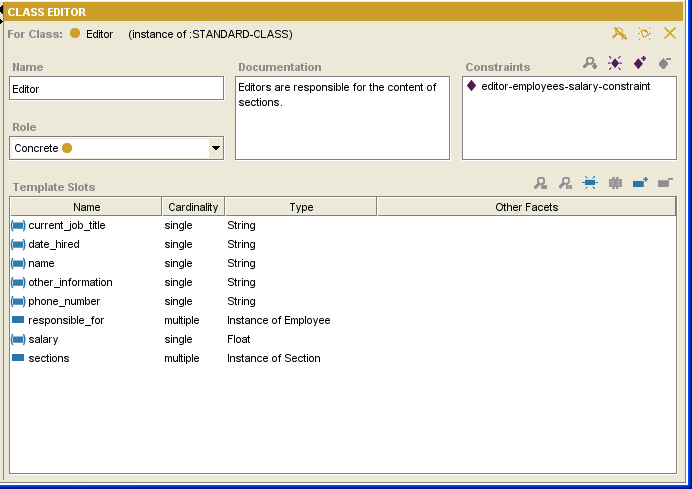
Using the Class Editor, you can view or edit a class's constraints, documentation, name, notes, or template slot fields.

Any changes you enter into the Class Editor take effect immediately. To make the changes permanent, save the knowledge base by selecting Save from the Project menu. To revert to the last saved version, close Protege-Frames without saving changes. If you have made extensive changes to your knowledge base during the current session, you may wish to save or archive the project before editing classes.
Working with Class Notes
The note icons
(![]() ,
,
![]() ,
,
![]() )
at the upper right of the Editor allow you work with class sticky notes.
These notes, which are not part of your ontology,
can be used for todos or communication
while you are developing your knowledge base.
)
at the upper right of the Editor allow you work with class sticky notes.
These notes, which are not part of your ontology,
can be used for todos or communication
while you are developing your knowledge base.
To hide or show all class notes, click the Hide Class Notes (
 ) button.
To create a note for the current class, click the Create Class Note (
 ) button.
To delete a note from the current class, click the Delete Class Note (
 ) button
and then select the note from the list.
For more information, see Working with Notes.
Notes are not available when working with the Editor as a free-standing window.
Changing the Name of a Class
To change the name of a class, edit the name in the Name field. The following rules apply to class names:
The name must be a unique frame name in the knowledge base.
Class names are case sensitive.
Note: A recommended convention is to make the first character of each word in a class name uppercase and the rest lowercase, and to separate words by underscores.
Changing the Role of a Class
Select the new role from the Role menu. Concrete classes may have direct instances, but do not have to; abstract classes cannot have direct instances. Protege-Frames does not impose any restrictions on the role of your classes.
Changing Constraints
Class constraints are defined programmatically. See Constraints for more information.
Changing Class Documentation
To change the notes for a class, change the text directly in the Class Documentation pane.
Working with Template Slots
The Template Slot buttons at the Template Slots pane allow you to:
edit a slot at the top level using the View Top-level Slot (
 ) button.
override a slot at the class using the View Slot Overrides (
 ) button;
slots that have been overridden are displayed with an override
(
 ) icon.
create a new slot using the Create Slot (
 ) button.
remove slot overrides using the Remove Slot Overrides (
 ) button.
add an existing slot to the class, using the Add Slot (
 ) button.
remove a slot from the class using the Remove Slot (
 ) button;
the slot is removed from the class,
but still exists in the knowledge base.
For more information about working with slots, see the Slots Table of Contents.
Other Class Editing Operations
Viewing Multiple Classes
To view or edit the information for several classes at once,
select the classes one by one and click the View Class
(![]() )
button
to open the Class Editor
for every selected class.
Opening a new Class Editor does not close the previous editor.
This allows you to compare the attributes for two or more classes.
Edits can be made directly in any open Class Editor.
)
button
to open the Class Editor
for every selected class.
Opening a new Class Editor does not close the previous editor.
This allows you to compare the attributes for two or more classes.
Edits can be made directly in any open Class Editor.
Changing Superclasses
To change the superclasses of a class, see: Adding a Superclass, Replacing a Superclass, and Removing a Superclass.