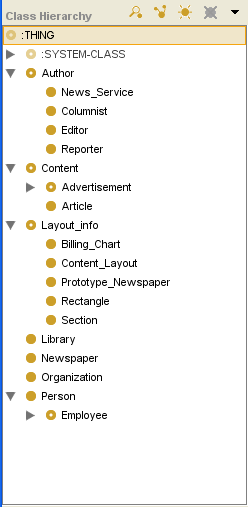
PrF UG classes class window
The Class Hierarchy Window
The Class Hierarchy window in the Class Browser displays the classes for the project and allows you to rearrange your hierarchy using "drag-and-drop". By default, the Class window displays the class structure of your knowledge base, with all classes shown as descending, directly or indirectly, from the system class :THING.
Description
This window shows the following:
Subclasses appear below their superclasses and are indented to the right.
Hierarchy icons indicate how much or how little of the hierarchy is displayed:
An "expanded" icon (
 )
means that all direct subclasses of the class are displayed.
A "collapsed" icon (
 )
means that the class has direct subclasses which are not currently displayed.
You can click on this icon to toggle it.
If no icon is displayed, the class has no direct subclasses.
Tip: You can also display all classes below a class by right-clicking the class and selecting Expand from the cascading Class Menu.
The currently selected class is shown with a highlight.
Classes with more than one superclass appear more than once in the tree.
Class icons show information about your class (e.g., the class role).
Note: You can also change the view from the default to view the class relations for a selected class. Most of the time, however, you will work with the default hierarchy view.
Tasks
The Class Hierarchy window allows you to perform the following tasks:
You can select a class by clicking on it.
You can edit the attributes of a class in the Class Editor. When a class is selected, the Class Editor appears to the right. You can also open the Class Editor for one or more selected classes by clicking the View Class (
 ) button.
You can create a new class by clicking the Create Class (
 ) button
and creating and editing its attributes
in the Class Editor.
You can delete a class by clicking the Delete Class (
 ) button.
You can search for a class by typing all or part of the class name in the Class lookup bar and then clicking the Find Class (
 ) button.
You can work with metaclasses and hidden classes, using the right mouse button. See the Class menu for more information.
You can also rearrange the superclass/subclass relationships:
You can move a class to another superclass by selecting the class, dragging it directly over the new superclass, and then dropping it.
You can add an additional superclass to a class by selecting the class, dragging it over the additional superclass, and holding down the Ctrl (Cmd) key while you drop it.
For additional superclass tasks that you can perform, see the Superclasses pane.
