Difference between revisions of "PrF UG slots all"
(New page: <div id='prf_ug'> {{:PrF_UG_slots}} {{:PrF_UG_slots_slots_tab}} {{:PrF_UG_slots_slot_browser}} {{:PrF_UG_slots_slot_buttons}} {{:PrF_UG_slots_slot_menu}} {{:PrF_UG_slots_slot_editor}} {{:P...) |
|||
| (One intermediate revision by the same user not shown) | |||
| Line 1: | Line 1: | ||
| − | <div id='prf_ug'> | + | <noinclude>{{PrF_UG}}__TOC__<div id='prf_ug'></noinclude> |
{{:PrF_UG_slots}} | {{:PrF_UG_slots}} | ||
{{:PrF_UG_slots_slots_tab}} | {{:PrF_UG_slots_slots_tab}} | ||
| Line 31: | Line 31: | ||
{{:PrF_UG_slots_slot_icons}} | {{:PrF_UG_slots_slot_icons}} | ||
{{:PrF_UG_slots_superslots_pane}} | {{:PrF_UG_slots_superslots_pane}} | ||
| − | </div> | + | <noinclude></div> |
| − | + | [[Category:Protege-Frames 3.x User's Guide]]</noinclude> | |
| − | [[Category:Protege-Frames 3.x User's Guide]] | ||
Latest revision as of 12:52, November 14, 2008
Contents
- 1 Slots
- 1.1 The Slots Tab
- 1.2 The Slot Browser
- 1.3 The Slot Buttons
- 1.4 The Slot Menu
- 1.5 The Slot Editor
- 1.6 The Value Type Menu
- 1.7 The Any Value Type
- 1.8 The Boolean Value Type
- 1.9 The Class Value Type
- 1.10 The Float Value Type
- 1.11 The Instance Value Type
- 1.12 The Integer Value Type
- 1.13 The String Value Type
- 1.14 The Symbol Value Type
- 1.15 Creating a New Slot
- 1.16 Viewing a Slot
- 1.17 Editing a Top-Level Slot
- 1.18 Overriding Slot Properties at a Class
- 1.19 Editing Slot Properties
- 1.20 Removing a Slot from a Class
- 1.21 Deleting a Slot from the Project
- 1.22 Adding a Slot to a Class
- 1.23 Removing Overrides From a Slot
- 1.24 Understanding Inverse Slots
- 1.25 Creating an Inverse Slot Relationship
- 1.26 Working with Subslots
- 1.27 Finding a Slot
- 1.28 The Slot Hierarchy Window
- 1.29 The Slot Icons
- 1.30 The Superslots Pane
Slots
This section of the User's Guide covers the concepts of understanding, creating, and using Protege-Frames slots.
Note: Before you create and use slots, you should be confident with the basic Protege-Frames interface. You should also be comfortable with Protege-Frames projects, project types, windows, and classes.
To return to the main table of contents, click the Protege-Frames User's Guide link (located at the top of the table of contents on the right-hand side of this page).
The Slots Tab
The Slots tab provides a single window in which you may view, create, and edit slots. Slots usually represent properties of classes or relationships between classes. For example, the name slot represents the property of having a name. Once you have created a slot, you can attach it to a class. When name is attached to the Person class, it represents the name of the person.
Although slots are usually thought of in terms of classes, they can be defined and manipulated independently, and can exist without any relationship to classes.
The tab consists of two panes:
The Slot Browser, on the left, shows all the slots in the project. It allows you to edit existing slots, create new slots, and delete slots, as well as work with superslots.
When a single slot is selected, the Slot Editor for the selected slot is shown at the right. The Slot Editor allows you to name the slot, choose its cardinality and value type, define constraints, defaults, and maximum and minimum values, as well as provide a brief description. The Slot Editor can be displayed as a separate window by clicking the View Slot (
 ) button
in the Slots pane.
The Slot Editor
can also be accessed
from the Templates Slots pane
in the Classes tab.
Click on an area in the picture to jump to it:
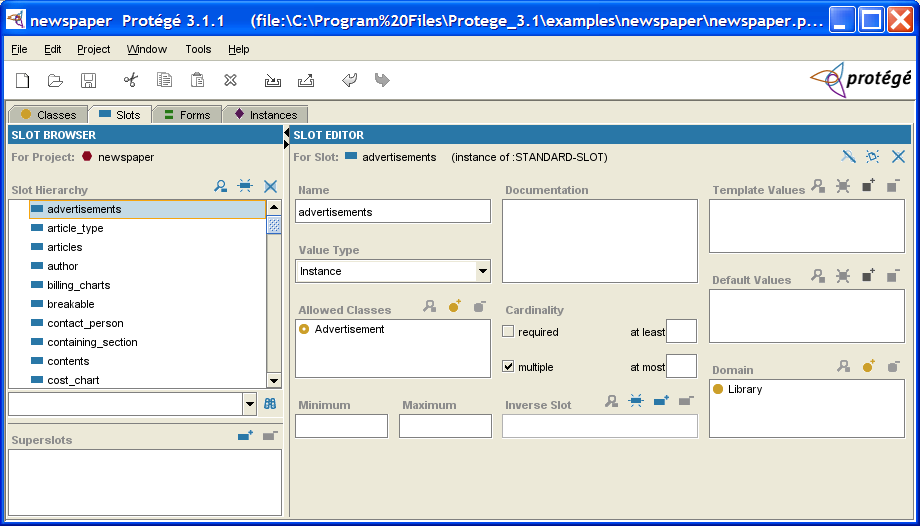
For information about the Slots tab user interface and about accomplishing specific tasks, see the Slots Table of Contents.
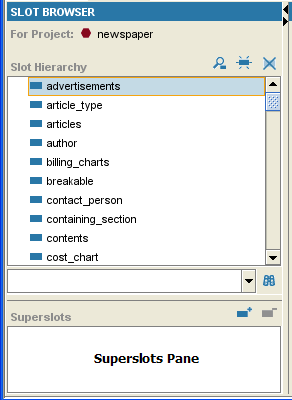
The Slot Browser
The Slot Browser, on the left of the Slots tab, displays the all the slots in your project. The Slot Browser includes the following:
Slot buttons allow you to create (
 ),
view/edit
(
 ),
and delete
(
 ) classes
in your knowledge base.
The Slot Hierarchy window: displays your slot hierarchy. Icons give additional information about your slots. In this window you can:
rearrange the slot hierarchy, using "drag-and-drop".
select a slot and see its information displayed in the Slot Editor to the right.
right-click a slot to use the Slot menu, which allows you to create and delete slots as well as work with slot metaclasses.
Slot search bar: allows you to find a slot in the Slot Hierarchy window by typing all or part of the slot name and clicking the Search for Slot (
 ) button.
Superslots pane: allows you to add and remove superslots for a slot as well as jump to a different superslot in the hierarchy view.
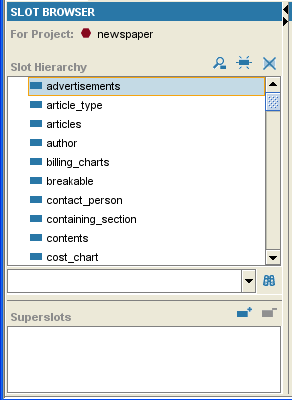
For information about the Slots tab user interface and about accomplishing specific tasks, see the Slots Table of Contents.
The Slot Buttons
The slot buttons, located at the top right of the Slot Browser in the Slots tab, allow you to view/edit, create, or delete a slot. You can also perform these commands by right-clicking on a slot and selecting a command from the Slot menu.
The buttons have the following actions:
|
View Slot: Opens the Slot Editor for the highlighted slot. You can also view a slot by double-clicking it in the Slot Browser. If you make any changes to the slot from the Slots tab, they affect the slot everywhere it appears, including the Slots tab and all classes where the slot is attached. See Viewing a Slot. | |
|
Create Slot: Creates a new slot. | |
|
Delete Slot: Deletes the highlighted slot from the project. See Deleting a Slot. |
You can also view, create, and edit slots from the Template Slots pane. See the Template Slot buttons for more information.
The Slot Menu
Whenever you have a slot selected in the Slot Editor, you can access the cascading slot menu by clicking the right mouse button. This menu allows you to perform a number of slot-related tasks.
To access the slot menu:
Select a slot in the Slot Editor.
Click the right mouse button. The cascading slot menu will be displayed.
Make your selection and click the left mouse button.
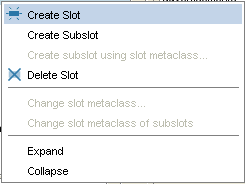
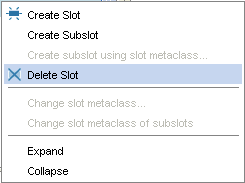
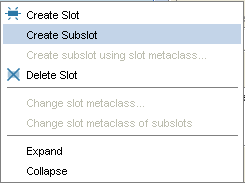
The slot menu allows you to perform the following tasks. Not all tasks are available at all times; tasks that cannot be performed are grayed out. Note that metaclasses and metaslots are advanced features; you should have a good understanding of Protege-Frames before you use metaclasses:
 Create slot:
Creates a new slot.
This operation is identical to clicking the Create Slot
(
 )
button.
Create Subslot: Creates a subslot subordinate to the highlighted slot.
Create subslot using slot metaclass...: (advanced) If you have added slot metaclasses to your project, allows you to create a new subslot, using a slot metaclass as a template.
 Delete Slot:
Deletes
the highlighted slot and all of its subslots,
removing it from the current project.
This operation is identical to the Delete Slot
(
 )
button.
Change slot metaclass: (advanced) Changes the slot metaclass of the highlighted slot. See Changing the Slot Metaclass of a Slot for more information.
Change slot metaclass of subslots: (advanced) Changes the slot metaclass of all subordinate slots to the slot metaclass of the highlighted slot.
Expand: Shows all slots subordinate to the highlighted slot. This is a multi-level display operation that is more extensive than clicking the "collapsed" (
 ) icon,
which only shows the next level of direct subslots.
Collapse: Hides all slots subordinate to the highlighted slot. This is a multi-level display operation that is more extensive than clicking the "expanded" (
 ) icon
to the left of the slot.
The Slot Editor
The Slot Editor can be used to define and edit the attributes, or facets, of a slot. The Slot Editor for the selected slot is displayed at the right of the Slots tab. The Slot Editor can also be displayed as a free-standing window, as follows:
When you highlight a slot in the Slots tab and then click the View Slot (
 )
button.
When you create a new slot for a highlighted class by clicking the Create Slot (
 ) button
in the Template Slots pane
of the Classes tab.
When you highlight a slot in the Template Slots pane and then click the View Top-level Slot (
 )
or the View Slot Overrides
(
 )
button.
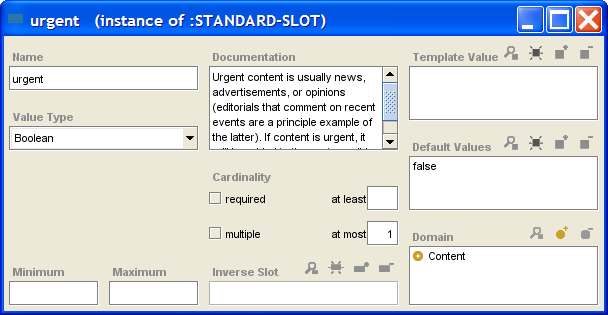
In the example below, the slot urgent for the class Article was double-clicked in the Template Slots pane. The Slot Editor displays a Boolean Type, with Single Cardinality, and a text documentation pane of the urgent slot.
A slot can be attached to more than one class. Each slot has a top-level (system) description; the system description can be specialized, or overridden, for a specific class. The scope of your edits depends on how you access the Slot Editor:
Editing a Top-Level Slot: When you access the Slot Editor via the Slots tab or via the View Top-level Slot (
 ) button
in the Template Slots pane
of the Classes tab,
you can view and edit the top-level description;
these modifications affect the slot for any class where it occurs.
Overriding Slot Properties at a Class: When you access the Slot Editor via the View Slot Overrides (
 ) button
in the Template Slots pane
of the Classes tab,
you can view and edit the slot properties for the currently highlighted class.
Class-level modifications, called overrides,
only affect the slot at the current class and its subclasses.
The Slot Editor displays the following information for a slot:
Note icons, which allow you to add notes.
Name of the slot.
Value Type of the slot.
Cardinality of the slot.
(optional) Minimum and Maximum values for the slot (slots of type Integer or Float only).
(optional) Any Documentation that has been entered for the slot.
(optional) An Inverse Slot for the slot (slots of type Class or Instance).
(optional) Any Template Values that have been defined for the slot.
(optional) Any Defaults that have been defined for the slot.
Domain of the slot.
For certain value types, an additional pane appears below the Value Type pane:
For type Class, the Allowed Superclasses pane appears.
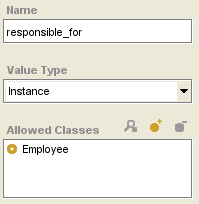
For type Instance, the Allowed Classes pane appears.
For type Symbol, the Allowed Symbols pane appears.
Note Icons
The note icons
(![]() ,
,
![]() ,
,
![]() ),
at the upper right of the Editor,
allow you to add and remove yellow sticky notes to your slot.
These notes, which are not part of your ontology,
are displayed when the slot is selected
at the Slots tab.
For information on how to add notes to any frame
(class, instance, or slot),
see Working with Notes.
),
at the upper right of the Editor,
allow you to add and remove yellow sticky notes to your slot.
These notes, which are not part of your ontology,
are displayed when the slot is selected
at the Slots tab.
For information on how to add notes to any frame
(class, instance, or slot),
see Working with Notes.
Slot Name
You can edit the slot name directly in the Name field. Slot names are case-sensitive. A recommended convention is to make slot names lowercase, separating adjacent words with an underscore (_).
Value Type Menu
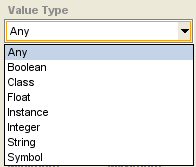
The Value Type menu allows you to select the slot value type, which determines the kind of values that the slot may hold. When you are creating instances for a slot, the slot type also determines how the slot is displayed in the Instance Editor. See the Standard Widgets for more information about instances and type.
The following table summarizes the value types. For a full description, click on the type name:
| Type | Description | Examples |
|---|---|---|
|
any of the types below (logical Union) |
||
|
a logical, Boolean value; i.e., a value that is either true or false |
true, false | |
| the slot takes one or more classes as values | Editor | |
| a floating-point number (number with a decimal point) | 1.0, 3.4e10, -0.3e-3 | |
| the slot takes one or more instances as values | Head Honcho | |
| an integer (a whole number) | 1, 2, -4, 0 | |
| String of alphanumeric (ASCII) characters, possibly including spaces | "Mars Mission" | |
| the slot takes values from a list of strings you define | {red, blue, green} |
When a value type of Class, Instance, or Symbol is selected, an additional pane appears below the Value Type menu. This pane allows you to select or create the values for the slot.
Cardinality
The Cardinality field allows you to specify the number of values allowed or required for the slot. This supplies the following options:
The default configuration allows the slot to have at most one value; that is, it can have one value or no value. You can change the default by entering a positive whole number in the at least and/or at most options, or by selecting the multiple option:
required/at least: Sets the minimum number of values for the slot. To use, enter a positive whole number in the at least entry bar:
If you enter a value for at least, required is automatically selected.
Setting at least equal to one (1) means a value is required for the slot.
Setting at least greater than one automatically selects multiple as well.
Setting at least equal to 1 and at most equal to 1 specifies that the slot must have exactly one value.
at most: Sets the maximum number of values for the slot. To use, enter a positive whole number in the at most entry bar:
Setting at most equal to one (1) means that the slot can have at most one value; this is called a single slot.
Setting at most greater than one automatically selects multiple. The slot can contain multiple values, but there is a limit to the number of values.
multiple: Allows the slot to have more than one value; multiple values are stored and displayed as a list:
As above, to set a minimum number of values, set the at least value.
As above, to set a maximum number of values, set the at most value.
The lack of an at most value indicates that there is no limit to the number of items the slot may contain.
Duplicate values are allowed, although their use is uncommon
Minimum (optional)
This field is applicable only to slots of type Integer or Float.
Minimum allows you to specify a minimum value for your slot. When present, the Minimum value is displayed in the Other Facets column of the Template Slots pane.
When an instance is created for a class with this slot, the value of the slot must be greater than or equal to the minimum. For example, a minimum of zero means instances cannot have negative values.
Together, Minimum and Maximum can be used to define an allowable range.
Maximum (optional)
This field is applicable only to slots of type Integer or Float.
Maximum allows you to specify a maximum value for your slot. When present, the Maximum value is displayed in the Other Facets column of the Template Slots pane.
When an instance is created for a class with this slot, the value of the slot must be less than or equal to the maximum. Together, Minimum and Maximum can be used to define an allowable range.
Documentation (optional)
The Documentation field allows you to enter a text description of the slot. Filling in this field is optional, but is recommended to make maintaining the knowledge base easier. This documentation is part of your knowledge base.
Inverse Slot (optional)
Only available for slots of type Class or Instance.
Allows you to create a reciprocal relationship between two slots. If this relationship is set up correctly, assigning a value (i.e., a specific class or instance) to the slot for one instance automatically assigns the instance as a value to the appropriate inverse slot. For example, the "direct superclass/direct subclass" relationship is actually an inverse slot relationship. See Understanding Inverse Slots and Creating an Inverse Slot Relationship for more information.
If a slot has an inverse slot, the name of the inverse slot is shown after the slot name at the Slots tab.
Template Values (optional)
Allows you to specify the value(s) for a slot at the class level:
The template value is a required, uneditable value that is filled in for all classes and instances that use or inherit the slot.
The template value can not be changed or overridden at the instance level.
The number of Template Values should not exceed the at most value for the Cardinality of the slot.
For a value that can be overridden, use Defaults instead.
When present, any Template Values are displayed in the Other Facets column of the Template Slots pane in the Classes tab.
Defaults (optional)
Allows you to specify default value(s) for a slot:
When an instance is created for a class that has this slot, the default is automatically entered as the value of the slot.
The default value can be changed or overwritten.
The number of defaults should not exceed the at most value for the Cardinality of the slot.
When present, any Defaults are displayed in the Other Facets column of the Template Slots pane in the Classes tab.
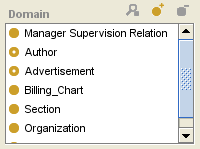
Domain
The set of classes where the slot is attached is called the domain of the slot. For example, the slot urgent is attached to a single class, Content, while the slot name is attached to a number of classes:
See Adding a Slot to a Class for more information about editing the domain of a slot.
Viewing Several Slots
To view the information for several slots at once,
select the slots at the Slots tab
and click the View
(![]() )
slot button
to open the Slot Editor for each slot.
To highlight multiple slots, hold down the Ctrl (Cmd) key while clicking each slot.
To highlight a range of slots, click the first slot,
then hold down the Shift key and click the last slot in the range.
)
slot button
to open the Slot Editor for each slot.
To highlight multiple slots, hold down the Ctrl (Cmd) key while clicking each slot.
To highlight a range of slots, click the first slot,
then hold down the Shift key and click the last slot in the range.
You can also view multiple slots using the View Top-level Slot
(![]() )
or View Slot Overrides
(
)
or View Slot Overrides
(![]() )
template slots buttons
in the Template Slots pane.
)
template slots buttons
in the Template Slots pane.
Opening a new Slot Editor does not close the previous Editor. This allows you to compare the attributes for two or more slots. Edits can be made directly in any open Editor.
If you have multiple forms open, you can manage them as follows:
Cascade multiple forms by clicking the Cascade (
 )
button below the main menu bar,
or by selecting Cascade Windows from the Windows menu.
Close all open forms by clicking the CloseAllWindows (
 )
button below the main menu bar,
or by selecting Close All Windows from the Windows menu.
The Value Type Menu
The Value Type menu in the Slot Editor allows you to select the slot value type, which determines the kind of values that the slot may hold. When a value type of Class, Instance, or Symbol is selected, an additional pane appears below the Value Type menu.
When you are creating instances for a slot, the slot type also determines how the slot is displayed in the Instance Editor. See the Standard Widgets for more information about instances and type.
The following value types are available:
Any: the slot can take any of the values on the menu.
Boolean: a logical, Boolean value; i.e., a value that is either true or false
Class: the slot takes one or more classes as values
Float: the slot has a floating-point number as a value
Instance: the slot takes one or more instances as values
Integer: the slot takes an integer as a value
String: the slot takes ASCII text strings as values
Symbol: the slot takes values from a list of strings you define
The Any Value Type
A value type of Any means the slot can take any one of the other values: Boolean, Class, Float, Instance, Integer, String, or Symbol. Any allows you to create a generic slot for a high-level class and then determine the actual value type at a lower level.
If a class inherits a slot of type Any, then the slot may be modified by restricting it to one of the other types. This is the only case where the actual value type of an inherited slot can be changed.
For example, suppose you are modeling a taxonomy for all the vertebrates in an ecosystem, with specific species as the instances. You could create the slot Diet at the Vertebrate class level. Then:
for the subclass Carnivore, you could restrict the Diet slot to type Instance, so that you could select specific species already in your taxonomy as the diet
for the subclass Herbivore, you could restrict the Diet slot to type Symbol and list possible food plants by name
A class that has a slot of type Any cannot have instances.
The Boolean Value Type
A Boolean slot holds a logical Boolean value; that is, a value that is either true or false. To set the value type of a slot to Boolean:
Create the slot, or view the Slot Editor for an existing slot.
Select Boolean from the Value Type menu.
The Name of the slot will be used as a label for the checkbox; make sure this is what you want.
When an instance is created for a class with a Boolean slot, the instance entry field corresponding to the slot is a Boolean field and is displayed as a checkbox:
For example, the Personals_Ad class contains the Boolean slot Urgent; the Silly instance of Personals_Ad is not Urgent, while the M137 instance is.
The Class Value Type
A slot of type Class has classes as values. Specifically, when Class is selected as the value type, you specify one or more allowed superclasses. An instance of this class then has a class entry field that takes one of these classes or any of their subclasses as the value(s) of the slot.
Setting the Value Type to Class
To set the value type of a slot to Class:
Create the slot, or view the Slot Editor for an existing slot.
Select Class from the Value Type menu. The Allowed Superclasses pane will be displayed.
To add one or more allowed superclasses, click the Add Class (
 ) button.
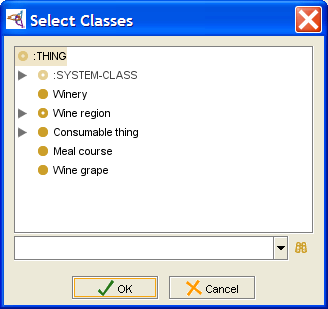
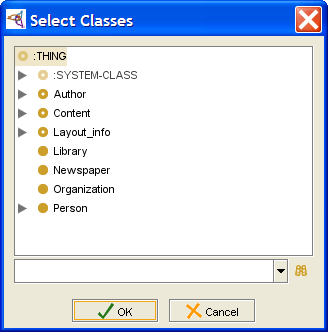
Select the classes you want as allowed superclasses in the Select Classes dialog box. To select multiple classes, use the Ctrl (Cmd) key; to select a range, use the Shift key. When an instance is created, the only values that can appear in the entry field corresponding to this slot will be the listed classes and their subclasses.
Click OK.
Removing an Allowed Superclass
To remove a class from the list of allowed superclasses for a slot of type Class:
Select the classes to remove in the Allowed Superclasses pane. To highlight multiple classes, use the Ctrl (Cmd) key. To highlight a range of classes, use the Shift key.
Click the Remove Class (
 ) button
at the top of the Allowed Superclasses pane.
Example
For example, the Wines project is a knowledge base which includes, among other information:
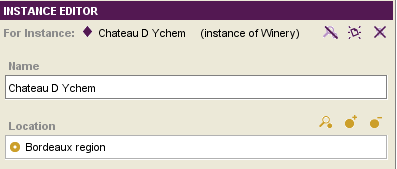
the class Winery, which has wineries as instances
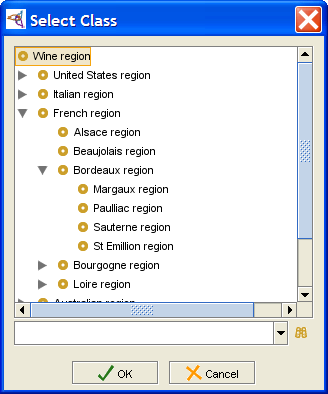
the class Wine region, which has a subclass hierarchy of regions. For example, Wine region has the subclass French region, which in turn has subclasses such as Bordeaux region and Loire region.
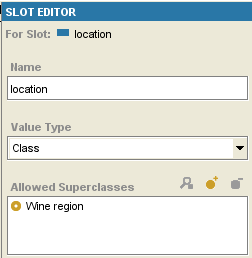
The slot location, which is of type Class, with Wine Region as the Allowed Superclasses. location is attached to the Winery class.
When a user creates an instance for Winery, the entry field corresponding to the location slot is a Class Entry field. A user can choose the region from the list of classes subordinate to and including Wine region.
The Float Value Type
A slot of type Float has numbers as values; these numbers may include a decimal point. Values of type Float are stored on your system as floating-point values, and are only as accurate as the representation used by your system.
Setting the Value Type to Float
To set the value type of a slot to Float:
Create the slot, or view the Slot Editor for an existing slot.
Select Float from the Value Type menu.
Fill in the other facets of the slot as desired.
Minimum and Maximum Values
For slots of type Float, you can enter a Minimum and/or Maximum value. See The Slot Editor for more information:
Minimum allows you to specify a minimum value for your slot. When an instance is created for a class with this slot, the value of the slot must be greater than or equal to the minimum. For example, a minimum of zero means instances cannot have negative values.
Maximum allows you to specify a maximum value for your slot. When an instance is created for a class with this slot, the value of the slot must be less than or equal to the maximum.
Together, Minimum and Maximum can be used to define an allowable range.
When present, the Minimum and/or Maximum values are displayed in the last column of the Template Slots pane.
Entering Floating-Point Numbers for an Instance
When entering a Float value for an instance, you can use decimal point or exponential representation. You can enter positive and negative values. For example:
| Representation | Description |
|---|---|
| 1234.56 | Standard decimal notation. |
| 1.23456E3 or 1.2345e3 |
Exponential notation; the example is shorthand for 1.23456 · 103. Represents 1234.56 (For convenience in typing, you can enter a lower case e, instead of an uppercase E.) |
| -1234.56 | Negative number. |
| 1.23456E-3 or 1.2345e-3 |
Exponential notation with a negative exponent, shorthand for 1.23456 · 10-3. Represents 0.00123456. |
The Instance Value Type
A slot of type Instance has instances as values. More specifically, when Instance is selected as the value type, you specify one or more allowed classes. An instance of the class with this slot then takes instances of the allowed classes or of their subclasses as the value(s) of the slot.
Setting the Value Type to Instance
To set the value type of a slot to Instance:
Create the slot, or view the Slot Editor for an existing slot.
Select Instance from the Value Type menu. The Allowed Classes pane will be displayed.
To add one or more allowed classes, click the Add Class (
 ) button.
Select the classes you want as allowed classes in the Select Classes dialog box. To select multiple classes, use the Ctrl (Cmd) key; to select a range, use the Shift key.
Click OK.
Removing an Allowed Class
To remove a class from the list of allowed classes for a slot of type Integer:
Select the classes to remove. To highlight multiple classes, use the Ctrl (Cmd) key. To highlight a range of classes, use the Shift key.
Click the Remove Class (
 ) button
at the top of the Allowed Classes pane.
Example
In the Newspaper example, the slot responsible_for in the class Editor takes instances of the class Employee as values.
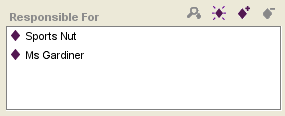
The instance Chief_Honcho is responsible for two instances which are descended from Employee: Sports Nut and Ms Gardiner.
The Integer Value Type
An Integer slot holds an integer number value. (Recall that integer numbers are whole numbers that are positive, negative, or zero; they cannot include a decimal point. Values of type Integer are stored programmatically on your system as integer values.)
To set the value type of a slot to Integer:
Create the slot, or view the Slot Editor for an existing slot.
Select Integer from the Value Type menu.
Fill in the other facets of the slot as desired.
For slots of type Integer, you can enter a Minimum and/or Maximum value.
Minimum allows you to specify a minimum value for your slot. When an instance is created for a class with this slot, the value of the slot must be greater than or equal to the minimum. For example, a minimum of zero means instances cannot have negative values.
Maximum allows you to specify a maximum value for your slot. When an instance is created for a class with this slot, the value of the slot must be less than or equal to the maximum.
Together, Minimum and Maximum can be used to define an allowable range.
When present, the Minimum and/or Maximum values are displayed in the last column of the Template Slots pane.
The String Value Type
A slot of type String has text strings as values. You can enter ASCII characters for an instance, including upper and lowercase letters, numbers, and the basic symbols on the keyboard, such as !, _, and %. String values can also include spaces.
To set the value type of a slot to String:
Create the slot, or view the Slot Editor for an existing slot.
Select String from the Value Type menu.
Fill in the other fields as desired.
The Symbol Value Type
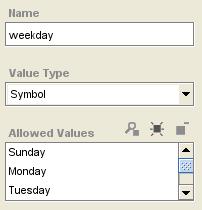
A slot of type Symbol allows you to create a predefined list of strings; an instance of a class chooses from among these strings. When Symbol is selected as the value type, the Allowed Values pane is displayed. An instance then takes string(s) from among the allowed values as the value(s) of the slot.
To set the value type of a slot to Symbol:
Create the slot, or view the Slot Editor for an existing slot.
Select Symbol from the Value Type menu. The Allowed Values pane will be displayed.
Create the values you want as the list of available values for a slot. To create a value:
When you have created all the values you want for this symbol, fill in the other fields as desired.
To edit a pre-existing value:
Click the View Value (
 ) button
at the top of the Allowed Values pane.
Edit the string in the Edit Symbol window.
Click OK.
To remove a value from the list of values:
Select the values to remove. To highlight multiple values, hold down the Ctrl (Cmd) key while clicking each value. To highlight a range of values, click the first value, then hold down the Shift key and click the last value in the range.
Click the Remove Value (
 ) button
at the top of the Allowed Values pane.
Example
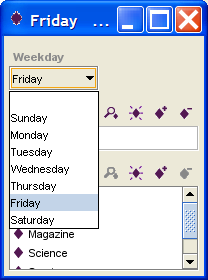
For example, the weekday slot at the class Prototype_Newspaper allows you to choose from among the seven days of the week: Sunday, Monday, Tuesday, Wednesday, Thursday, Friday, and Saturday.
An instance has a pop-up menu that allows a user to choose one of the symbol values for the slot:
Creating a New Slot
A new slot is created with a generic name, such as newspaper_Slot_1. There are three ways to create a slot:
By clicking the Create Slot (
 )
Slot button in the Slot pane
of the Slots tab.
This creates a slot, but does not assign it to any class.
The slot can later be attached
to one or more classes.
By right-clicking in the Slot Browser in the Slots tab and selecting Create slot from the Slot menu. This is identical to the previous operation.
By selecting a class in the Classes tab and then clicking the Create Slot (
 ) button
in the Template Slots pane.
This creates a slot
and attaches it to the selected class.
You can use the Slot Editor to edit the properties of the slot.
Viewing a Slot
You can view and edit a slot at two levels:
View/edit the top-level properties of a slot. This changes the fundamental definition of the slot all across the project, including the Slots tab and all classes that reference the slot.
View/override the slot at a class. This creates "overrides" that appear at the class and any subclasses. The slot remains unchanged at the Slots tab, any superclasses, and any unrelated classes. A slot with overrides is shown with an override (
 ) icon
in the Template Slots pane.
In either case, you can edit the properties of the slot directly in the Slot Editor. See Editing Slot Properties for more information. Any changes you enter into the Slot Editor take effect immediately. To make the changes permanent, save the project by selecting Save from the Project menu.
Editing a Top-Level Slot
Editing at the top-level changes the definition of the slot. The changes appear everywhere the slot occurs, including the Slots tab and all the classes that reference the slot.
You can edit the top-level properties of a slot in two locations:
directly from the Slots tab
by using the View Top-level Slot (
 ) button
in the Template Slots pane.
From the Slots Tab
To edit the properties of a slot from the Slots tab:
Select the slot you wish to edit in the Slot pane of the Slots tab.
Click the View Slot (
 )
button
or press Enter/Return.
This will open the Slot Editor
for the selected slot.
From the Template Slots Pane
To edit the top-level properties of a slot from the Template Slots pane in the Classes tab:
Select a class in the Class Browser in the Classes tab.
Select the slot you wish to edit in the Template Slots pane.
Open the Slot Editor in one of the following ways:
Click the View Top-level Slot (
 )
Template Slot button
at the upper right of the template
Template Slots pane
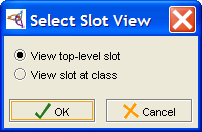
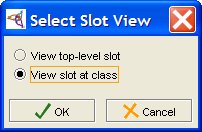
or Double-click the slot and select View top-level slot in the Select Slot View dialog box, then click OK.
You can also override the slot properties at a class and all of its subclasses without changing the top-level slot. See Overriding Slot Properties at a Class for more information.
Overriding Slot Properties at a Class
You can override slot properties by editing the slot at the class level.
This allows you to be more restrictive about the slot facets relative to that class.
A slot with overrides is shown with an override
(![]() ) icon
in the Template Slots pane.
) icon
in the Template Slots pane.
You can also edit the properties of a slot directly, instead of just overriding them at a class. See Editing a Top-level Slot for more information.
Overriding a Slot
To edit the slot properties for a specific class:
Select a class in the Classes tab of the Class Browser.
Select the slot you wish to edit in the Template Slots pane.
Open the Slot Editor in one of the following ways:
Click the View Slot Overrides (
 )
Slot button
at the upper right
of the Template Slots pane.
Double-click the slot and select View slot at class in the Select Slot View dialog box, then click OK.
Change the desired properties in the Slot Editor. See Editing Slot Properties for more information.
After you have edited a slot at the class level,
the slot will be displayed with an override
(![]() ) icon.
) icon.
Scope
Overrides appear:
at the selected class
at all of its subclasses
Overrides do not appear:
at the Slots tab
at any superclasses
at any unrelated classes
Examples
The slot employee_list is a slot of type Instance that takes the value Employee at the top level. By default, whenever you attach this slot to a class, it will range over the instances of Employee. Suppose, however, that for this class, you want to restrict the possible employees to salespeople. By overriding the slot, you can restrict the value range to the Salesperson subclass of Employee for the current class and its subclasses, without affecting the slot value range for any other class.
Suppose you had a class of articles which appeared only on work days, not Saturday or Sunday. You could override the slot weekday at that class to remove Saturday and Sunday from the Symbol list for that class only, restricting the possibilities to working days. Once again, the top-level slot and its range at other classes will remain unchanged.
Restrictions
When you override a slot at a class, you can edit slot facets in the same way as you can at the top level. The override will not remove any existing restrictions, however, and may in fact tighten one or more of them:
The Name of an inherited slot cannot be changed.
For Cardinality, the slot may be changed from Multiple to Single, but not vice versa. The at least value may be increased; the at most value may be decreased.
For certain value types, some restrictions apply:
For a slot of type Any, the slot may be restricted to one of the other types (Boolean, Class, Float, Instance, Integer, String, or Symbol). You cannot change the type of slots other than type Any.
For a slot of type Class, the allowed superclasses can only be changed to subclasses of the allowed superclasses in the superclass.
For a slot of type Instance, the allowed classes can only be changed to subclasses of the allowed classes in the superclass.
A Minimum value (on types Integer or Float) may be created or increased.
A Maximum value (on types Integer or Float) may be created or decreased.
Default values cannot be removed.
Note: Currently, when you override a slot, Protege-Frames does not enforce the restrictive property. That is, you could theoretically expand or change the facets of a slot, rather than restricting them. However, it is not recommended that you do this, both because it is not good practice and because Protege-Frames may enforce restriction in the future.
Editing Slot Properties
You can edit the properties of a newly created or existing slot using the Slot Editor.
Slot Name
To change the name of a slot, edit the text in the Name field. Slot names are case sensitive. To distinguish slot names from class names, a recommended convention is to make slot names lowercase.
Value Type
To change the value type of the slot, select a different type from the Value Type menu. The available types are summarized in the following table:
| Type | Description | Examples |
|---|---|---|
| Any | Any of the types below (logical Union) | |
| Boolean | Logical Value | True, False |
| Class | Class in the knowledge base | Organization |
| Float | Number with a decimal point | 1.0, 3.4e10, -0.3e-3 |
| Instance | Instance of a class in the knowledge base | instance_00010 |
| Integer | Whole number | 1, 2, -4 |
| String | List of alphanumeric characters, possibly including spaces | "John Doe" |
| Symbol | Enumerated list of values, which may not include spaces | red, blue, and green |
Note: If you are editing the slot from a specific class, and the slot is inherited, the following restrictions apply:
For an inherited slot of type Any, you can select any one of the other types.
For an inherited slot of a value type other than Any, you cannot change the type of the slot. However, for slots of type Class, Instance, or Symbol, you can change the choices in the associated Allowed menu.
When a value type of Class, Instance, or Symbol is selected, an additional pane appears below the Value Type menu, as follows:
| Value Type | Associated Pane |
|---|---|
|
The Allowed Superclasses pane. See Setting the Value Type to Class in the Value Type Class for information on how to add and remove allowed superclasses. | |
|
The Allowed Classes pane. See Setting the Value Type for information on how to add and remove allowed classes. | |
|
The Allowed Values pane. See The Symbol Value Type for information on how to add and remove allowed values. |
Cardinality
To change whether or not a slot can be composed of more than one item, select a different option for the Cardinality.
The default configuration allows the slot to have at most one value; that is, it can have one value or no value. You can change the default by entering a positive whole number in the at least and/or at most options, or by selecting the multiple option with no at most value.
To require a minimum number of values for the slot, enter a positive whole number in the at least entry bar. Setting at least equal to one requires a value for the slot. Setting at least equal to 1 and at most equal to 1 means that the slot must have exactly one value. If you enter a value for at least, required is automatically selected. If you set at least greater than one, multiple is automatically selected.
To allow the slot to have multiple values, select multiple.
To allow the slot to have multiple values, but to limit the number of values allowed, enter the maximum number of values in the at most entry var. If you set at most greater than one, multiple is automatically selected.
Note: If you are editing the slot for a specific class, and the slot is inherited, you cannot change the cardinality from single to multiple. The at least field must be greater than or equal to any inherited at least. The at most field must be less than or equal to any inherited at most.
Minimum (optional)
For a slot of type Integer or Float, you can change the minimum value by typing the new value in the Minimum field. If you are editing the slot for a specific class, and the slot is inherited, the new minimum value must be greater than or equal to the inherited minimum.
Maximum (optional)
For a slot of type Integer or Float, you can change the maximum value by typing the new value in the Maximum field. If you are editing the slot for a specific class, and the slot is inherited, the new maximum value must be less than or equal to the inherited maximum.
Defaults (optional)
Allows you to specify the default value(s) for a slot. When an instance is created for a class that has a slot with a defined default, the default value is automatically entered as the value of the slot. The default value can then be changed or overwritten.
For a slot with Single cardinality, Defaults must be a single value or no value; for a slot with Multiple cardinality, Defaults can be more than one item.
When present, any Defaults are displayed in the second-to-last column of the Template Slots pane in the Classes tab.
Documentation (optional)
You can change the text description of the slot directly in the documentation field.
Removing a Slot from a Class
You can remove a slot from a class without deleting it from the knowledge base. You can remove the association between a slot and a class in one of two ways:
removing the slot from the template slots of the class
removing the class from the domain of the slot
You can only remove a direct slot from a class; you may not remove an inherited slot. Removing a slot cannot be undone; you may wish to save or archive the project before removing slots.
Removing a Slot at a Class
To remove a slot from the list of template slots for a class:
Display the Class Editor for the class which has the slot you want to remove. The slots for the class will be displayed in the Template Slots pane.
Highlight the slot(s) you wish to remove in the Template Slots pane. To highlight multiple slots, hold down the Ctrl (Cmd) key while clicking each slot. To highlight a range of slots, click the first slot, then hold down the Shift key and click the last slot in the range.
Click the Remove Slot (
 )
Template Slot button.
Any slots you removed no longer appear among the slots for the class.
They are also removed from any subclasses of the class.
Removing a Class from the Domain of a Slot
To remove a class from the classes listed in the domain of a slot:
Display the Slot Editor for the desired slot. The Domain is located at the bottom right of the Slot Editor.
Select the class(es) you wish to remove from your slot. To remove more than one class, hold down Ctrl (Cmd) while clicking, or use the Shift key to select a range of classes.
Click the Remove Class (
 ) button
at the top right of the Domain facet.
You can also delete a slot from the entire knowledge base, using the Slots tab. See Deleting a Slot for more information.
Deleting a Slot from the Project
You can delete a slot so that it is no longer part of the knowledge base. Deleting a slot cannot be undone. You may wish to save or archive your project before deleting slots.
Deleting a Single Slot
To delete a single slot:
In the Slots tab, highlight the slot which you want to remove.
Click the Delete Slot (
 )
button
or click the right mouse button and select Delete selected slots
from the Slot menu.
The slot will no longer appear in the list of slots. It will also be removed from any classes where it appears.
Deleting Multiple Slots
To delete several slots at once:
In the Slots tab, highlight the slots you wish to remove. To highlight multiple slots, hold down the Ctrl (Cmd) key while clicking each slot. To highlight a range of slots, click the first slot, then hold down the Shift key and click the last slot in the range.
Click the Delete Slot (
 )
button.
The slots will no longer appear in the list of slots
and will be deleted from any classes where they appear.
You can also remove a slot from a class where it appears without deleting it from the project. See Removing a Slot for more information.
Adding a Slot to a Class
You can attach a slot to one or more classes. For example, the Prototype_Newspaper class has a Weekday slot, which can be used to choose among the days of the week. If you were creating a new type of employee who wrote a weekly feature, you might want to reuse this slot. You can create an association between a slot and a class in one of two ways: attaching the slot to a class or adding a class to the domain of the slot.
Attaching a Slot to a Class
To attach a slot to a class:
Display the Class Editor for the desired class.
Click the Add Slot (
 ) button
at the top right
of the Template Slots pane.
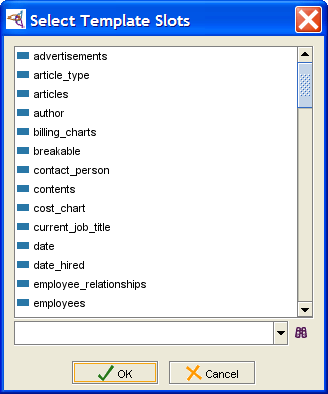
The Select Slots form will display all of the slots you can add to the class.
Select the slot(s) you wish to add to your class. To add more than one slot, hold down Ctrl (Cmd) while clicking, or use the Shift key to select a range of slots.
Click OK. The selected slot(s) are added to the Template Slots pane as directly attached slot(s), displayed with a blue rectangle (
 ) icon.
If you wish to edit
or override a slot after adding it,
double-click it or click the View Top-Level Slot
(![]() )
or the View Slot at Class
(
)
or the View Slot at Class
(![]() ) button
to display the Slot Editor.
See Viewing a Slot
and Editing Slot Properties
for more information.
) button
to display the Slot Editor.
See Viewing a Slot
and Editing Slot Properties
for more information.
Adding a Class to the Domain of a Slot
The domain of a slot (i.e., the list of the classes to which the slot is attached) is shown in the Domain facet of the Slot Editor. You can associate a slot to a class by adding the class to the domain of the slot:
Display the Slot Editor for the desired slot. The Domain is located at the bottom right of the Slot Editor.
Click the Add Class (
 ) button
at the top right of the Domain facet.
Select the class(es) you wish to add to your slot. To add more than one class, hold down Ctrl (Cmd) while clicking, or use the Shift key to select a range of classes.
Click OK. The selected class(es) are added to the Domain for the slot. If you view the Class Editor for the class(es), you will see the slot in the Template Slots pane.
Removing Overrides From a Slot
You can remove any class-level
overrides from a slot,
using the Remove Slot Overrides
(![]() )
Template Slot button
in the Template Slots pane.
)
Template Slot button
in the Template Slots pane.
To remove the slot overrides at a class:
Select the class where you want to remove the overrides in the Class Browser.
Select the slot whose overrides you wish to remove in the Template Slots pane. Overrides are indicated by the override (
 ) icon.
Click the Remove Slot Overrides (
 )
button
at the upper right
of the Template Slots pane.
The overrides will be cleared from the slot at this class and all of its subclasses.
The slot will now match the top-level definition.
Any overrides created at an unrelated class will still exist.
Understanding Inverse Slots
This topic gives an overview of how to analyze a project and design inverse slots in Protege-Frames. An inverse slot relationship is a reciprocal relationship between two slots. Whenever one slot is filled in at one instance, its inverse slot is automatically filled in at another instance, according to the relationship you specified.
This topic describes the most common relationship - an inverse slot relationship between two instances, including the following steps: identifying an inverse relationship, analyzing the Protege-Frames components of the relationship, implementing the relationship in Protege-Frames.
You create inverse slots using the Inverse Slot widget in the Slot Editor. For more information on how to use the user interface, see Creating an Inverse Slot Relationship. Note that if you create an inverse slot relationship after one or more instances have been created, existing instances will not display the inverse slot information.
Example
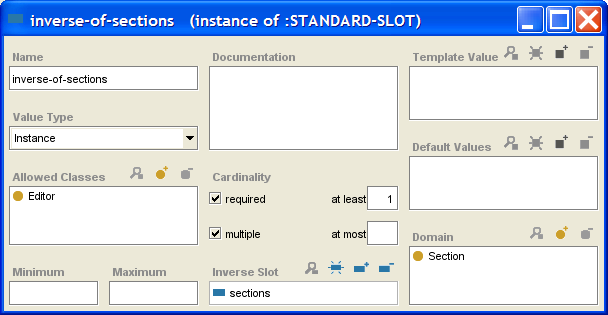
For example, suppose you want to keep track at the section level of which editor(s) edit which section(s). There is already a slot named sections at the class Editor; it takes instances in the class Section as values:
You could create an inverse slot named editor at the class Section which takes instances in the class Editor as values:
Now, when you edit the instance Mr. Science to assign the value Science to the slot sections, the inverse relationship is tracked by Protege-Frames. At the instance Science, Mr. Science automatically appears as a value for the slot editor.
Identifying the Relationship
First, you must determine if an inverse slot will appropriately represent the structure of your knowledge base. An inverse slot represents a reciprocal relationship that always occurs. For example, if Mr. Science edits the Science section, the Science section is edited by Mr. Science. Protege-Frames supports several different types of inverse relationships:
The relationship must be reciprocal.
The relationship can be a one-to-one correspondence, or one or both of the slots can have multiple values. For example, Chief Honcho edits a number of sections.
The relationship can be between instances in different classes or instances in the same class. For example, likes and is_liked_by would be a relationship where the slot and its inverse slot are both attached to Person.
A slot can be its own inverse. shares_ an_ office_ with would be a candidate for an inverse relationship where the inverse slot was identical with the original slot. This is a stronger tie than simply having instances in the same class.
Analyzing the Relationship for Protege-Frames
Once you have identified the relationship in your ontology, you need to analyze it in terms of your Protege-Frames project. For an inverse slot relationship between Instance slots, determine the following:
What Protege-Frames class(es) do you want for the first set of instances? We will call this first list of classes Class_List_A.
Make sure to choose a class or classes that are appropriate for the project.
It is most important to choose a class list that is not too small; that is, you need to select a list of classes such that every possible instance is in one of those classes.
At the same time, for simplicity, you want the class list to be focused on the instances and not be too broad.
This list may consist of a single class. For example, in the newspaper project, one of the reporters, Larry Tennis-Nut, is an eager beaver and sometimes edits the Sports section. It would make sense to expand the list of classes to Editor and Reporter. However, no salesmen or columnists are allowed to edit a section. Therefore, while it would be possible to simply use the class Employee, it is cleaner not to.
If the second set of instances is different from the first, perform the same analysis for the second set of instances. Call this second list of classes Class_List_B.
As before. this list may be a single class.
This list may be identical to Class_List_A.
Steps Required for Implementing the Relationship
In this example, we will restrict ourselves to instances in the class Section.
The following steps are necessary to create an inverse slot relationship in a Protege-Frames project:
Create a slot of type Instance whose allowed classes are Class_List_A. We'll call this the original_slot.
Create another slot of type Instance whose allowed classes are Class_List_B. We'll call this the inverse_slot. If the information is important in your ontology, it is likely that one or both of these slots already exist in the project.
Attach your Protege-Frames slots to the appropriate classes.
First, add original_slot to every class in Class_List_B. Recall that the target values of original_slot are in Class_List_A. Assigning the slot to Class_List_B is what creates the cross-connection between the classes.
Similarly, assign inverse_slot to every class in Class_List_A.
Create the inverse relationship between inverse_slot and original_slot. (You can actually do this as soon as both slots are created.)
If you already have a slot original_slot of type Instance in your project and it already has the desired allowed classes and domain, you can create a new slot specifically as the inverse of original_slot. In this case, the inverse_slot has the following properties; you can edit them after creation if necessary:
inverse_slot is automatically attached to all classes in the list of allowed classes for original_slot.
its allowed classes automatically includes the list of all the classes where original_slot is attached.
For information on how to use the Protege-Frames interface to make an inverse slot, see Creating an Inverse Slot Relationship.
Creating an Inverse Slot Relationship
The Inverse Slots widget on the Slot Editor allows you to create an inverse relationship between two slots of type Class or Instance.
You can create an inverse slot relationship in one of two ways: linking two existing slots and creating a new slot as the inverse of an existing slot
You can also modify inverse slot relationships, removing the inverse slot link between two slots or replacing an inverse slot with another slot.
For an inverse relationship to work correctly, your two slots and the classes where they appear must be designed appropriately. For slots of type Instance, the following situation provides optimal results:
All classes where the first slot is attached (i.e., the domain of the slot) appear in the Allowed Classes pane for the second slot.
All classes where the second slot is attached appear in the Allowed Classes pane for the first slot.
However, depending on the structure of your knowledge base, this may not be appropriate or feasible. Other situations are also valid. For example, suppose slots A and B are inverse slots. If one of the allowed classes for slot A does not have B as one of its attached slots, all that happens is that inverse slot value does not get created for those instances. The inverse relationship will still work normally for those allowed classes that do have slot B attached.
A slot can have at most one inverse slot. For more information on designing an inverse slot relationship, see Understanding Inverse Slots.
Note that if you create an inverse slot relationship after instances have been created, existing instances will not display the inverse slot information.
Linking Two Existing Slots
To create an inverse slot relationship between two existing slots, the slots you choose must be of value type Class or Instance. To create the relationship:
Open the Slot Editor for one of the two slots; it does not matter which one you choose. You can open the Slot Editor from the Classes tab or the Slots tab.
Click the Add Slot (
 ) button
at the right of the Inverse Slot field.
Note: If the button is grayed out, you cannot create an inverse slot for the selected slot. Make sure that the slot is of type Class or Instance.
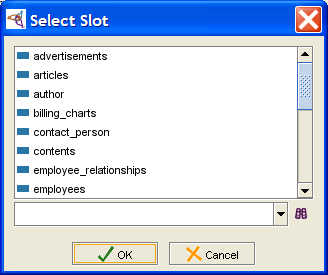
Select the slot you want to use from the Select Slot dialog box. Only slots of type Class or Instance will appear.
Click OK. The two slots will now be inverses of each other.
You can view the Slot Editor of the second slot
by double-clicking on its name in the Inverse Slot field
or by using the View Slot
(![]() ) button.
You will see that it automatically has the first slot as its inverse slot.
You may also wish to check that the Allowed Classes of each slot
contains all the possible classes where the other slot will appear.
) button.
You will see that it automatically has the first slot as its inverse slot.
You may also wish to check that the Allowed Classes of each slot
contains all the possible classes where the other slot will appear.
Creating a New Inverse Slot
To create a new slot and make it the inverse of a slot:
Open the Slot Editor for the slot you want to create an inverse for. You can do this from either the Class tab or the Slots tab:
On the Slots tab, select the slot from the list of slots in the Slot Browser pane.
On the Classes tab, double-click the slot in the list of Template Slots (or select the slot in the list of Template Slots and click the "View Top-Level Slot" button).
Click the Create Slot (
 ) button
at the right of the Inverse Slot Editor.
Note: If the button is grayed out, you cannot create an inverse slot for the selected slot. Make sure it is of type Class or Instance.
A new class of type Instance is created. The Slot Editor for the new slot opens automatically.
Name the slot.
The classes where your original slot appears will be automatically entered in the Allowed Classes field. Modify this list if necessary.
The classes in the Allowed Classes field of the original slot will be added to the Domain field. Modify this list if necessary. Remember that attaching a slot to a class also attaches it to all subclasses of the class.
Make any other changes you wish to the slot definition.
Removing an Inverse Slot Relationship
Removing the inverse slot relationship removes the link between the two classes. Note that, if you remove an inverse slot relationship after instances have been created, existing values that were created by the inverse slot relationship are not removed. Removing an inverse slot only affects the values of new instances. To remove the inverse slot relationship between two slots:
Highlight the Inverse Slot field in the Slot Editor for either one of the two slots.
Click the Remove (
 ) button
at the right of the Inverse Slot field.
The slot relationship will be removed.
Replacing an Inverse Slot
Replacing the inverse slot relationship at a slot removes the link to the original inverse slot and makes a link with a different, existing, slot. Note that, if you replace an inverse slot relationship after instances have been created, existing values that reflect the original (replaced) inverse slot relationship are retained. Replacing an inverse slot only affects the values of new instance. To replace an inverse relationship:
Select the slot you want to have a different inverse.
Click the Add Slot (
 ) button
at the right of the Inverse Slot field.
Select the slot you want from the Select Slot dialog box.
Click OK. The new slot becomes the inverse slot of the current slot. The original inverse slot is now unlinked from the slot where you made the change and no longer has an inverse slot.
Working with Subslots
Normally, whenever you create a new slot, it is a top-level slot. However, you can also create a subslot of an existing slot.
Understanding Subslots
Subslots have the following characteristics:
When you first create a subslot, the subslot inherits the properties of the superslot. Only the name is different.
You can only modify a subslot to make it more restrictive than its superslot. You cannot make it less restrictive.
When you attach a superslot to a class, all of its subslots are attached.
Subslots allow you to do the following:
You can create two (or more) slots which share information, but where one slot (the subslot) is more restrictive.
You can attach multiple related properties, using a single slot. To do this, create a single superslot and then create subslots that define characteristics of the superslot. By attaching the superslot to a class, you automatically attach all of its subslots.
Creating a Subslot
To create a subslot of a slot:
In the Slot tab, select the slot that you want as the superslot of your subslot.
Click the right mouse button.
Select Create Subslot from the Slot menu.
The new slot is created as a subslot of the selected slot. Except for the name, when created, it has the same properties as its parent slot.
You can use the Slot Editor to edit the properties of the new slot.
Restrictions on Edits
When you create a subslot, there are restrictions on the possible edits:
For Cardinality, the slot may be changed from Multiple to Single, but not vice versa. The at least value may be increased; the at most value may be decreased.
For certain value types, some restrictions apply:
For a slot of type Any, the slot may be restricted to one of the other types (Boolean, Class, Float, Instance, Integer, String, or Symbol). You cannot change the type of slots other than type Any.
For a slot of type Class or Instance, you cannot change the allowed classes.
A Minimum value (for types Integer or Float) may be created or increased.
A Maximum value (for types Integer or Float) may be created or decreased.
Default values cannot be removed.
These restrictions are similar to the restrictions on slot overrides, except that you can change the name of a subslot, and you cannot make any changes to the allowed classes of a subslot.
Finding a Slot
To find a slot by name in the Slot Browser:
Type all or part of the name of the slot in the Slot lookup bar at the bottom of the Slot Browser.
Press Enter/Return or click the Search for Slot (
 ) button.
If there is one match, the slot will be highlighted.
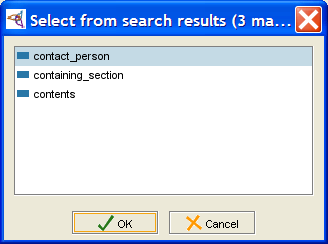
Otherwise, you will get a dialog box of all the matches,
and you will be able to select one.
The Slot Hierarchy Window
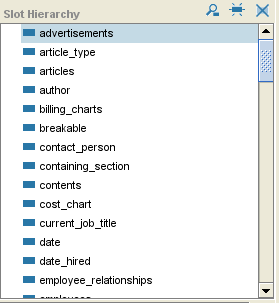
The Slot Hierarchy window in the Slot Browser displays the slots for the project and allows you to rearrange your hierarchy using "drag-and-drop". By default, the Slot window displays the slot structure of your knowledge base, with all slots shown as descending, directly or indirectly, from the system slot :THING.
Description
This window shows the following:
Subslots appear below their superslots and indented to the right.
Hierarchy icons indicate how much or how little of the hierarchy is displayed. An "expanded" (
 ) icon
means all direct subslots of the slot are displayed.
A "collapsed"
(
 ) icon
means the slot has direct subslots which are not currently displayed.
Clicking on either icon toggles it to the other.
If no icon is displayed, the slot has no direct subslots.
Tip: You can also display all slots below a slot by right-clicking the slot and selecting Expand from the cascading Slot menu.
The currently selected slot is shown with a highlight.
Slots with more than one superslot appear more than once in the tree.
Slot icons show information about your slot.
If a slot has an inverse slot, the name of the inverse slot is shown after the slot name:
Tasks
The Slot Hierarchy window allows you to perform the following tasks:
You can select a slot by clicking on it.
You can edit the attributes of a slot in the Slot Editor. When a slot is selected, the Slot Editor appears to the right. You can also open the Slot Editor for one or more selected slots by clicking the View Slot (
 ) button.
You can create a new slot by clicking the Create Slot (
 ) button,
then creating and editing its attributes
in the Slot Editor.
You can delete a slot by clicking the Delete Slot (
 ) button.
You can search for a slot by typing all or part of the slot name in the Slot lookup bar, then clicking the Search for Slot (
 ) button.
You can work with slot metaclasses, using the right mouse button. See the Slot menu for more information.
You can also rearrange the superslot/subslot relationships:
You can move a slot to another superslot by selecting the slot, dragging it directly over the new superslot, and then dropping it.
You can add an additional superslot to a slot by selecting the slot, dragging it over the additional superslot, and holding down the Ctrl (Cmd) key while you drop it.
For additional superslot tasks you can perform, see the Superslots pane.
The Slot Icons
The icons in the Slot Browser and the Template Slots pane give information about the slots. There are two types of icons: slot icons and hierarchy icons.
Slot Icons
These icons give information about a slot. When a class inherits a class from a superclass, icons in the Template Slots pane give information related to the inheritance and overrides; these icons are not shown anywhere else.
|
A blue rectangle indicates a slot. In the Template Slots pane, this icon means that the slot is direct; that is, it was attached directly to the selected class. responsible_for is a direct slot. | |
|
(Template Slots pane only) A bracketed icon means that the slot is inherited from one of the selected class's ancestors. Inherited slots can be edited, but not deleted; there are also some restrictions on the edits that are allowed. | |
|
(Template Slots pane only) A bracketed icon with an O inside it means the slot has overrides; that is, the slot is inherited and it has been modified at the class. | |
|
A pale icon indicates a system slot or a slot that has been included from another project. These slots cannot be edited. |
Hierarchy Icons
(Slot Browser only) If you have created any subslots, the following icons in the Slot Browser give information about the display of the slot hierarchy:
The Superslots Pane
The Superslots pane, at the bottom of the Slot Browser, displays all the superslots of the slot that is currently selected. This pane provides the interface for adding, locating, removing, or viewing superslots.
Note: If you cannot see the Superslots pane, your window may be too small. You can see the pane by enlarging your window or by dragging the slider bar at the bottom of the Slot Browser. See Working With a Small Window for more information.
Viewing the List of Superslots
To see a list of all superslots of a given slot, highlight any occurrence of the slot in the Slot Browser. The Superslots pane automatically displays a list of all of the superslots of the selected slot.
Adding a Superslot
To add a superslot to the selected slot,
click the Add Superslot
(![]() ) button,
highlight the slot you want as an additional superslot in the Select Slot window,
and then click OK.
) button,
highlight the slot you want as an additional superslot in the Select Slot window,
and then click OK.
Removing a Superslot
To remove a superslot from the list of superslots for the selected slot,
highlight the superslot you want to remove,
and click the Remove Superslot
(![]() ) button.
The superslot/subslot relationship is broken,
but the superslot is not deleted from the knowledge base.
) button.
The superslot/subslot relationship is broken,
but the superslot is not deleted from the knowledge base.
Locating Another Superslot
To jump to a different superslot in the Slot Browser, click on any superslot in the Superslots pane. The highlight in the Slot Browser automatically moves to the occurrence of the slot which is directly under the chosen superslot. If the occurrence is not currently visible in the Slot Browser, Protege-Frames automatically scrolls to the correct location and expands the hierarchy to make the slot visible.
