PrF UG queries all
Contents
- 1 Queries
Queries
This section of the User's Guide covers the concepts of understanding, creating, and using Protege-Frames queries.
Note: Before you create and use classes, you should be confident with the basic Protege-Frames interface. You should also be comfortable with Protege-Frames projects, project types, windows, classes, slots, forms, and instances.
To return to the main table of contents, click the Protege-Frames User's Guide link (located at the top of the table of contents on the right-hand side of this page).
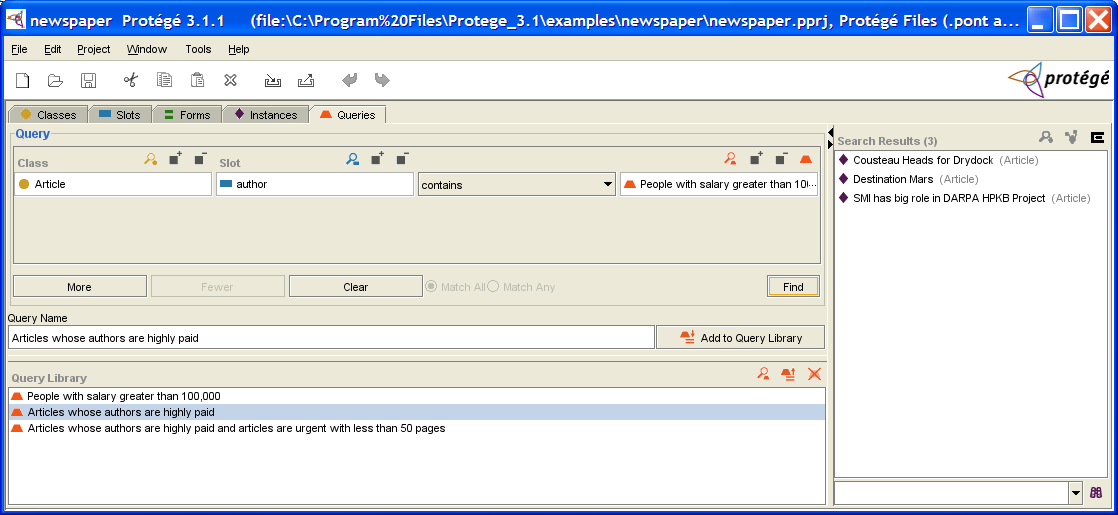
The Queries Tab
The Queries tab allows you to create, run, and save queries. Queries are not part of your knowledge base, but are a way to identify (i.e., select) the instances in your project, based on class and slot properties.
The Queries tab consists of the following:
The Query Editor, where you enter or modify your query. You can also combine multiple queries.
The Find button, which runs a query:
 Find button
The Search Results pane, which displays the query results when you click Find.
The Save Query bar, which allows you to name and save a query.
The Query Library, which allows you to view, delete, and retrieve saved queries. Saved queries can be modified or combined.
Note: If you are working on a smaller screen, you may not see all of these panes. To view or enlarge the Query Library pane, drag the slider bar near the bottom of the Queries tab. To view or enlarge the Search Results pane, drag the slider bar between the Search Results pane and the Query Editor. See Working With a Small Window for more information.
The Query Editor
The Query Editor allows you to enter, modify, or save your queries. The Query Editor has the following components:
One or more query bars, where you can construct a query by selecting a class, slot, criterion, and value.
The Combined Query buttons, which allow you to add and remove additional query bars, and to specify how they are combined.
The Find button, which allows you to run your query.
Query Bar(s)
Each query bar has:
A Class entry field, which allows you to specify a class by clicking the Select Class (
 ) button.
If a class is already shown,
using the Select Class button replaces it.
You can also view the selected class by clicking the View Class
(
) button.
If a class is already shown,
using the Select Class button replaces it.
You can also view the selected class by clicking the View Class
( ) button,
or remove it by clicking the Remove Class
(
) button,
or remove it by clicking the Remove Class
( ) button.
A Slot entry field, which allows you to specify a slot by clicking the Select Slot (
 ) button.
If a slot is already shown,
using the Select Slot button replaces it.
You can also view the selected slot by clicking the View Slot
(
) button.
If a slot is already shown,
using the Select Slot button replaces it.
You can also view the selected slot by clicking the View Slot
( ) button,
or remove it by clicking the Remove Slot
(
) button,
or remove it by clicking the Remove Slot
( ) button.
A criteria menu, which allows you to set the criteria for the query, based on the slot.
A value entry bar or menu, which allows you to set the value for comparison. The entry type is based on the slot value type.
Choices for the criteria menu and value are as follows:
| Slot Type | Criteria Menu | Action |
|---|---|---|
|
|
Verifies whether or not the Boolean value is true or false, as selected from the menu at the right. | |
|
|
The selected criterion is compared to a class selected at the right.
To select a class, click the Select Class
( | |
|
|
The selected criterion is compared to the value typed in the Float entry bar at the right. | |
|
|
The selected criterion is compared to an instance or query selected at the right.
| |
|
|
The selected criterion is compared to the value typed in the Integer entry bar at the right. | |
|
|
The selected criterion is compared to all or part of a string typed in the entry bar to the right. For example, selecting begins with and typing M in the String entry bar will find all instances of the selected class/slot combination that begin with M. | |
|
|
The Symbol entry bar to the right becomes a drop-down menu that displays all possible values for the slot. The selected criterion is compared to the value. |


Combined Query Buttons
|
More |
Click this button to create an additional query bar, which can then be set with class, slot, and criterion. |
|
Fewer |
If there are two or more query bars, click this button to remove the bottom-most query bar. |
|
Clear |
Click this button to clear all query bars and reduce the Query Editor to a single, blank query bar. |
|
Match All |
For two or more query bars, click this button to specify that any instance found must match all of the criteria (the intersection or AND) specified in the query bars. |
|
Match Any |
For two or more query bars, click this button to specify that any instance found must match at least one of the criteria (the union or OR) specified in the query bars. |
The Search Results Pane
The Search Results pane, at the right of the Query tab, displays the query results when you click Find.
Note: If you are working on a smaller screen, you may not see this pane. To view or enlarge the Search Results pane, drag the slider bar. See Working With a Small Window for more information.

The Search Results pane has the following components:
A list box which shows all instances that match the most recent query.
Buttons which allow you to get more information about a selected instance.
A Find bar which allows you to find an instance in a long list.
The buttons at the top right of the pane have the following actions:
|
|
View Instance: Opens the Instance Editor for a selected instance. |
|
|
View References to Instance: Opens the References window to show all references to the selected instance. |
|
|
Export Slot Values: Exports the list of instances and the values of selected slots to a text file. |
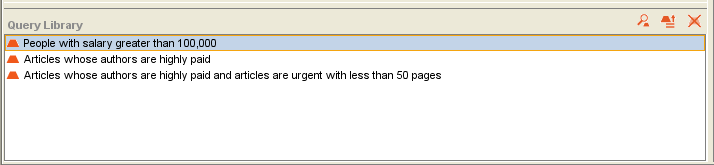
The Query Library Pane
The Query Library pane lists saved queries and allows you to view, retrieve, and delete them.

Note: If you are working with a smaller screen, you may not see this pane. To view or enlarge the Library pane, drag the slider bar near the bottom of the Query Editor (above the Query Library pane), or click the up button at the bottom of the Query Editor. See Working With a Small Window for more information.
The Query Library pane has the following components:
A list of all saved queries.
Buttons that allow you to view, retrieve, or delete a query.
The buttons at the right of the pane have the following actions:
|
|
View Query: displays the Query Editor for a selected query. |
|
|
Retrieve Query: retrieves the query, displaying it in the Query Editor ready for modification or for finding instances. |
|
|
Delete Query: deletes the highlighted querie(s) from the Query Library. |
Creating a Single Query
The Queries tab allows you to query your project and locate all instances that match the criteria you specify. You can create a simple query, or combine multiple criteria to restrict or expand your results.
You can create a simple query based on a class, a slot, or both. When you specify a slot, you also specify the criteria for matching the slot:
A query based solely on a class will find all instances of the selected class and all of its subclasses.
A query based solely on a slot will find all instances whose value at the slot match the criteria you specify.
A query based on a class and a slot will find all instances of the class that match the criteria at the selected slot.
Note: Sometimes the query buttons or query entry bar will not display correctly. You can refresh the query entry by clicking on another tab and then returning to the Query tab.
The directions below show how to select a class first, then a slot. You can also select the slot first and then the class; this is useful if you remember the slot name, but are not certain of the classes that it is attached to. To do this, select the slot as in Steps 3 and 4, then select the class as in Steps 1 and 2. In this case, the Select Classes dialog box will show only those classes that have the selected slot.
To create a query:
To specify a class, click the Select Class (
 ) button
above the Class entry bar.
(If you wish to create a query based solely on a slot, start at Step 3.)
) button
above the Class entry bar.
(If you wish to create a query based solely on a slot, start at Step 3.)
 Class entry bar
Select the class you want from the Select Classes dialog box, then click OK. (If you wish to create a query solely on that class, you are now ready to run it.)
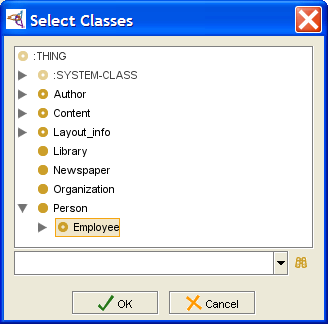 Select Classes dialog, "Employee" selected
Click OK.
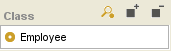 Class entry bar
To specify a slot, click the Select Slot (
) button,
above the Slot entry bar.
 Slot entry bar, empty
Select a slot from the Select Slot dialog box. If you selected a class, only slots attached to that class will be shown. If no class is selected, all slots are available.
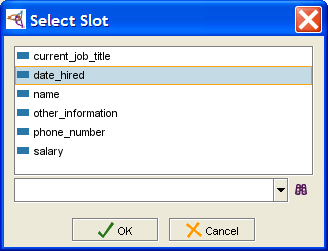 Select Slot dialog, "date_hired" selected
Click OK. The slot will be filled in and the criteria menu immediately to the right will be displayed.
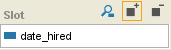 Slot entry bar, filled
Make a selection from the pull-down criteria menu. This menu becomes active after you select a slot; the choices are based on the slot's Value Type.
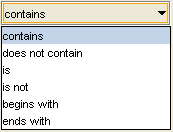 pull-down criteria menu
Enter a value for comparison at the entry bar to the right. The entry method for this value depends on the slot value type.
For Boolean value type, select whether the slot value is true or false.
For Class value type, click the Select Class (
) button
and select a class from the dialog.
The query will find all instances where the slot value
contains (or does not contain) the selected class.
For Float or Integer value type, enter the number to which you want to compare the slot value.
For Instance value type, click the Select Instance (
)
or Select Query
( ) button
and select a value from the dialog box.
) button
and select a value from the dialog box.
For Symbol value type, the possible values are displayed as a drop-down list. Select a symbol from this list.
Note: Sometimes the query buttons or query entry bar will not display correctly. You can refresh the query entry by clicking on another tab and then returning to the Query tab.


To run the query, click the Find button:
To save the query in the Query Library,
give it a name and click the Add Query to Library
(![]() ) button.
) button.
Combining Multiple Queries
The More button, at the bottom of the Query Editor, allows you to combine multiple query bars into a single query. To combine multiple queries:
Create the first query, as described in Creating a Single Query or Retrieving a Query.
Click the More button. An additional query bar will be displayed.
 More button
Fill in the new query bar, either manually or by retrieving another query. You may use the same class or slot, but you do not have to.
Continue to click the More button, creating query bars as necessary to add more criteria to your query.
Specify how the criteria should be combined:
To see instances that match all the criteria specified (Boolean AND), click Match All.
To see all instances that match at least one of the different query bars (Boolean OR), click Match Any.
To run your query, click the Find button:
Find button
If you are combining multiple queries, and wish to remove the criteria in the last (bottom-most) query bar:
Click Fewer. The bottom-most query bar will be removed.
Chaining Multiple Queries
Queries saved in the Query Library can be used as matching values for slots of type Instance. When you do this, the resulting query looks for instances where the slot value is a search result for the specified query.
Often, when you need to create a query of this type, you will look at a class that has a slot of type Instance and want to know which of those instances have a certain property. When you create the combined query, you need to create the query for the property first, and then create the query for the class.
For example, the query "Articles whose Authors are highly paid" looks for instances of the Class Article whose value at the slot author is also a valid result of the query "People with salary greater than 100,000".

You do not have to use a slot in either query. If you just use a class, you will find all instances of that class and its subclasses.
To create a query of this type, you need to make sure the two queries satisfy the following:
The slot value for Query B, the query that contains another query, must be one of the following:
a slot of type Instance
empty (in this case, you must select a class)
For the final chained query to be meaningful, Query A (the query that will be used inside the other query) must have results that intersect the possible inputs for Query B. If Query A has a slot, the domain for the slot should intersect the Allowed Classes for the slot of type Instance in Query B. If Query A does not have a slot, the subclasses of the class in Query should intersect the subclasses of the Allowed Classes for the slot of type Instance in Query B.
To create a query of this type
Create an initial query.
Save this query in the Query Library.
Clear the current query.
Select the Class and/or Slot you want for the second query.
Select contains or does not contain from the menu.
Click the Add Query (
) button.
Note: You may have some trouble getting this to display. If you do, try switching to another tab and then returning to the Queries tab. If that doesn't work, try retrieving the "Articles whose authors are highly paid" query from the Query Library, then clearing it and recreating your query. You may still have to switch to another tab after you have entered your slot, but this should work.
A Pick Query dialog displays the saved queries.
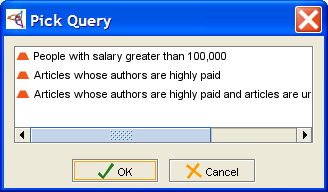 Pick Query dialog
Select the query you want and click OK.

You can also combine chained queries with other queries.
Running a Query
The Find button, at the bottom of the Query Editor, allows you to run your queries and find all instances that match the criteria currently in the Query Editor.
To run a query:
Make sure that the query is filled out as desired. See Creating a Query or Combining Multiple Query Bars.
If the query is a combination of several query bars, specify how the criteria should be combined:
to see instances that match all the criteria specified (Boolean AND), click Match All.
to see all instances that match at least one of the different query bars (Boolean OR), click Match Any.
Click the Find button. The matching instances will be displayed in the Search Results pane:
Find button
Saving a Query
Once you have a set up a query the way you like, as described in Creating a Query or Combining Multiple Query Bars, you can save it in the Query Library to retrieve it later. This is especially useful for complex queries or for queries that you use often.
To save a query:
Enter a name for the query in the Save Query bar. It is a good idea to use a name that describes the query, such as "Articles that are urgent".
 Save Query bar
Click the Add to Query Library (
 ) button.
The query will be saved in the Query Library.
) button.
The query will be saved in the Query Library.
See Retrieving a Query for information on running a saved query.
Retrieving a Query
Once you have saved a query in the Query Library, you can retrieve it at any time.
To retrieve a query:
Select the query you want from the list in the Query Library. (If you are working on a smaller screen, you may not see this pane. To view or enlarge the Library pane, drag the slider bar near the bottom of the Query Editor or click the up arrow button at the bottom of the Query Editor.)
 Library pane
Click the Retrieve Query (
 ) button.
Any query information currently in the Query Editor will be cleared.
The highlighted query will be loaded into the Query Editor.
) button.
Any query information currently in the Query Editor will be cleared.
The highlighted query will be loaded into the Query Editor.
If you wish to make any changes, or combine this query with additional query information, you can modify it. See Combining Multiple Query Bars for more information.
If the query is a combination of several query bars, you can change how the criteria should be combined:
To see instances that match all the criteria specified (Boolean AND), click Match All.
To see all instances that match at least one of the different query bars (Boolean OR), click Match Any.
Click Find to run the query and see all matching instances:
Find button
Clearing a Query
You can clear all of the information in the Query Editor. This allows you to create a new query.
To clear a query, click the Clear button. All information in the Query Editor will be cleared:
Exporting Query Results
You can export the results of a query to a text file, protege_query_results.txt, which is saved in the same folder as your Protege .pprj project file. To export the results:
Click the Export Slot Values (
 ) button
at the top right
of the Query Results pane.
) button
at the top right
of the Query Results pane.
By default, the text file will list each instance and its class. A dialog box will prompt you to choose any additional slot values of the instance that you wish to export. Select those you want and click OK.
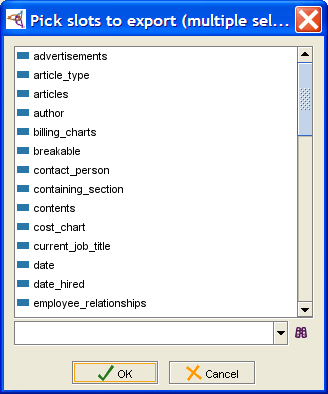 Pick slots to export dialog
The information will be exported to a text file, with slot values separated by tabs.
Cousteau Heads for Drydock               Article
Destination Mars                         Article
SMI has big role in DARPA HPKB Project   Article

Note:
If you wish to export the results for more than one query,
make sure to rename the text file so that it will not be overwritten.