Difference between revisions of "PrF UG meta customize editor"
(Automated import of articles) |
|||
| (5 intermediate revisions by the same user not shown) | |||
| Line 2: | Line 2: | ||
== Customizing the Class or Slot Editor == | == Customizing the Class or Slot Editor == | ||
| − | {{PrF_UG_TOC_meta}}<div id='prf_ug'> | + | <noinclude>{{PrF_UG_TOC_meta}}<div id='prf_ug'></noinclude> |
| − | Using metaclasses, | + | Using metaclasses, you can customize the layout |
| − | you can customize the layout of the | + | of the [[PrF_UG_classes_class_editor|Class Editor]] |
| − | [[PrF_UG_classes_class_editor|Class Editor]] | + | or the [[PrF_UG_slots_slot_editor|Slot Editor]] |
| − | or the | + | at the [[PrF_UG_forms_forms_tab|Forms tab]]. |
| − | [[PrF_UG_slots_slot_editor|Slot Editor]] | ||
| − | at the | ||
| − | [[PrF_UG_forms_forms_tab|Forms | ||
You can hide entry fields and resize and reposition fields. | You can hide entry fields and resize and reposition fields. | ||
Normally you do <b><i>not</i></b> want to change widgets, | Normally you do <b><i>not</i></b> want to change widgets, | ||
| Line 17: | Line 14: | ||
To customize the standard | To customize the standard | ||
[[PrF_UG_classes_class_editor|Class Editor]], | [[PrF_UG_classes_class_editor|Class Editor]], | ||
| − | select <b>:STANDARD-CLASS</b> at the Forms | + | select <b>:STANDARD-CLASS</b> at the Forms tab and then make your desired edits. |
| − | Since any new class is | + | Since any new class is (by default) created using <b>:STANDARD-CLASS</b>, |
| − | (by default) | + | the Class Editor itself reflects the structure and layout specified for <b>:STANDARD-CLASS</b> |
| − | created using <b>:STANDARD-CLASS</b>, | + | at the [[PrF_UG_forms_forms_tab|Forms tab]]. |
| − | the Class Editor itself reflects the structure and layout specified for <b>:STANDARD-CLASS</b> at the | + | Your modifications will show up for every class, whether existing or new. |
| − | [[PrF_UG_forms_forms_tab|Forms | + | Similarly, to customize the standard [[PrF_UG_slots_slot_editor|Slot Editor]], |
| − | Your modifications will show up for every class, | + | select <b>:STANDARD-SLOT</b> at the Forms tab and make your desired edits. |
| − | whether existing or new. | ||
| − | Similarly, | ||
| − | to customize the standard | ||
| − | [[PrF_UG_slots_slot_editor|Slot Editor]], | ||
| − | select <b>:STANDARD-SLOT</b> at the Forms | ||
If you have non-standard metaclasses or slot metaclasses in your project, | If you have non-standard metaclasses or slot metaclasses in your project, | ||
you can create custom editors for classes or slots that use these. | you can create custom editors for classes or slots that use these. | ||
| − | For example, | + | For example, when you add a field, |
| − | when you add a field, | ||
you may want to reposition it or resize it in the editor. | you may want to reposition it or resize it in the editor. | ||
=== Example === | === Example === | ||
| − | For example, | + | For example, you could customize the Class Editor for classes |
| − | you could customize the Class Editor for classes that used the <b>Wine template</b> to an InstanceTableWidget that shows the location and the name of the best wineries: | + | that used the <b>Wine template</b> to an InstanceTableWidget |
| + | that shows the location and the name of the best wineries: | ||
<ol class='a'> | <ol class='a'> | ||
<li><p> | <li><p> | ||
| − | At the Forms | + | At the Forms tab, select the <b>Wine template</b>. |
| − | |||
| − | |||
| − | |||
</p> | </p> | ||
| + | <div>[[Image:PrF_UG_meta_meta_at_forms_tab.png|frame|none| | ||
| + | Forms tab, "Wine template" selected]]</div> | ||
<li><p> | <li><p> | ||
Select the <b>Best Wineries</b> widget. | Select the <b>Best Wineries</b> widget. | ||
| − | |||
</p> | </p> | ||
| + | <div>[[Image:PrF_UG_meta_best_wineries_widget.png|frame|none| | ||
| + | Best Wineries widget]]</div> | ||
<li><p> | <li><p> | ||
| − | Select <b>InstanceTableWidget</b> from the <b>Select Widget Type</b> menu at the top right of the Form Editor. | + | Select <b>InstanceTableWidget</b> from the <b>Select Widget Type</b> menu |
| − | + | at the top right of the Form Editor. | |
| − | |||
</p> | </p> | ||
| + | <div>[[Image:PrF_UG_meta_menu_directinstanceswidget.png|frame|none| | ||
| + | InstanceTableWidget selected in menu]]</div> | ||
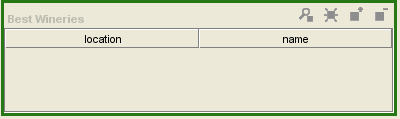
| + | <p> | ||
| + | This will change the widget display, adding field headings. | ||
| + | </p> | ||
| + | <div>[[Image:PrF_UG_meta_widget_instancetable.png|frame|none| | ||
| + | Best Wineries widget, with field headings]]</div> | ||
<li><p> | <li><p> | ||
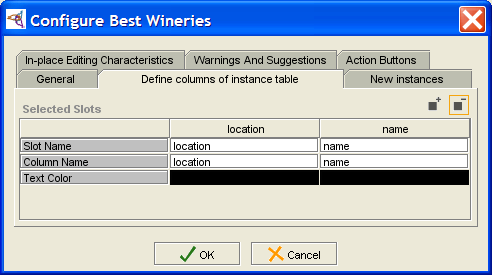
| − | You can further configure the widget by double-clicking on it to open the <b>Configure widget</b> dialog. | + | You can further configure the widget by double-clicking on it |
| + | to open the <b>Configure widget</b> dialog. | ||
To delete the <i>produces</i> column, | To delete the <i>produces</i> column, | ||
select the <b>Define columns of instance table</b> tab, | select the <b>Define columns of instance table</b> tab, | ||
click on the slot name <i>produces</i>, | click on the slot name <i>produces</i>, | ||
| − | click the <b>Remove the currently selected column | + | click the <b>Remove the currently selected column</b> |
| − | [[Image:PrF_UG_all_object.remove.gif|all_object.remove]] | + | ([[Image:PrF_UG_all_object.remove.gif|all_object.remove]]) button |
and click <b>OK</b>. | and click <b>OK</b>. | ||
| − | |||
| − | |||
</p> | </p> | ||
| + | <div>[[Image:PrF_UG_meta_configure_widget.png|frame|none| | ||
| + | Configure Best Wineries dialog]]</div> | ||
<li><p> | <li><p> | ||
You can also resize the widget by dragging. | You can also resize the widget by dragging. | ||
| − | |||
| − | |||
</p> | </p> | ||
| + | <div>[[Image:PrF_UG_meta_widget_resized.png|frame|none| | ||
| + | Best Wineries widget, resized]]</div> | ||
</ol> | </ol> | ||
| − | See the | + | See the [[PrF_UG_forms|Forms Table of Contents]] |
| − | [[PrF_UG_forms|Forms Table of Contents]] | ||
for more information about customizing forms. | for more information about customizing forms. | ||
| − | </div> | + | |
| + | <noinclude></div></noinclude> | ||
Latest revision as of 18:25, November 13, 2008
Customizing the Class or Slot Editor
Using metaclasses, you can customize the layout of the Class Editor or the Slot Editor at the Forms tab. You can hide entry fields and resize and reposition fields. Normally you do not want to change widgets, as the Class Editor and Slot Editor use special widgets for the standard fields.
To customize the standard Class Editor, select :STANDARD-CLASS at the Forms tab and then make your desired edits. Since any new class is (by default) created using :STANDARD-CLASS, the Class Editor itself reflects the structure and layout specified for :STANDARD-CLASS at the Forms tab. Your modifications will show up for every class, whether existing or new. Similarly, to customize the standard Slot Editor, select :STANDARD-SLOT at the Forms tab and make your desired edits.
If you have non-standard metaclasses or slot metaclasses in your project, you can create custom editors for classes or slots that use these. For example, when you add a field, you may want to reposition it or resize it in the editor.
Example
For example, you could customize the Class Editor for classes that used the Wine template to an InstanceTableWidget that shows the location and the name of the best wineries:
At the Forms tab, select the Wine template.
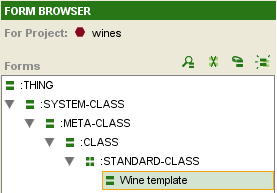 Forms tab, "Wine template" selected
Select the Best Wineries widget.
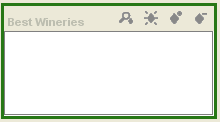 Best Wineries widget
Select InstanceTableWidget from the Select Widget Type menu at the top right of the Form Editor.
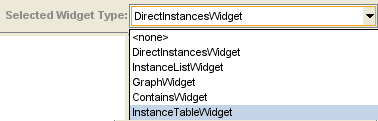 InstanceTableWidget selected in menu
This will change the widget display, adding field headings.
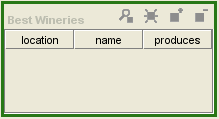 Best Wineries widget, with field headings
You can further configure the widget by double-clicking on it to open the Configure widget dialog. To delete the produces column, select the Define columns of instance table tab, click on the slot name produces, click the Remove the currently selected column (
 ) button
and click OK.
) button
and click OK.
 Configure Best Wineries dialog
You can also resize the widget by dragging.
 Best Wineries widget, resized


See the Forms Table of Contents for more information about customizing forms.