BioPortal Import Plugin
BioPortal Import Plugin
The BioPortal Import Plugin allows the user to import classes from external ontologies stored in BioPortal. The user can import entire trees of classes with a desired depth and choose which properties to import for each class.
Contents
Versions & Compatibility
This section lists available versions of BioPortal Import Plugin.
No version information available.
If you click on the button below to add a new version of BioPortal Import Plugin, you will be asked to define a page title for the new version. Please adhere to the naming convention of BioPortal Import Plugin X.X.X when you define the new page!
Changelog
No version information available.
`
Overview
The BioPortal Reference plugin is added as an action to the OWLClasses tab of the Protege-OWL user interface. The plugin allows a user to import classes from external BioPortal ontologies into a local ontology in Protege-OWL. The basic steps in using the plugin are to: a) browse through all the BioPortal ontologies (except remote ones) and select which one to import classes from; b) select one or more classes to import from the BioPortal ontology, and c) import them as subclasses of the selected class in the local ontology.
The plugin uses the RESTful services provided by BioPortal to allow the user to browse through the latest versions of all BioPortal ontologies. However, remote ontologies (identified by the value of their isRemote property) cannot be explored in the plugin, since BioPortal does not provide the information for these ontologies through its REST services. The user can view the classes of the selected ontology in an expandable tree format, and also view the properties of each class.
The plugin is configurable and works with Protege-OWL. The configurations provide users with the ability to: a) import entire subtrees of classes from BioPortal ontologies; b) save the imported classes as a separate ontology and/or as a file to the local disk, and c) choose which (if any) property values to import for each class and assign an equivalent user property for each imported property, if desired.
What does it look like
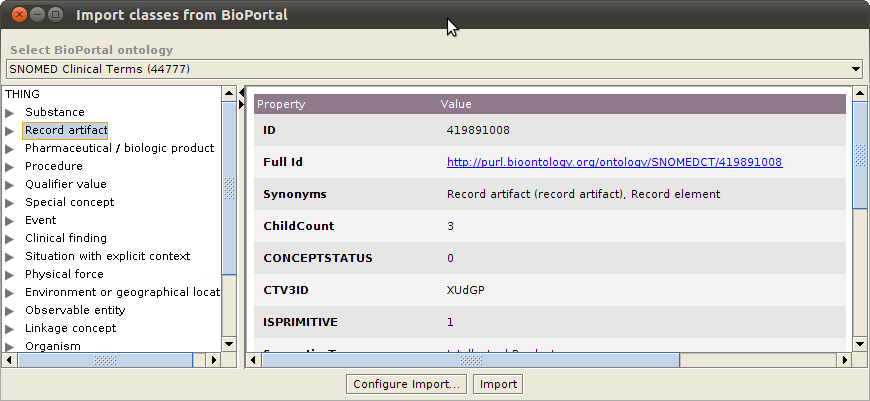
This is a screenshot of the BioPortal Import plugin showing the SNOMED CT ontology classes:
How to use it
The BioPortal Import plugin can be invoked by selecting a class of a domain ontology in the OwlClasses tab in Protege-OWL and then clicking on the icon as shown below:
Importing classes
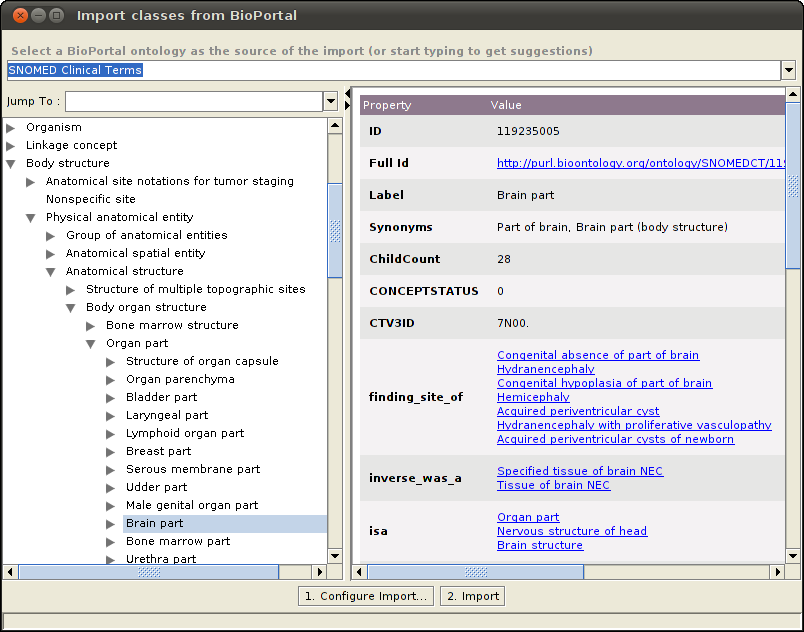
In the plugin window, select a BioPortal ontology from the dropdown list.
The plugin will show all the classes belonging to the selected ontology in an expandable tree format in the left pane. Selecting one of the classes will show the properties for that class in the details pane. Select one or more classes to import from the BioPortal ontology.
Configure the settings for importing classes by clicking on the "Configure Import..." button. More details about configuring the settings are provided in the "Configuring Imports" section.
Click on the "Import" button to import all selected classes into the local ontology.
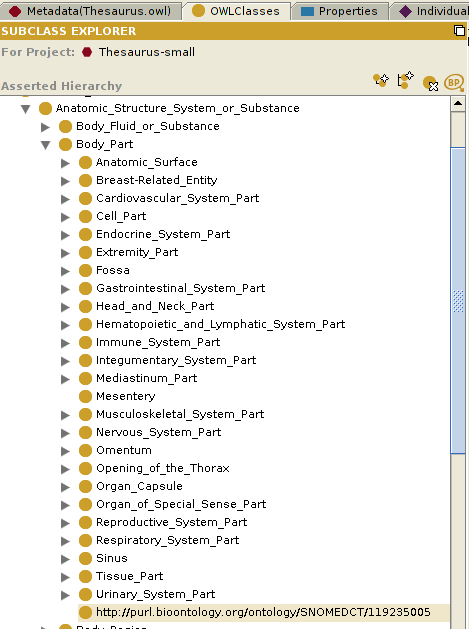
Below is an example of the Mosquito-borne flavivirus hemorrhagic fever class (Term ID 240489005) of the SNOMED CT ontology imported into the Abnormal_Cell class of the NCI Thesaurus ontology.
Plugin configuration
The user can configure the settings for all the above features of the plugin in two ways: 1. selecting "BioPortal>Configure..." from the Protege window menu bar, or 2. clicking on "Configure Import..." in the plugin window. It also allows the user to configure the base URL for BioPortal and BioPortal REST services, if required.
Configuring Imports
Importing a subtree of classes
If the user wants to import an entire subtree of classes, the plugin provides an option to enable it, as well as to configure the number of levels down the tree to import, starting from the children of the selected class. This makes it very convenient to import entire parts of an ontology at once.
Importing into a separate ontology
Often, a user might want to import classes into a separate ontology, which can then be imported into the main ontology. One advantage of this is that the imported classes can be edited and maintained separately. It also makes removing all the imports altogether much easier. If so desired, the user can configure whether he/she wants to import the selected classes into an entirely new ontology (in which case the ontology name and the name of the file to save it to needs to be provided), or as part of an already imported ontology (for which he needs to select from a list of already imported ontologies which are writable).
Configuring properties to be imported
Apart from the classes, the user might also wish to import various properties of each class, along with their values. However, since the same property might not exist in the local ontology, the user can choose which property of the local ontology to assign it to. Currently, the plugin allows a user to import only the Label, Definitions and Synonyms properties from BioPortal. However, this list might be extended in the future. The figure below depicts how to configure which properties to import for each class, and their equivalent properties in the local ontology.
Configure the widget
Normally, you would not change the default configuration of the widget, but in case you need to customize it for your own project please read this section. Otherwise, you may just skip it.
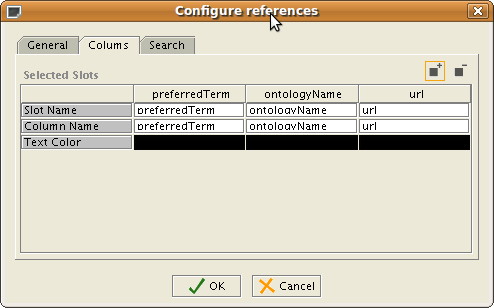
You may configure the widget in the Forms Tab by double clicking on the BioPortalReference widget. In the 'Columns Tab, you may configure what columns and the width of each column that should show up:
For example, you may remove the url slot and this will be removed from the display of the BioPortalReferenceWidget, or you may add other column, or switch the order.
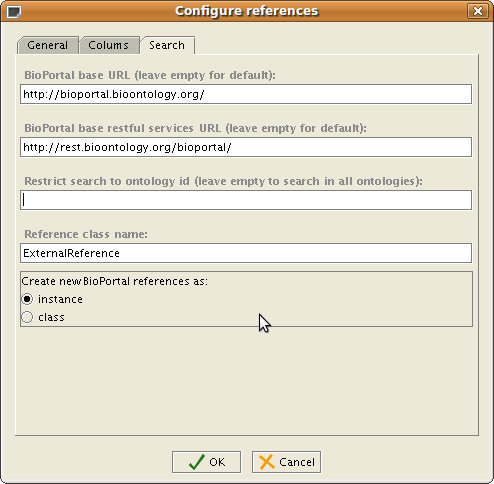
In the Search Tab, you may configure the search parameters for BioPortal:
The result
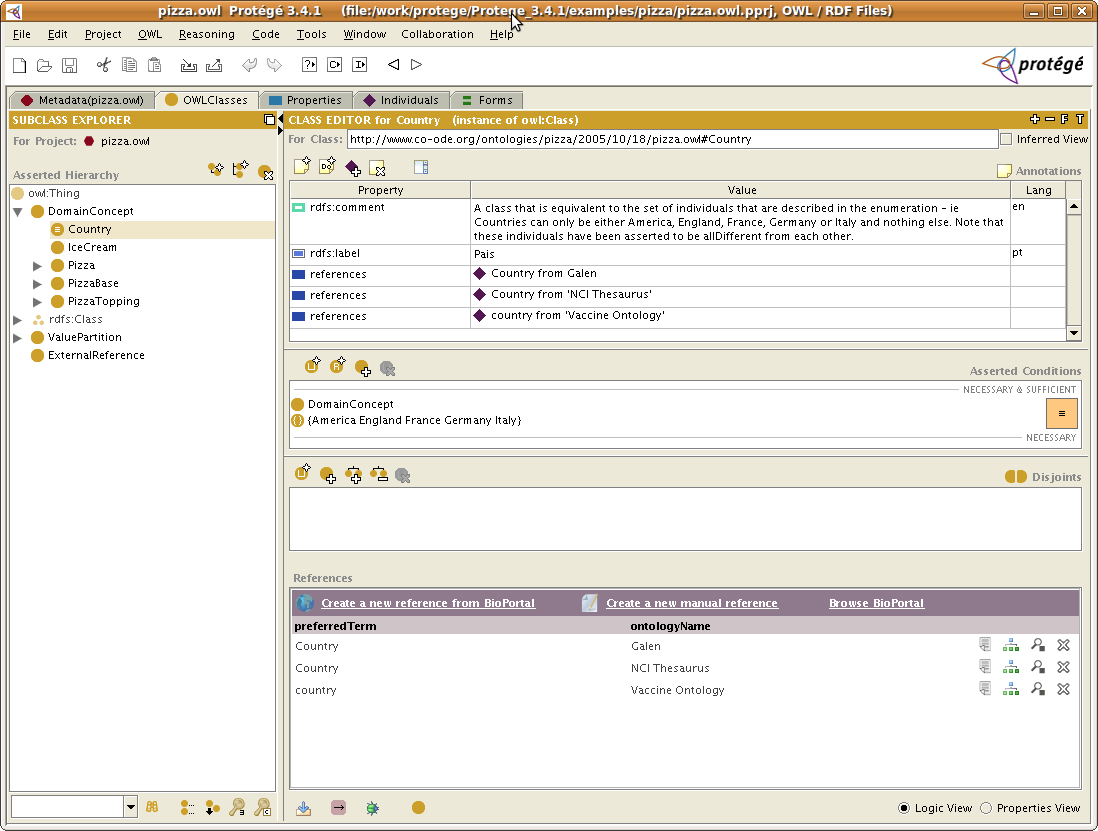
Below is a screenshot that shows the OWLClasses tab, for which we have configured using the steps above, the BioPortalReference widget:
Under the hood
The plugin creates instances of the OWLNamedClass class to store all the imported classes from BioPortal. If the user chooses to import any property of the imported classes, it is assigned to one of the OWLAnnotationProperties of the current OWLModel, as configured by the user.
To display the list of ontologies in BioPortal, get the details of the classes and their properties etc., the plugin invokes the BioPortal Restful Services.
Download
The plugin is distributed with the Protege 3.4.2 release and newer. However, we might need to make changes to the plugin to keep in sync with the BioPortal releases. For this reason, we also provide separate downloads for the plugin.
We have a patch version of the plugin for Protege 3.4.3, that can be downloaded from here. Unzip it into your Protege 3.4.x plugin folder. (Make sure you override the old versions of the plugin.)
The source code of the plugin is available in our SVN: http://smi-protege.stanford.edu/svn/bioportal-reference-plugin/trunk/ and it is licensed under Mozilla Public License.
Developer's Guide
This plugin is very easy to extend.
Configure the classpath and Eclipse setup
First, you should get the sources of the plugin from the SVN repository, as explained in the above section. The plugin depends on:
- standard-extensions (get the one in the zip from here)
- protege-owl
- xstream libs (get the binary version from here, Libs needed in the classpath: xpp3_min_xyz.jar and xstream-xyz.jar)
If you would like to use Eclipse development environment, we have a guide of how to set it up for plugin development here.
Explanation of classes
The plugin is very simple. It has classes for UI and classes for accessing BioPortal through rest services.
The slot plugin class (main UI) is: edu.stanford.bmir.protegex.bp.ref.BioPortalReferenceWidget
The panel in which you can search and import from BioPortal is: edu.stanford.bmir.protegex.bp.ref.SearchPanel
The reference model class that creates the reference instances and makes the actual import is: edu.stanford.bmir.protegex.bp.ref.ReferenceModel
If you would like to change the way that references are imported, change the method (or create your own):
public Instance createReference(String bpBaseUrl, String conceptId, String ontologyVersionId, String preferredName, String ontologyName)
The package org.ncbo.stanford contains the classes that can can invoke a rest service to BioPortal and that can read in the results. All you need to invoke the services is in the org.ncbo.stanford.util package.
Invoke BioPortal Rest services
The BioPortal Rest services are documented here.
For example, to invoke a search in BioPortal, you can use the utility class:
BioportalSearch sd = new BioportalSearch();
String urlStr = "http://rest.bioontology.org/bioportal/search/Myocardial%20Infarct?pagesize=20&pagenum=1";
try {
   Page p = sd.getSearchResults(new URL(urlStr));
   SearchResultListBean data = p.getContents();
   for (SearchBean searchBean : data.getSearchResultList()) {
       System.out.println(searchBean.getPreferredName() + "\t" + searchBean.getOntologyDisplayLabel());
   }
 } catch (MalformedURLException e) {
    e.printStackTrace();
 } catch (IOException e) {
    e.printStackTrace();
 }
For an example implementation see: edu.stanford.bmir.protegex.bp.ref.SearchPanel.getSearchResultsHtml()
To get all details of a concept, you can use the following code:
BioportalConcept c = new BioportalConcept();
String urlStr = "http://rest.bioontology.org/bioportal/concepts/39002/BRO:Resource";
try {
   ClassBean cb = c.getConceptProperties(new URL(urlStr));
   System.out.println(cb.getFullId() + " " + cb.getId() + " " + cb.getLabel());
   Map<Object, Object> relationsMap = cb.getRelations();
   for (Map.Entry<Object, Object> e : relationsMap.entrySet()) {
        System.out.println(e.getKey() + ": " + e.getValue());
   }
 } catch (MalformedURLException e) {
       e.printStackTrace();
 }
Where to get help and complain
If you have any problems with the plugin, please post a message on the protege mailing list (protege-owl for OWL ontologies, and protege-discussion for Protege frames ontologies). Instructions for posting on the lists are here:
http://protege.stanford.edu/community/lists.html
Before posting, please check the email list archives, whether the question has already been answered:
Thank you!