SetUpEclipseForPlugin
Setting up Eclipse for plug-in development
This page is intended for people who want to develop their own plug-in (e.g., tab widget, slot widget, project plug-in, etc.) and who use Eclipse as their Java development environment. This is a step-by-step guide that shows the setup of the Eclipse environment using screen shots. We will use as an example the scenario in which a developer wants to create a tab widget that displays "Hello World!". These steps can be used for developing any plug-in type.
Contents
Prerequisites
Before we start, make sure that you have the latest version of Protege 3.x and Eclipse installed.
- Download and install Eclipse from here.
- Download and install latest version of Protege 3.x from here. Let's say you have installed Protege in:
/work/protege/Protege_3.4.
Setting up Eclipse
Step 1. Create a new Java Project
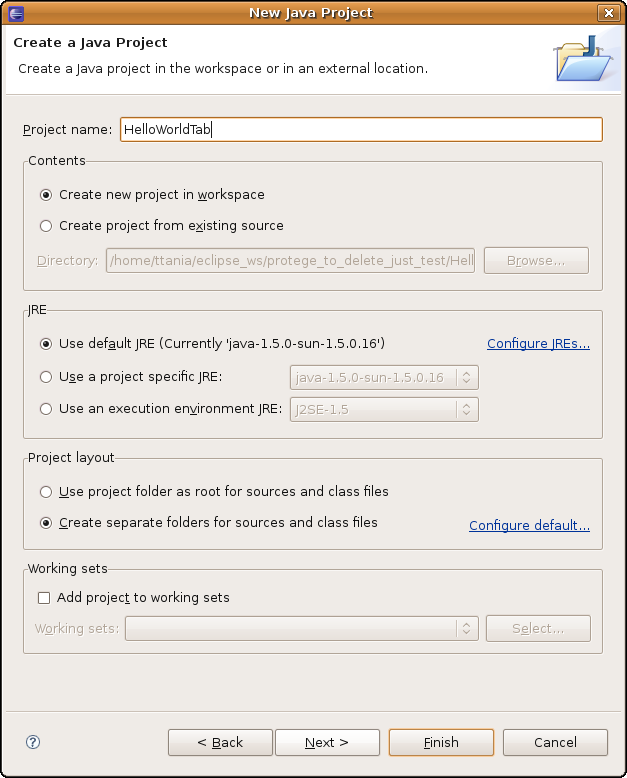
Start Eclipse. Go to File Menu -> New -> Project -> Select Java Project. Click Next. In the next panel choose a project name, say "HelloWorldTab". The screen should look like below:
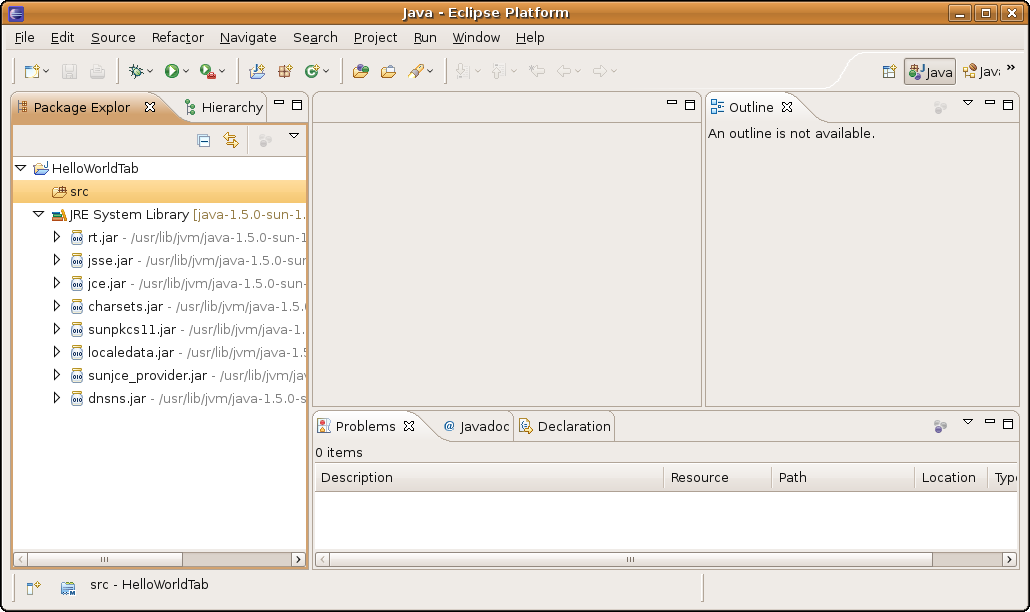
Click Finish. Congratulations! You have created an empty Java project. Your screen should look like:
Step 2. Configure the project build path
This step assumes that you have Protege 3.x installed on your computer. This example assumes that Protege was installed in /work/protege/Protege_3.4 (On Windows machines, the default installation directory would be something like C:\Program Files\Protege_3.4)
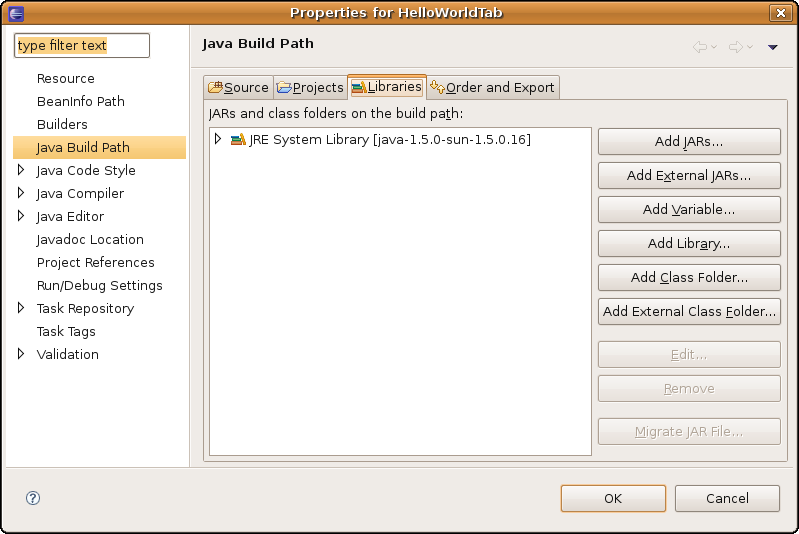
Select the project name, HelloWorldTab', right click, select Build Path -> Configure Build Path.... Switch to the Libraries tab. You should see an something like this:
Click on Add External JARs... and go to the Protege installation directory. Select from there the:
- protege.jar
- looks-2.1.3.jar (version may vary)
Click OK.
If your plug-in is for OWL, you will need to include also all the jars in the protege-owl plug-in folder. Repeat the same operation: Click Add External Jars, go to the Protege installation directory/plugins/edu.stanford.smi.protegex.owl and select all the jar files in that directory.
Note If your plug-in depends on other plug-ins (e.g., on the Change Management plug-in), then you need to add to the build path also all the jars in that plug-in folder.
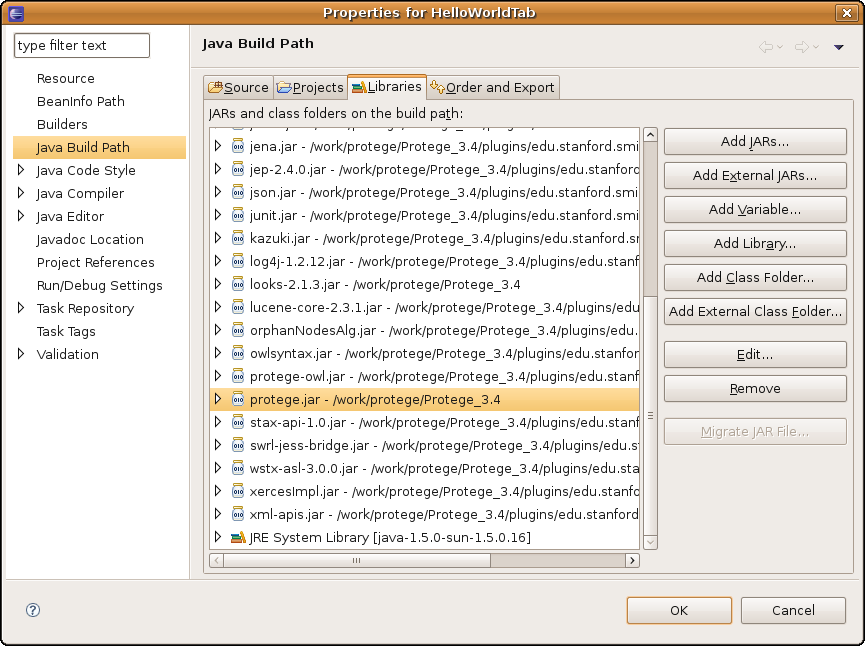
After adding the Protege jars (and the protege-owl jars), the Library tab should look like:
Click OK.
Step 3. Create the Java plug-in class
OK, so now Eclipse is set up, all we need is to create a new tab widget. We have documentation about implementing different plug-in types on our Developer's webpage.
This guide will create a tab widget that displays "Hello World". To create a Tab Widget, you need to extend the class edu.stanford.smi.protege.widget.AbstractTabWidget from the protege.jar and implement the method initialize() that is called when the tab is created.
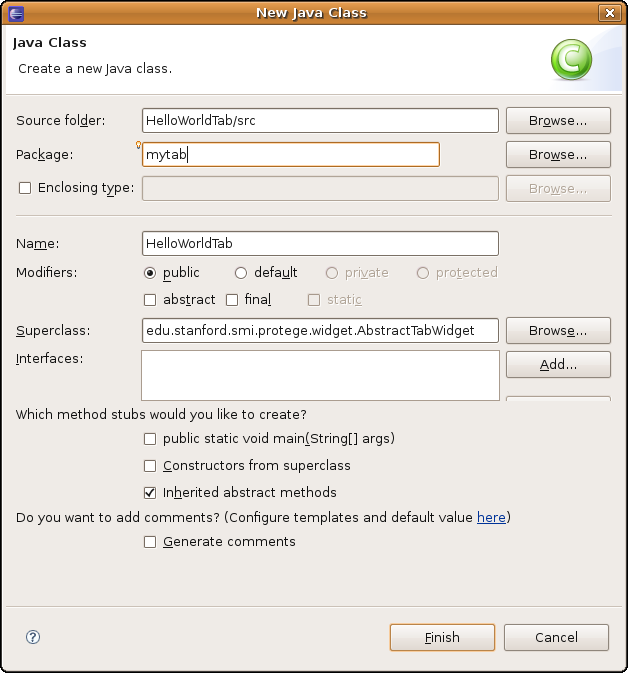
Right-click on src, select New -> Class. In the new class panel:
- Write in the Name field:
HelloWorldTab - Write in the Superclass field:
AbstractTabWidget(auto-completion also works, press Ctrl+Space) - Write in the Package field:
mytab
This is what you should see:
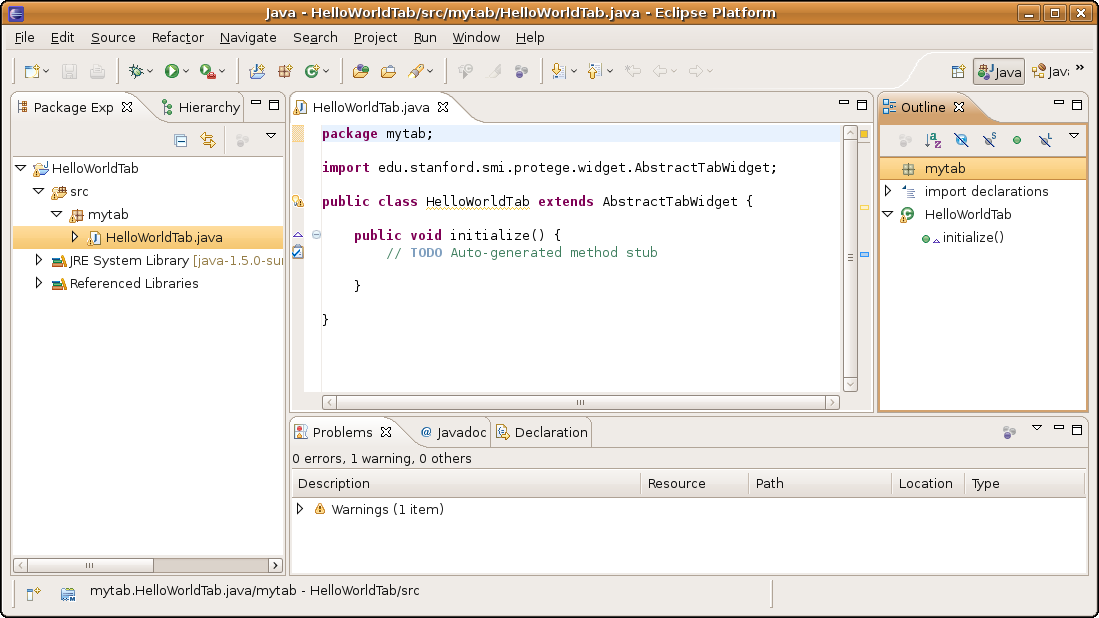
Click Finish. The new class should show up under the src folder. An empty implementation of the initialize method was already created by Eclipse. You should see this:
You can replace the code of the class with the one from below (just prints "Hello World!"):
package mytab;

import javax.swing.JLabel;

import edu.stanford.smi.protege.widget.AbstractTabWidget;

public class HelloWorldTab extends AbstractTabWidget {

	public void initialize() {
		setLabel("Hello World Tab");
		add(new JLabel("Hello World!"));
	}

	public static void main(String[] args) {
		edu.stanford.smi.protege.Application.main(args);
	}

}
Our HelloWorldTab plug-in will display "Hello World!" in a tab.
Step 4. Create the manifest file
To make Protege recognize the new tab widget, you will need to create a manifest file. We have instructions about creating the manifest file here.
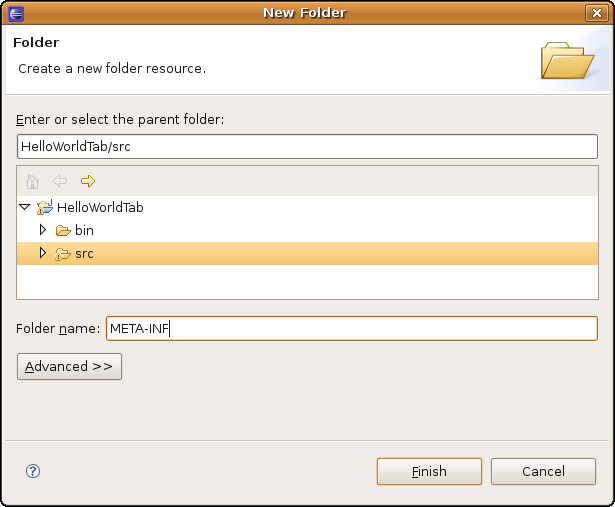
Right-click on src -> New -> Folder. In the panel, select the src node, and folder name: META-INF (capital letters!). This is what you should see:
After you click on Finish, the new folder META-INF is created under src.
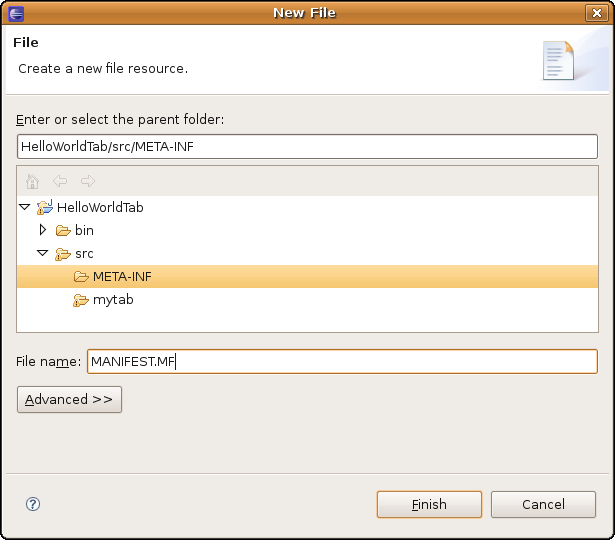
Right-click on the META-INF folder, New -> File. In the panel, select META-INF, and for the file name write: MANIFEST.MF (capital letters!). This is how it should look like:
Click Finish.
Copy and paste the text from below in the content of the just created MANIFEST.MF:
Manifest-Version: 1.0

Name: mytab.HelloWorldTab.class
Tab-Widget: True
The empty row at the end of the file is very important!
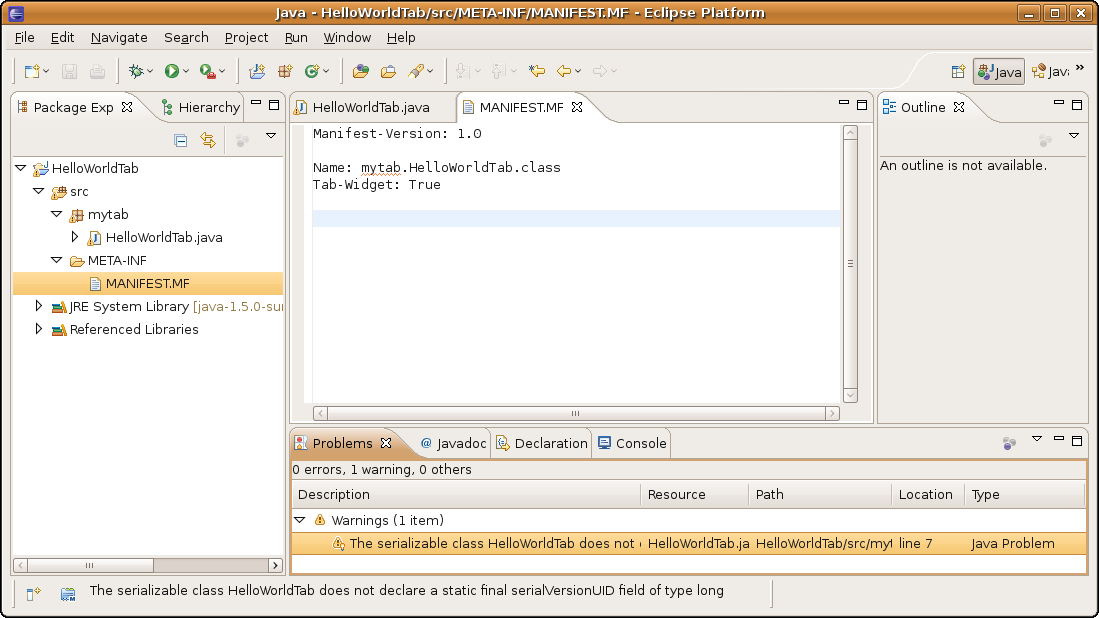
Save the MANIFEST.MF file (by clicking Ctrl+S) and this is what you should see:
Step 5. Run the plug-in
So far, we have all we need to start the new plug-in. All we need now is to set up a run configuration for executing the plug-in.
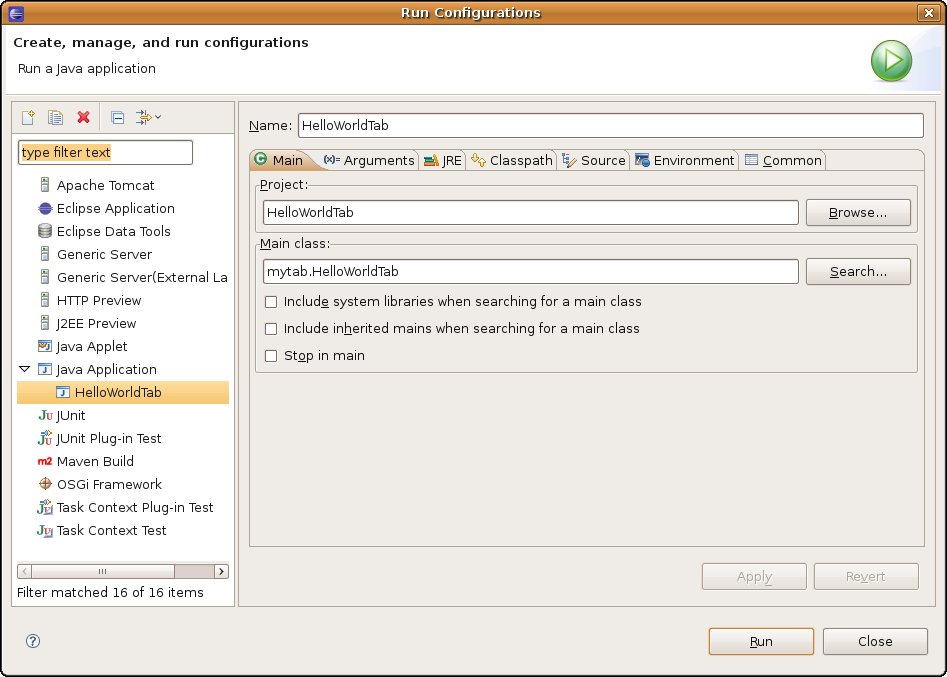
Go to Run Menu -> Run Configurations.... Create a new Java Application launcher, by selecting the Java Application in the tree and click on the create icon at the top of the panel. Fill in the following values:
-
Name: HelloWorldTab -
Project: Select HelloWorlTab -
Main class: mytab.HelloWorldTab
Eclipse will fill in automatically for you some of these values. This is what you should see:
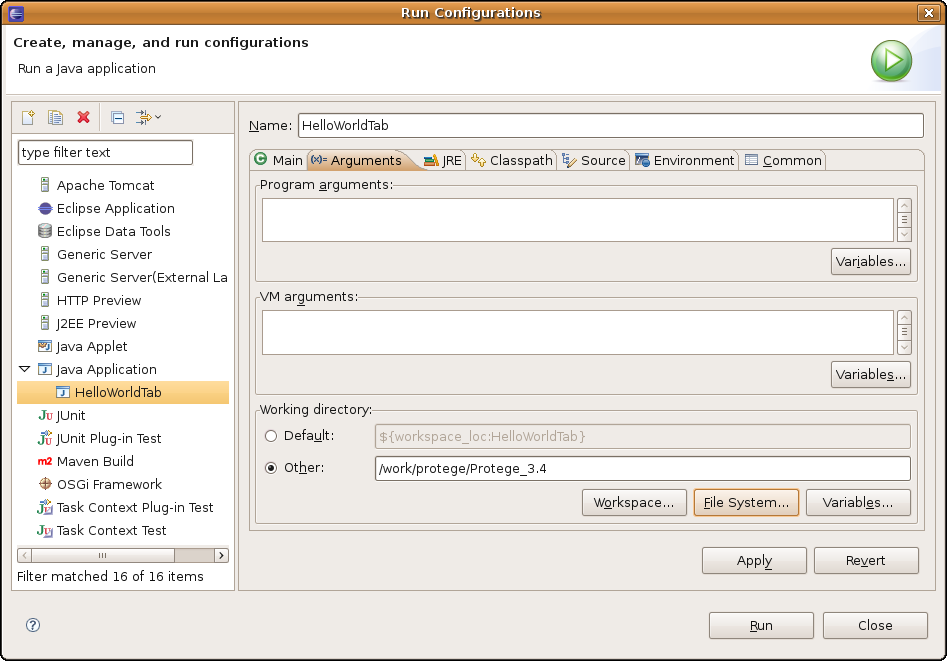
Then, switch to the Arguments tab, and for Working Directory select Other, then click on File System.. and select the path to your Protege installation directory . This is a very important step of the configuration.
In our example, Protege is installed in /work/protege/Protege_3.4 and this is the value that we select. See screen shot from below:
Click Run.
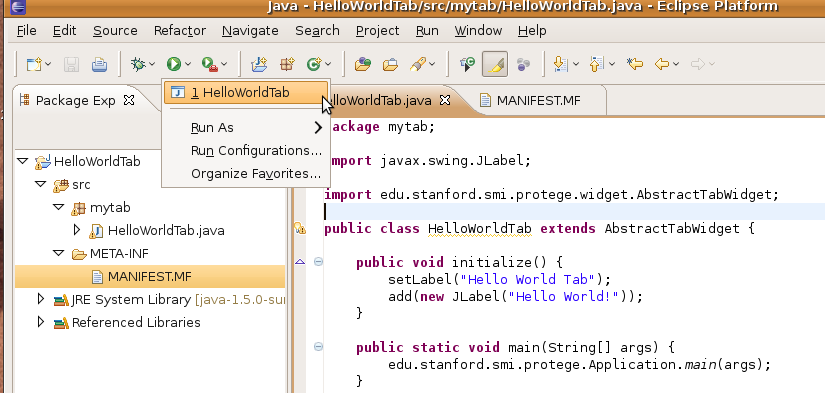
The next time you want to run the plug-in, you do not need to create another run configuration. You should reuse the existing run configuration that you can access by clicking on the green run icon. See below:
Once you click on Run, Protege will start-up. You should see in the console view the messages about loading plug-ins. If you do not, it means you have misconfigured the Working Directory entry. Please check it again.
To test the plug-in, once Protege has started, create a new project by clicking on the New project.. button in the Protege welcome dialog, and in the next screen, select Protege Files (pont and pins). You may also select any other backend, for example, OWL/RDF files. Click on Finish.
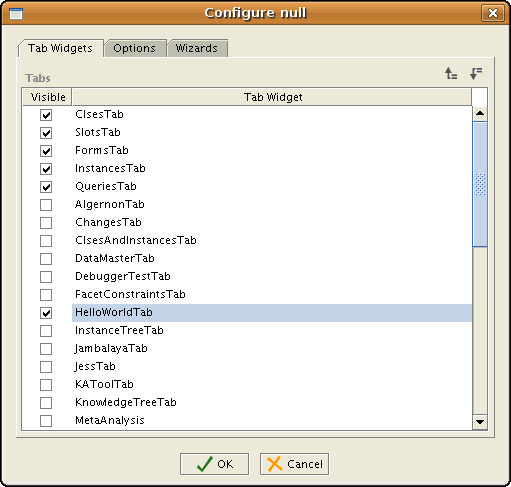
A new project is created. To enable the tab that we have just created, go to Project menu -> Configure and in the Tab Widgets tab enable the HelloWorldTab. See below:
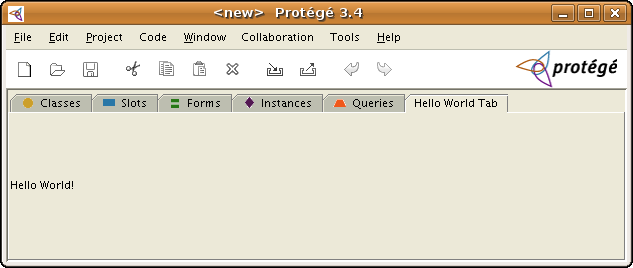
After you click OK, the new tab will show up in the Protege UI:
Congratulations! That's it!
Optional stuff
Increase the heap size
By default, when you run it from Eclipse, Protege will start with 66MB heap size, which might not be enough for larger ontologies. You can increase the heap size in the Run configuration -> Arguments Tab (Step 5), by entering in the VM arguments panel the following text:
-Xmx500M
Of course, you can change 500 with another number. We have guidelines for setting the heap size here (first paragraph).
Using in the run configuration the protege.dir java argument
There is an alternative way of running Protege (Step 5). Instead of setting the Working Directory to the Protege installation directory, you can leave the Working Directory to be the default one, and instead add a Java argument in the VM arguments panel:
-Dprotege.dir=/work/protege/Protege_3.4
Replace /work/protege/Protege_3.4 with your own Protege installation directory path.
Creating a jar for your plug-in
If you're done with the plug-in development, or you would like to test the plug-in in a runtime Protege, then you need to create a jar out of the plug-in classes and the manifest.mf (very important!) and copy the jar in a subfolder that you create in the plugins folder of your Protege installation.
Below are the steps for creating a jar.
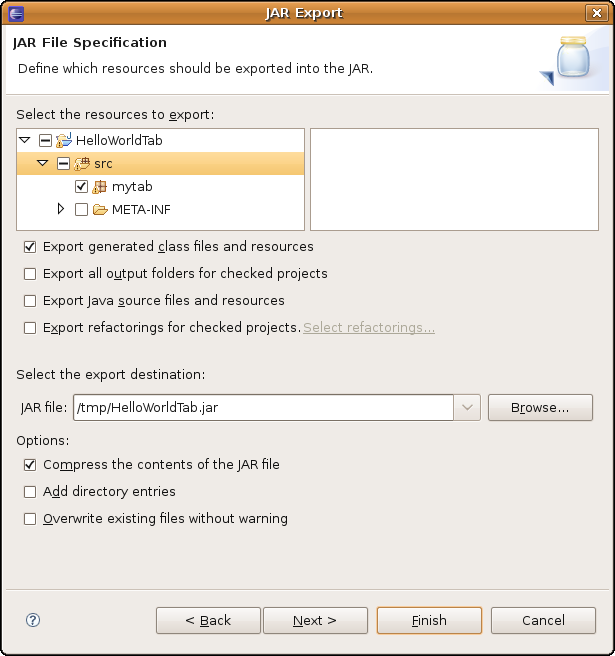
Right click on src -> Export -> open Java -> JAR file -> click Next. In the next window, select src, open the node and unselect META-INF (important!). Then add a path where the jar should be exported to. See below:
You could set as the path to which you export the plugin folder where the plug-in should actually be.
Click Next. In the next window, you can save the description of this jar in the workspace, in case you will want to generate later the jar again, by just one click (optional). Then, click Next'.
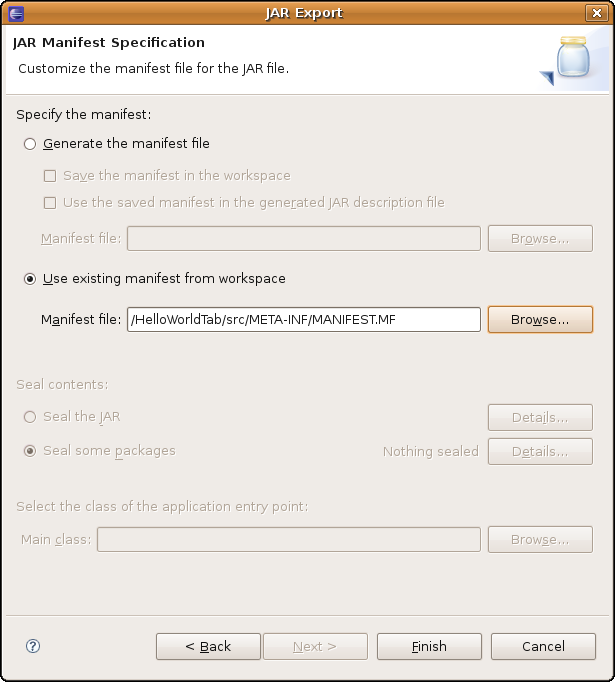
In the next window, you have to specify what manifest file should be used for the jar. Select Use manifest file from workspace and browse to the MANIFEST.MF in the workspace (In this example, /HelloWorldTab/src/META-INF/MANIFEST.MF). See below:
Click Finish. The jar will be generated in the location you have set up in the first export step.
To try out the plug-in in Protege, you have to create a subfolder of plugins in your Protege installation directory. For example, we could create a subfolder called: plugins/mytab. (Usually people use the Java package name as the sufolder name, but it is not required). Then copy the generated jar in this subfolder and start Protege. We have detailed documentation about how to create a jar for your plug-in for the different plug-in types.
Note: If your plug-in depends on other plug-ins (e.g., protege-OWL plug-in, change management plug-in, etc.), then you need to create a plugin.dependency file that you copy in the plugin subfolder next to the plugin jar. Read details here.
Using ant for compiling and running
If you are experienced with ant, you can customize an ant template that we provide for compiling, installing and running the plug-in. The ant template is available here (Click view for the latest revision). You will need to set a PROTEGE_HOME environment variable that points to the Protege installation directory. The rest of the template customization only consists in adapting the name and path of the plug-in, and possibly the dependencies. We have a page describing how to use ant targets for Protege plug-ins in Eclipse here.
Troubleshooting
1. My tab plug-in does not show up in Project -> Configure panel!
The reason is one of the following:
- The manifest file is missing or not at the correct location
- The entries in the manifest file are not correct (e.g. java class path is not written correctly)
- The exported jar does not have the right manifest in it.
For all cases, please recheck that the META-INF/MANIFEST.MF file is at the right location and contains the right java class in it (it should point to the class that extends the plugin class!). Read more about creating the manifest file here. Look also in the console if you have any exceptions. If after rechecking the manifest file, you are still lost, please send an email to the protege mailing list (see Where to report problems section) and attach any exception you get in the console.
2. My plug-in works in Eclipse but not as a jar!
The most likely cause is that you forgot to create or copy in the plug-in folder the plugin.properties file that declares the dependencies to other projects. Please read more about declaring your plug-in dependencies here.
Where to report problems
If you have problems with this guide, please post your questions on the Protege mailing lists. Before posting, please make sure you have searched the mailing list archive, because many questions have already been answered before.
