Collaborative Protege
Collaborative Protege
Collaborative Protégé is an extension of the existing Protégé system that supports collaborative ontology editing as well as annotation of both ontology components and ontology changes.
Contents
Versions & Compatibility
This section lists available versions of Collaborative Protege.
No version information available.
If you click on the button below to add a new version of Collaborative Protege, you will be asked to define a page title for the new version. Please adhere to the naming convention of Collaborative Protege X.X.X when you define the new page!
Changelog
No version information available.
Overview
Collaborative Protégé is an extension of the existing Protégé system that supports collaborative ontology editing. In addition to the common ontology editing operations, it enables annotation of both ontology components and ontology changes. It supports the searching and filtering of user annotations based on different criteria. We have implemented two types of voting mechanisms that can be used for voting of change proposals. Multiple users may edit the same ontology at the same time. In multi-user mode, all changes made by one user are seen immediately by other users.There are two working modes available for Collaborative Protégé. Both modes support multiple users working on an ontology:
- The multi-user mode - allows multiple clients to edit simultaneously the same ontology hosted on a Protégé server. All changes made by one client are immediately visible by other clients. This mode is also referred to as client-server mode, or concurrent mode and requires a client-server setup. This mode is based on the implementation of the multi-user Protégé and is the preferred mode in which Collaborative Protégé should be run.
- The standalone mode - allows multiple users to access the same ontology in succession. The ontology can be stored on a shared network drive and all clients will access the same project files. However, simultaneous access is not possible. This mode is also referred to as the consecutive mode.
This user guide applies to both multi-user and standalone mode of Collaborative Protégé.
Installation Guide
Collaborative Protégé is distributed with the full installation of Protégé starting with Protégé version 3.3 beta399. You may use Collaborative Protégé both in stand-alone mode and in multi-user mode. The installation guide will use as an example the Newspaper project distributed in the examples/newspaper folder in the Protégé installation directory.
Stand-alone mode
  1. Install the full distribution of the latest version of Protégé.
  2. Start Protégé.
  3. Open the newspaper.pprj project from the examples/newspaper folder in the Protégé installation directory.
  4. Enable the ChangesTab from the Project -> Configure menu.
  5. In the Project -> Configure -> Options panel enable the Track changes checkbox. Click on OK and exit the Configuration panel.
  6. Disable the ChangesTab from the Project -> Configure menu.
  7. Save the project. Check in the examples/newspaper folder that a project annotation_newspaper.pprj was created.
  8. Close the project and reopen it. You should see the collaborative panel.
Multi-user mode
If you want to use Collaborative Protégé in multi-user mode, you will need to do some additional steps.
  1. Do all the steps for the installation in Stand-alone mode.
  2. Open the metaproject.pprj project from the examples/server folder in the Protégé installation directory.
  3. In the ClsesTab, select the class Project and create a new template slot called annotationProject.
     The slot should have value type Instance and allowed classes Project.
  4. In the InstanceTab, create a new instance of Project for the annotation_newspaper.pprj.
     The name of the instance is not important. The location slot should point to the location of
     the annotation project. For this example, the value of the location slot should be:
     examples/newspaper/annotation_newspaper.pprj.
  5. Select the Newspaper instance and set as value of annotationProject slot the Project instance
     created in the previous step.
  6. Save the project and close Protégé.
Test the Protégé server and client:
  1. Start the Protégé server by using the run_protege_server start script.
  2. Start a Protégé client: Start Protégé and select the Server mode in the Open Project dialog.
  3. In the Server panel, leave all the default entries like they are.
     (Hostname: localhost, User: Guest, Password: guest). Click on OK.
  4. In the Select Project panel, select the Newspaper project. When the project is displayed,
     you should see also the collaborative pabel.
User Guide
The following guide gives a brief description of the main functionalities of Collaborative Protégé, which are:
1. Annotation of classes, properties and instances 2. Annotation of changes (for example, class creation, renaming, etc.) 3. General discussion threads 4. Proposals and voting 5. Searching and filtering of annotations by different criteria 6. Live discussion (chat) with other users connected to the same server
The collaborative panel
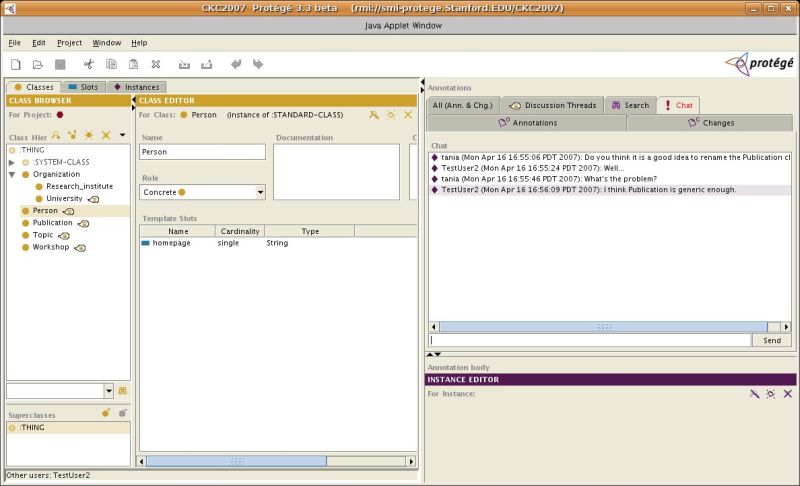
The main panel of the graphical user interface has been divided in two main panels (see image from below):
- The classical Protégé display (classes, properties and instances view) on the left side, and
- The collaborative panel on the right side.
The classical Protégé display shows the details of the different ontology components, such as classes, properties (slots) and instances. The collaborative panel adds functionality to support the collaborative development of ontologies.
The collaborative panel is made up of two types of tabs.
1. The Annotations, Changes and All tabs show information related to the selected item in the class tree. For example, if you select in the class tree the class Person, you will see in these tabs the annotations related to the class Person. In the InstanceTab of the main Protégé display, the collaborative panel is listening to the selection of the instances list (not the class tree). In this way, you may add annotations to the instances.
2. The Discussion Threads, Search and Chat tabs are generic tabs that do not listen to the selection of classes in the class tree.
The tabs in the collaborative panel are made up of a top component, which shows an annotation tree and a bottom component which shows the details of the selected annotation in the annotations tree.
It is possible to search in the annotations tree by using the search component at the bottom of the annotations tree panel. You may use the * wildcard character for your search. The searching is done on the annotation texts.
Another feature is the filtering of annotations or changes, which may be done by using the Filter component from the top of the annotations tree. You may choose between different types of filters that will be applied to the annotations tree: filtering by author, by annotation text, by annotation type or by creation date. The class tree in the main Protégé display shows a little call-out icon next to the class name if the class has any annotations or change annotations attached to it. In the Slots Tab and Instance Tab in the main Protégé display you will also see the call-out icon if a property (slot) or an instance have annotations attached to them.
Annotating classes, properties and instances
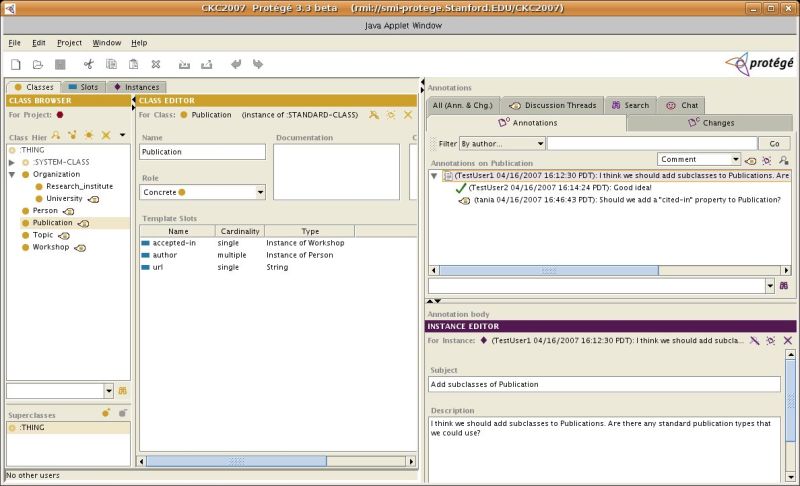
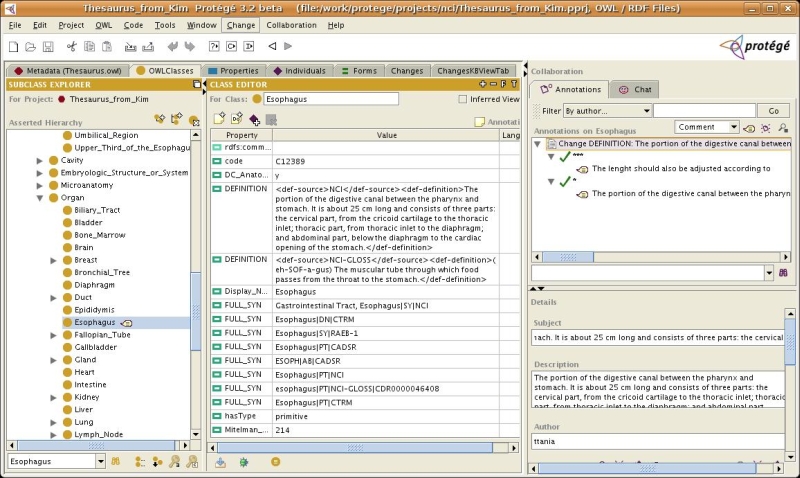
The Annotations tab in the collaborative panel, allows you to annotate the currently selected ontology component. By ontology component, we mean classes, properties (or slots) and instances. See image below.
The image shows an example of annotations attached to the Publication class. You may create discussion threads related to a particular ontology component (in the example, Publication class). There are different types of annotations that may be attached to an ontology component, such as comments, questions, examples, etc. It is also possible to create proposals and to allow other users to vote. Proposals and voting are described in the section below.
In order to create a new annotation, you have to first select an annotation type from the combo-box at the top of the Annotations tab. Then, you may choose to reply to an existing annotation by clicking on the call-out icon near the combo-box, or you may start a new discussion thread by clicking on the second icon (little rectangle). The third icon allows you to see the details of the annotation, such as the text of the annotation, the author and creation date.
Annotating changes
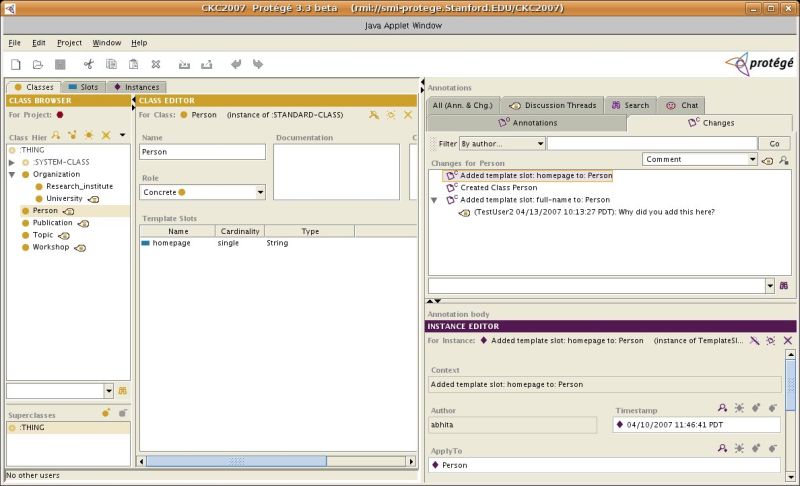
Collaborative Protégé is continuously tracking the changes that users are doing. You can see the changes related to a certain ontology component (for example, a class) in the Changes tab of the collaborative panel.
Besides annotating ontology components themselves, you may also annotate changes of the ontology. For example, you may comment on a class rename operation or on the addition of a property to a class, as show in the image below. Annotation of changes may be done in the Changes Tab in the collaborative panel (see image below).
If you want to create an annotation on a change, you have to first select an annotation type from the combo-box at the top of the Changes tab. Then, select a change in the annotations tree and click on the call-out icon next to the combo-box. The second icon allows you to see the details of the selected changes and annotations.
The All (Ann. & Chg.) tab allows you to see both the annotations and the changes related to a certain ontology component in an integrated view.
Discussion threads
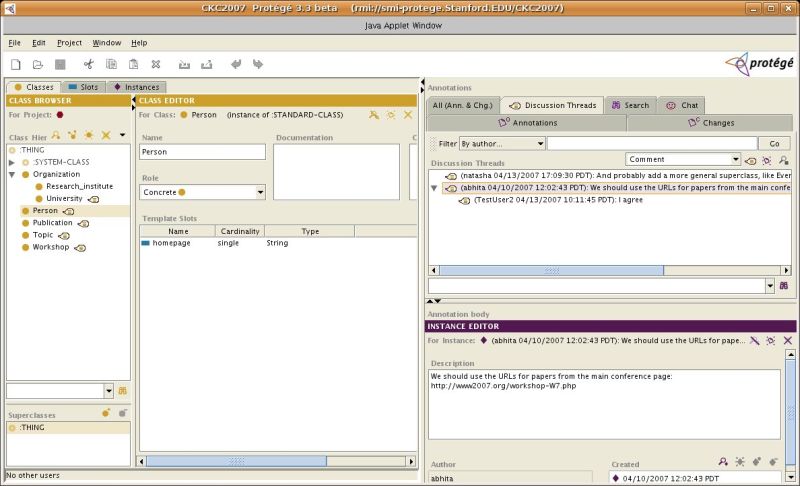
The Discussion Threads tab allows you to create generic discussion threads that are not necessarily related to a certain ontology component. The Discussion Threads tab is show in the image below.
First you need to select an annotation type from the combo-box at the top of the Discussion threads tab. If you want to start a new discussion thread, please use the Create icon at the top of the annotations tree (little rectangle icon). If you would rather reply to an existing message, please select first the annotation you would like to reply to and then click on the call-out icon. The view icon allows you to see the details of a certain message.
Proposals and Voting
Collaborative Protégé supports two different types of proposals and voting:
1. Agree / Disagree proposals, which users may vote with a Agree / Disagree vote 2. Five Stars Vote proposals and the corresponding Five Star voting.
Currently the prototype does not support workflows for proposals (such as starting and closing a proposal), but we intend to add this feature in the near future.
If you want to start a proposal, you can do this in one of the Annotations, Changes, All or Discussion Threads tabs. It is possible to start a proposal related to a certain ontology component, for example, a class. For this case, please create a proposal in the Annotations tab, after selecting the class in the Protégé classes tree. Then, select in the annotations type combo-box one of the AgreeDisagreeProposal or the FiveStarVoteProposal and click on the create annotation icon (little rectangle icon). You will see in the annotations tree a new node that has as an icon a little text file icon. You can see a screenshot of a proposal here.
It is also possible to start a proposal related to a change, which you can do in the Changes tab of the collaborative panel. If you want to start a generic proposal not related to a particular ontology component, you can do this in the Discussion Threads tab.
After you have created a proposal, other users may vote for it by selecting in the annotations type combo-box the corresponding vote type. Users may also comment their votes in the vote details pane at the bottom of the collaborative panel.
Searching
Besides the simple search functionality available in all the tabs of the collaborative panel, user may also do complex searches in the Search tab.
The Search tabs allows you to specify different types of searches that can be combined by an AND or OR condition:
1. Author name 2. Annotation text 3. Annotation type 4. Date
Once you click on the Search button, the results of the search are shown in the Search Results panel. You may see details on a certain result either in the bottom details panel or by clicking on the view icon from the top of the Search Results pane.
Chat with other users
You may chat with other users that are connected at the same time on the Protégé server. All the chat messages are broadcasted to all the users. You can see the users that are connected to the server in the task bar at the bottom of the main Protégé display.
If a chat message is received, while you are browsing another tab, the icon and font of the chat tab will change so that it attracts your attention. You can see this in the image from above. If there are no new messages in the Chat tab, you will see a smiley icon next to the Chat tab title, like here.
Configuring the collaborative components
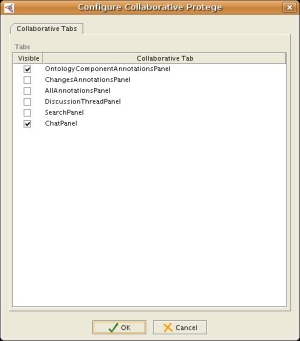
Starting with Protege 3.4 beta 109, it is possible to configure the collaborative tabs that will be displayed in Protégé. This can be done from the Collaboration menu -> Configure. In this way it is possible to enable and disable the collaborative tabs. After clicking on Configure, you will get the panel from below:
In this panel, enable the checkboxes corresponding to the tabs that you would like to see and disable the ones that you would like to hide. In the example from the screenshot, the user enabled the Annotations and the Chat tab and disabled the rest. After the configuration, the Protege display may look like in the figure below:
Contact and support
Collaborative Protégé is actively developed and supported. It is currently just a prototype that we intend to extend into a full-fledged web-based application for collaborative ontology development. All your feedback is welcome! Please send comments, questions and bug-reports to tudorache at stanford.edu.
Resources
For more information, please see the following links:
1. A short paper describing Collaborative Protégé 2. A short presentation of Collaborative Protégé 3. Protégé Client-Server Tutorial 4. Protégé user guides
