Difference between revisions of "SetUpEclipseForPlugin"
(New page: = Setting up Eclipse for plug-in development = This page is intended for people who want to develop their own plug-in (e.g., tab widget, slot widget, project plug-in, etc.) and who use Ec...) |
|||
| Line 8: | Line 8: | ||
#Download and install Eclipse from [http://www.eclipse.org/downloads/ here]. | #Download and install Eclipse from [http://www.eclipse.org/downloads/ here]. | ||
| − | #Download and install latest version of Protege 3.x from [http://protege.stanford.edu/download/download.html here]. | + | #Download and install latest version of Protege 3.x from [http://protege.stanford.edu/download/download.html here]. Let's say you have installed Protege in: |
== Setting up Eclipse == | == Setting up Eclipse == | ||
| + | |||
| + | '''Step 1. Start Eclipse and create a Java Project''' | ||
| + | |||
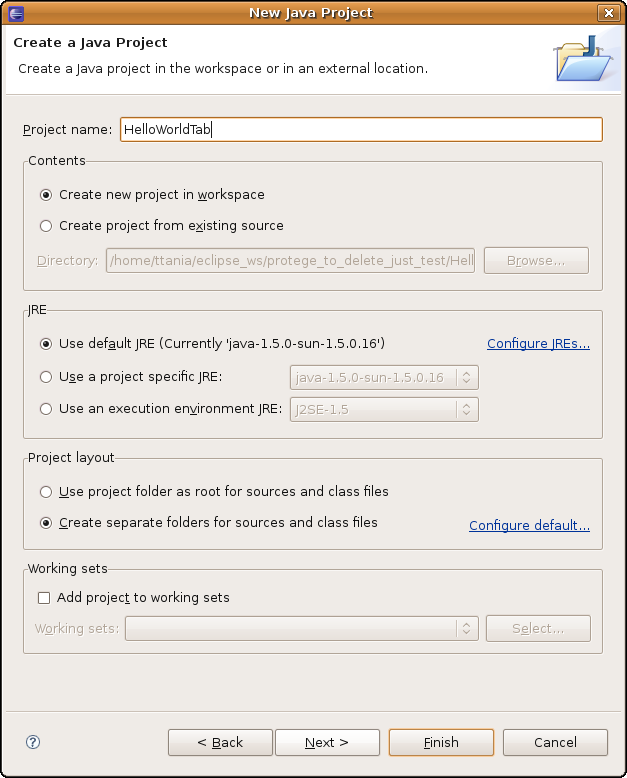
| + | Go to ''File Menu -> New -> Project'' -> Select ''Java Project''. Click ''Next''. In the next panel choose a project name, say "HelloWorldTab". The screen should look like below: | ||
| + | |||
| + | |||
| + | [[Image:Eclipse_plugin_new_project.png]] | ||
| + | |||
| + | |||
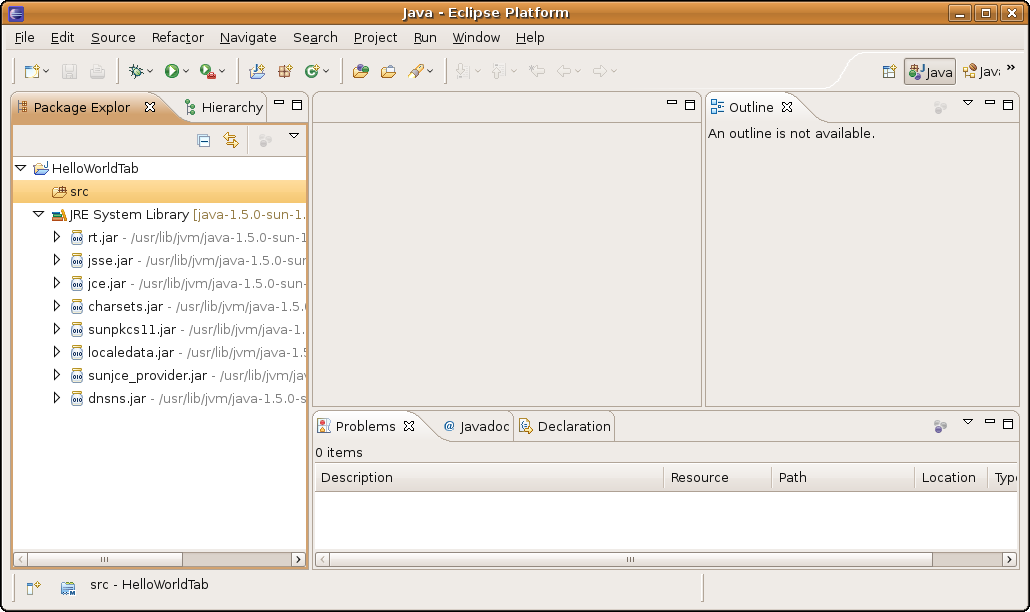
| + | Click ''Finish''. Congratulations! You have created an empty Java project. Your screen should look like: | ||
| + | |||
| + | |||
| + | [[Image:Eclipse_plugin_empty_project.png]] | ||
| + | |||
| + | |||
| + | ''Step 2. Configure the project build path'' | ||
| + | |||
| + | This step assumes that you have Protege 3.x installed on your computer. This example assumes that Protege was installed in ''/work/protege/Protege_3.4'' (On Windows machines, the default installation directory would be something like ''C:\Program Files\Protege_3.4'') | ||
Revision as of 16:14, March 19, 2009
Setting up Eclipse for plug-in development
This page is intended for people who want to develop their own plug-in (e.g., tab widget, slot widget, project plug-in, etc.) and who use Eclipse as their Java development environment. This is a step-by-step guide that shows the setup of the Eclipse environment using screen shots. We will use as an example the scenario in which a developer wants to create a tab widget that displays "Hello World!". These steps can be used for developing any plug-in type.
Prerequisites
Before we start, make sure that you have the latest version of Protege 3.x and Eclipse installed.
- Download and install Eclipse from here.
- Download and install latest version of Protege 3.x from here. Let's say you have installed Protege in:
Setting up Eclipse
Step 1. Start Eclipse and create a Java Project
Go to File Menu -> New -> Project -> Select Java Project. Click Next. In the next panel choose a project name, say "HelloWorldTab". The screen should look like below:
Click Finish. Congratulations! You have created an empty Java project. Your screen should look like:
Step 2. Configure the project build path
This step assumes that you have Protege 3.x installed on your computer. This example assumes that Protege was installed in /work/protege/Protege_3.4 (On Windows machines, the default installation directory would be something like C:\Program Files\Protege_3.4)

