Difference between revisions of "CompileProtege4InEclipse"
| (32 intermediate revisions by 2 users not shown) | |||
| Line 1: | Line 1: | ||
| − | + | '''''These instructions are out of date and not recommended. Try [[CompileProtege4InEclipseFromSvn|this version]] instead.''''' | |
| − | + | ||
| + | = Setup and run the Protege 4 OWL editor from Eclipse = | ||
This document is in progress. While it is not fully documented yet it | This document is in progress. While it is not fully documented yet it | ||
| Line 8: | Line 9: | ||
[[Protege4DevDocs#Protege-OWL_editor_in_a_Generic_IDE|generic ide instructions]]. | [[Protege4DevDocs#Protege-OWL_editor_in_a_Generic_IDE|generic ide instructions]]. | ||
| − | # Download the protege plug-ins with linked source. Currently these can be found [[http://protege.stanford.edu/ | + | # Download the protege plug-ins with linked source. Currently for Protege 4.0, these can be found [http://smi-protege.stanford.edu/protege4/Protege4SourcePlugins.zip here] (version information is [http://smi-protege.stanford.edu/protege4/Protege4SourcePluginsVersion.txt here]). The Protege 4.1 version can be found [http://smi-protege.stanford.edu/protege4/Protege41SourcePlugins.zip here] and we build these source bundles each night. |
| + | |||
| + | It is also possible to follow all of these steps by using the plugins from any installation of Protege 4 but these plugins-ins will not include the source. The minimal set of plugins needed is | ||
| + | ## org.protege.common.jar | ||
| + | ## org.protege.editor.core.application.jar | ||
| + | ## org.protege.editor.owl.jar | ||
| + | ## org.semanticweb.owl.owlapi.jar | ||
# Create a new eclipse workspace | # Create a new eclipse workspace | ||
# Click "File -> Import..." This will bring up a dialog box. | # Click "File -> Import..." This will bring up a dialog box. | ||
| Line 25: | Line 32: | ||
We now need to create a runnable. As far | We now need to create a runnable. As far | ||
| − | as I can tell Mac users cannot get the following steps to work. It is | + | as I can tell Mac users cannot get the following steps to work. It is possible |
that this does work on intel macs but I have not been able to test this. | that this does work on intel macs but I have not been able to test this. | ||
| − | There are claims made on the web saying that this issue is solved. | + | There are claims made on the [http://www.eclipse.org/swt/faq.php#swtawtosx web] saying that this issue is solved. |
| − | + | [[SwingSwtProblems]] describes the results of my current experiments on this issue. Mac users need to | |
use an [[#Creating_a_Runnable_for_OS_X| alternative method]]. | use an [[#Creating_a_Runnable_for_OS_X| alternative method]]. | ||
| + | |||
| + | User Remark: The following with Eclipse-3.5-cocoa for MacOSX10.5.8 works fine for me, | ||
| + | just 1 problem: The placement of views always crashes protege. | ||
Windows and Linux users now do the following to make a runnable. | Windows and Linux users now do the following to make a runnable. | ||
| Line 44: | Line 54: | ||
== Creating a Runnable for OS X == | == Creating a Runnable for OS X == | ||
| − | + | You would really rather not be reading these instructions. But Apple's java has always been an issue for several reasons. Here are some workarounds that I have not yet been able to try. (I am on a powerbook and none of the ideas that follow apply yet.) It is possible | |
| − | + | that one of these workarounds might enable you to follow the | |
| − | http://smi-protege.stanford.edu/ | + | directions for linux or windows above. |
| − | + | ||
| − | + | First, make sure you are using the latest version of eclipse. The | |
| − | + | eclipse folk have marked the relevant bug as closed so all issues fall | |
| − | + | to the Cupertino folk. In addition, try using Apple's latest Java 6. | |
| − | + | It may be that this version works fine with the eclipse OSGi | |
| + | emulation. Finally, if none of the above work, you could try | ||
| + | openjdk through [http://www.macports.org/ macports]. This is promising and I | ||
| + | expect a version of openjdk will be available for my machine in the | ||
| + | very near future. Any information you can provide about whether any | ||
| + | of the above steps work would be appreciated. | ||
| + | |||
| + | Ok - if you get here we will have to resort to using ant to deploy | ||
| + | your plugin to a Protege distribution. This method will require that | ||
| + | you download a Protege 4 distribution. Since Protege 4.1 is not quite | ||
| + | released yet, I have included a Protege 4.1 distribution [reference here]. | ||
| + | I will describe this in two steps. First I will describe how you run | ||
| + | the Protege distribution in eclipse and then I will describe how you | ||
| + | compile your plugin into the distribution. | ||
| + | |||
| + | === Step 1: Running Protege from Eclipse === | ||
| + | |||
| + | First obtain a Protege.app distribution. These will be included with | ||
| + | the releases but before the release is out you can obtain a Protege 4.0 version [http://smi-protege.stanford.edu/protege4/Protege-4.1-app.zip here] and a Protege 4.1 version | ||
| + | [http://smi-protege.stanford.edu/protege4/Protege-4.1-app.zip here]. The Protege 4.1 version is built nightly. Place this application in | ||
| + | some memorable location. | ||
| + | |||
| + | Click on debug configurations. | ||
| + | |||
| + | [[File: Protege41InEclipseDebugConfigurations.png]] | ||
| + | |||
| + | Make a runnable (give it any name you like) and set the main class to | ||
| + | be org.apache.felix.main.Main. | ||
| + | |||
| + | [[File: Protege41InEclipseRunnableMainTab.png]] | ||
| + | |||
| + | In the arguments tab set the vm arguments as follows: | ||
| + | <pre> | ||
| + | -Dfelix.config.properties=file:config.properties | ||
| + | -Dlog4j.configuration=file:log4j.xml | ||
| + | -Dorg.protege.plugin.dir=Java/plugins | ||
| + | -Djavax.xml.parsers.DocumentBuilderFactory=com.sun.org.apache.xerces.internal.jaxp.DocumentBuilderFactoryImpl | ||
| + | </pre> | ||
| + | and set the working directory to be the Contents/Resources directory | ||
| + | underneath the Protege.app distribution (use the "File System..." button). | ||
| + | |||
| + | [[File: Protege41InEclipseRunnableArgsTab.png]] | ||
| + | |||
| + | Finally, nearly home now!, in the class path tab remove any existing | ||
| + | class path entries under the user entries and add, using the external | ||
| + | jars button, crimson.jar and felix.jar. Both of these are found in | ||
| + | the Contents/Resources/Java directory underneath the Protege.app distribution. | ||
| + | |||
| + | [[File: Protege41InEclipseRunnableClassPathTab.png]] | ||
| + | |||
| + | === Step 2: Including your plugin in the distrubtion === | ||
| + | |||
| + | So this is all fine. But presumably the reason that you are following | ||
| + | these instructions is that you are building some plugin and would like | ||
| + | to be able to debug its operation. To do this you will need to have | ||
| + | some way of running and debugging Protege with the plugin installed. | ||
| + | To follow the instructions that follow you will need an ant build | ||
| + | file. Fortunately this is easy, we have a | ||
| + | [http://smi-protege.stanford.edu/repos/protege/protege4/protege-base/trunk/etc/template-plugin-build.xml template] which usually requires only trivial modification. There is | ||
| + | some discussion of this [[Provege...here]]. This script has undergone | ||
| + | some modifications so it is important to be using the version of this | ||
| + | script that has the build.properties line in it (16th line of the | ||
| + | template just below the property environment declaration in it). | ||
| + | |||
| + | So the first thing is to add a menu item in eclipse that will install | ||
| + | your plugin in the distribution.<br/> | ||
| + | |||
| + | [[File:Protege41InEclipseAntConfigurationMenu.png]] | ||
| + | |||
| + | <br/>Create a new ant build configuration, name it and choose the build file for your plugin project.<br/> | ||
| + | |||
| + | [[File:Protege41InEclipseAntMainTab.png]] | ||
| + | |||
| + | <br/>Make sure that the right target is chosen in the Targets tab<br/> | ||
| + | |||
| + | [[File:Protege41InEclipseAntTargetsTab.png]] | ||
| + | |||
| + | <br/>And finally the key step is to ensure that the PROTEGE_HOME environment variable is set in the ant environment tab.<br/> | ||
| + | |||
| + | [[File:Protege41InEclipseAntEnvironmentTab.png]] | ||
| − | + | Now you can run the install script and then when you debug/run Protege you will be able to debug the plugin. | |
| − | |||
Latest revision as of 11:39, December 3, 2012
These instructions are out of date and not recommended. Try this version instead.
Contents
Setup and run the Protege 4 OWL editor from Eclipse
This document is in progress. While it is not fully documented yet it does represent the recommended way to set up a protege 4 environment in eclipse. If this documentation is insufficient the fall back is to go to the generic ide instructions.
- Download the protege plug-ins with linked source. Currently for Protege 4.0, these can be found here (version information is here). The Protege 4.1 version can be found here and we build these source bundles each night.
It is also possible to follow all of these steps by using the plugins from any installation of Protege 4 but these plugins-ins will not include the source. The minimal set of plugins needed is
- org.protege.common.jar
- org.protege.editor.core.application.jar
- org.protege.editor.owl.jar
- org.semanticweb.owl.owlapi.jar
- Create a new eclipse workspace
- Click "File -> Import..." This will bring up a dialog box.
- Choose "Plug-in Development -> Plug-ins and Fragments" and click "Next". This will bring up a dialog box.
- Unselect "The target platform (as specified in the Preferences)"
- Click the browse button and browse to the directory where you downloaded the protege plug-ins with linked source
- Don't worry about the warning at the top of the dialog box. The "Plug-ins and Fragments to Import" box should say "Select from all plug-ins..." and the "Import As" box should say "Binary projects".
- Click next bringing up a new dialog box.
- Click "Add All".
- Click "Finish"
This is a milestone. You should now see the Protege bundles as imported Plug-in projects.
Creating a Runnable for Windows or Linux
We now need to create a runnable. As far as I can tell Mac users cannot get the following steps to work. It is possible that this does work on intel macs but I have not been able to test this. There are claims made on the web saying that this issue is solved. SwingSwtProblems describes the results of my current experiments on this issue. Mac users need to use an alternative method.
User Remark: The following with Eclipse-3.5-cocoa for MacOSX10.5.8 works fine for me, just 1 problem: The placement of views always crashes protege.
Windows and Linux users now do the following to make a runnable.
- Click "Run -> Debug Configurations". This will bring up a dialog box.
- Select "OSGi Framework" and click the "New" Icon at the top.
- Name the "New_Configuration" something useful like "Protege".
- In the Bundles box, scroll down to where it says "Target Platform". Unselect all the bundles from the target platform (one click to the left of "Target Platform")
- Click on "Add Required Bundles".
- Click "Apply" to save your changes.
- Click "Debug" and Protege should come up.
Windows and Linux users should now be able to easily use eclipse to develop their plug-ins. To start a new bundle just create a new Eclipse Plug-in project. These projects will automatically get attached to the Protege runnable.
Creating a Runnable for OS X
You would really rather not be reading these instructions. But Apple's java has always been an issue for several reasons. Here are some workarounds that I have not yet been able to try. (I am on a powerbook and none of the ideas that follow apply yet.) It is possible that one of these workarounds might enable you to follow the directions for linux or windows above.
First, make sure you are using the latest version of eclipse. The eclipse folk have marked the relevant bug as closed so all issues fall to the Cupertino folk. In addition, try using Apple's latest Java 6. It may be that this version works fine with the eclipse OSGi emulation. Finally, if none of the above work, you could try openjdk through macports. This is promising and I expect a version of openjdk will be available for my machine in the very near future. Any information you can provide about whether any of the above steps work would be appreciated.
Ok - if you get here we will have to resort to using ant to deploy your plugin to a Protege distribution. This method will require that you download a Protege 4 distribution. Since Protege 4.1 is not quite released yet, I have included a Protege 4.1 distribution [reference here]. I will describe this in two steps. First I will describe how you run the Protege distribution in eclipse and then I will describe how you compile your plugin into the distribution.
Step 1: Running Protege from Eclipse
First obtain a Protege.app distribution. These will be included with the releases but before the release is out you can obtain a Protege 4.0 version here and a Protege 4.1 version here. The Protege 4.1 version is built nightly. Place this application in some memorable location.
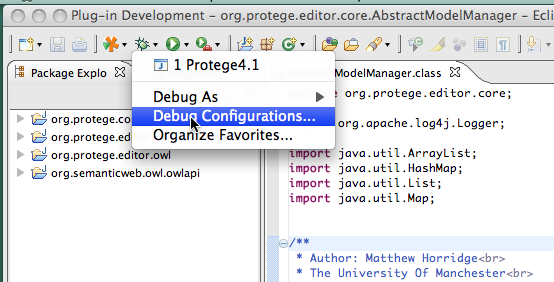
Click on debug configurations.
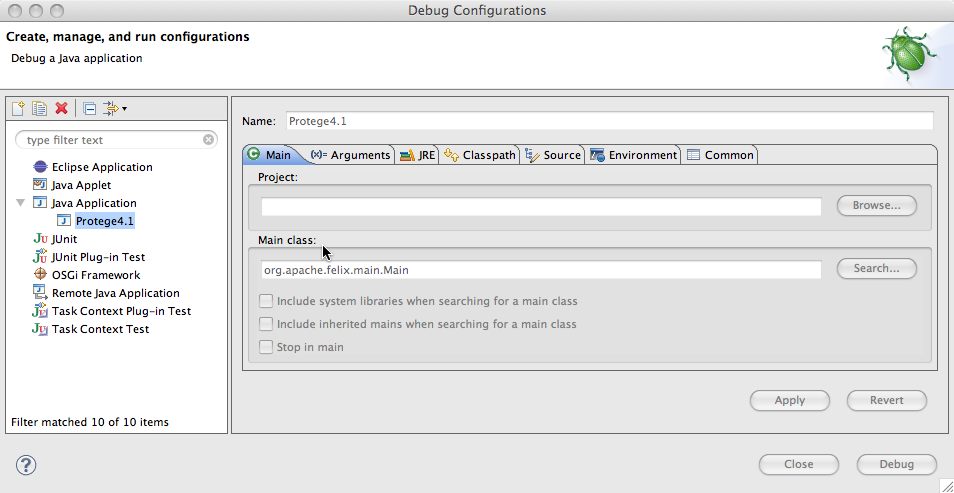
Make a runnable (give it any name you like) and set the main class to be org.apache.felix.main.Main.
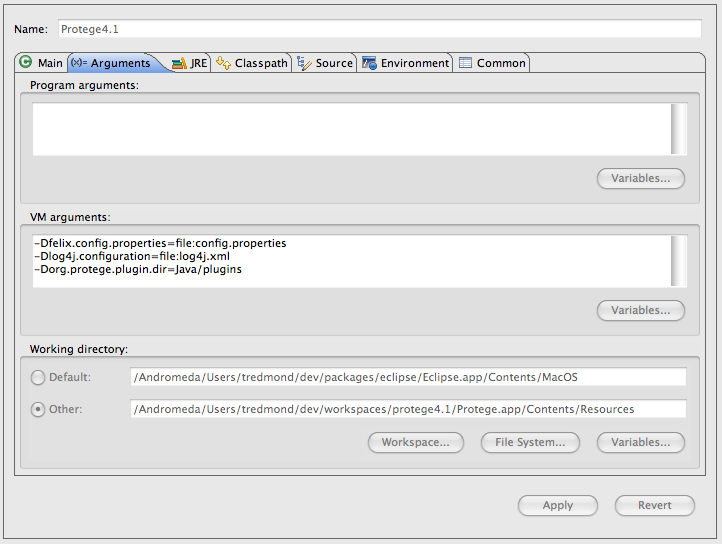
In the arguments tab set the vm arguments as follows:
-Dfelix.config.properties=file:config.properties
-Dlog4j.configuration=file:log4j.xml
-Dorg.protege.plugin.dir=Java/plugins
-Djavax.xml.parsers.DocumentBuilderFactory=com.sun.org.apache.xerces.internal.jaxp.DocumentBuilderFactoryImpl
and set the working directory to be the Contents/Resources directory underneath the Protege.app distribution (use the "File System..." button).
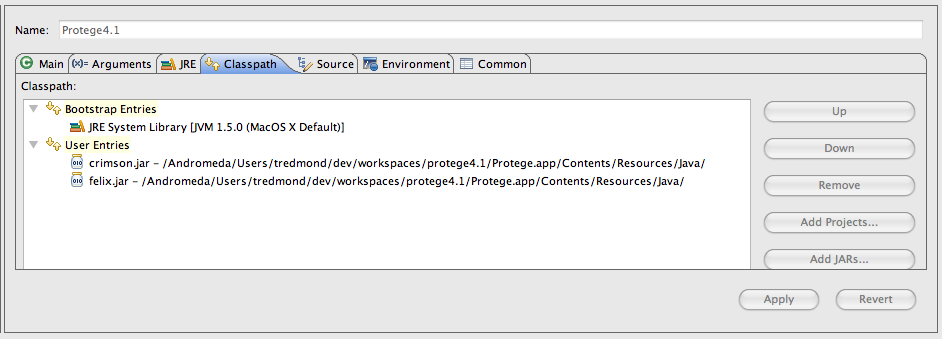
Finally, nearly home now!, in the class path tab remove any existing class path entries under the user entries and add, using the external jars button, crimson.jar and felix.jar. Both of these are found in the Contents/Resources/Java directory underneath the Protege.app distribution.
Step 2: Including your plugin in the distrubtion
So this is all fine. But presumably the reason that you are following these instructions is that you are building some plugin and would like to be able to debug its operation. To do this you will need to have some way of running and debugging Protege with the plugin installed. To follow the instructions that follow you will need an ant build file. Fortunately this is easy, we have a template which usually requires only trivial modification. There is some discussion of this Provege...here. This script has undergone some modifications so it is important to be using the version of this script that has the build.properties line in it (16th line of the template just below the property environment declaration in it).
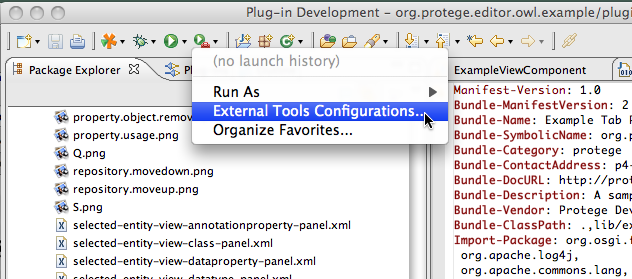
So the first thing is to add a menu item in eclipse that will install
your plugin in the distribution.
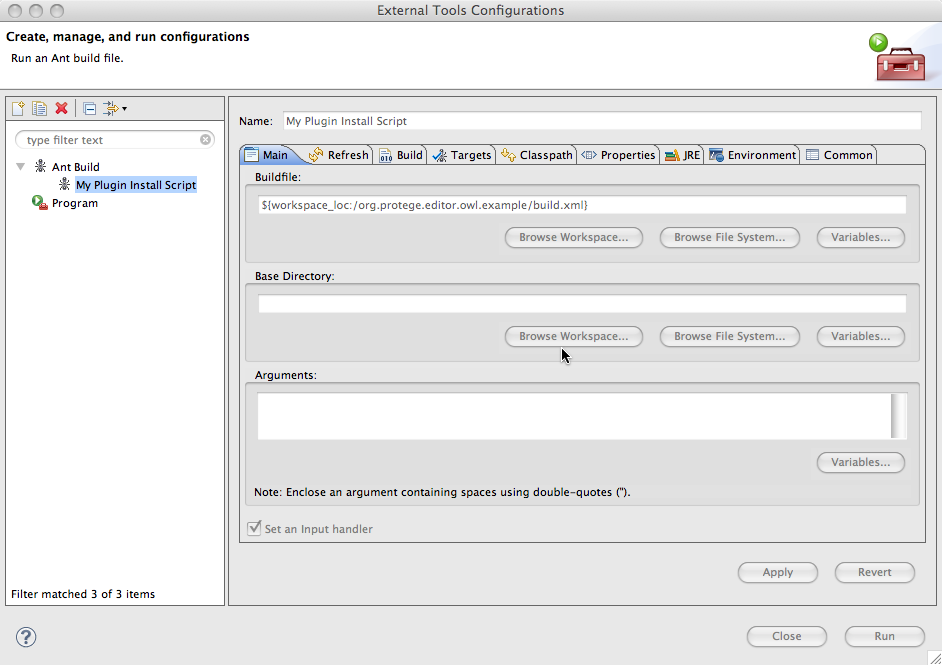
Create a new ant build configuration, name it and choose the build file for your plugin project.
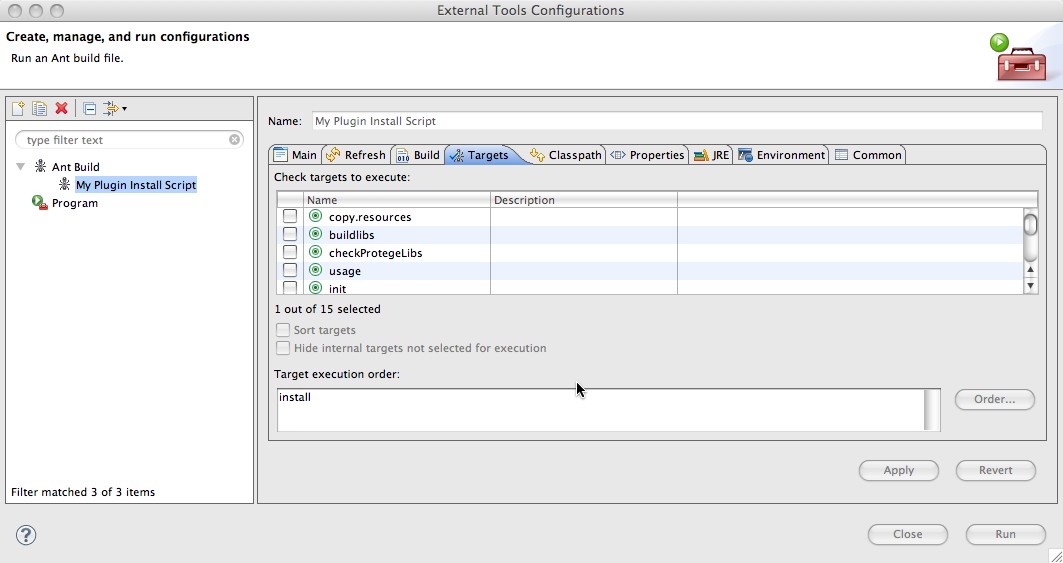
Make sure that the right target is chosen in the Targets tab
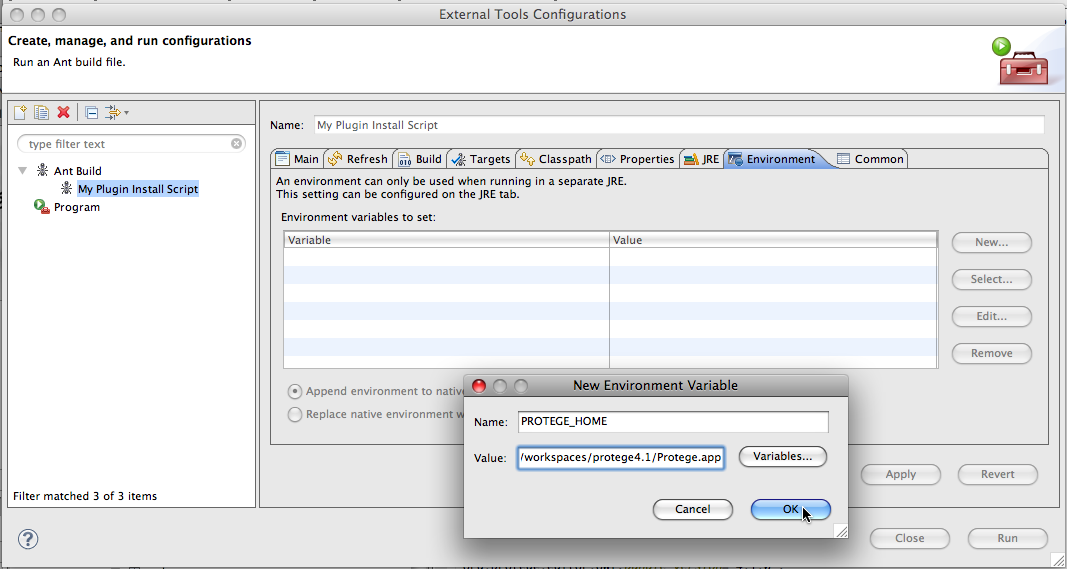
And finally the key step is to ensure that the PROTEGE_HOME environment variable is set in the ant environment tab.
Now you can run the install script and then when you debug/run Protege you will be able to debug the plugin.
