WebProtege1.0AdminGuide
This page refers to an older version of WebProtege (release 1.0). Please follow the links from the main WebProtege wiki page to get to documentation for the latest WebProtege.
WebProtégé 1.0 Administrator's Guide
Contents
Go back to WebProtégé main page.
Find here instructions on how to move your ontology to the new WebProtege server (http://webprotege.stanford.edu)
Introduction
This page describes the administration and installation for the WebProtege 1.0 (that works with Protege 3.x series).
WebProtégé is a web application that runs in a servlet container, such as Tomcat. WebProtégé comes as a war file that can be easily deployed in a servlet container.
There are two ways to install and run WebProtégé:
- Local Mode: WebProtégé loads the ontologies from a standalone instance of Protégé running in a servlet container (default mode), or
- External Server Mode: WebProtégé loads the ontologies from a Protégé server running outside of the servlet container, and acts as a web-based client connecting to the Protégé server (see more information about the client-server version of Protégé here). This WebProtégé mode of operation is also sometimes called the client-server mode.
WebProtégé WAR file
The WebProtégé WAR file is available for download from here:
Unzip the file to get the war file. If you are using the external server mode mode of WebProtégé, then please check the Protégé - WebProtégé compatibility table from below and make sure that the Protégé server and WebProtégé are compatible.
Install WebProtégé - Local mode
In Local Mode, WebProtégé loads the ontologies from a standalone instance of Protégé running in a servlet container, such as Tomcat. WebProtégé will NOT use the Protégé server to manage ontology loading. The Local Mode is the default mode of operation for WebProtégé.
Deploy the WebProtégé WAR file
Deploy the WebProtégé WAR file into your Servlet container. The procedure for doing this will be specific to which Servlet container you are using. At BMIR, we are currently using the latest version of Tomcat 5.5. If you are also using Tomcat, you can use the following steps to deploy:
- Start Tomcat
- Copy webprotege.war into the webapps folder
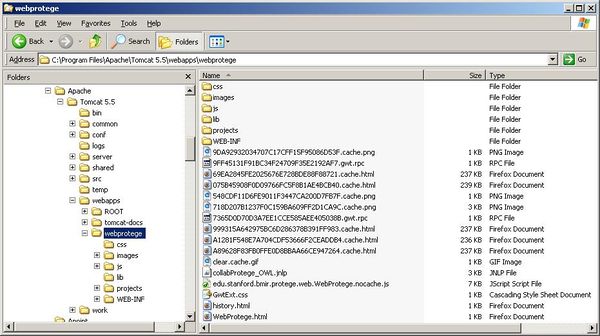
Tomcat will unpack the WAR file and the exploded file structure should look something like the following:
Next, you can optionally configure the metaproject, or proceed to the section on testing your installation.
Configure the metaproject
By default, WebProtégé will display a list of example ontologies that are available for the user to edit on the My WebProtégé page. If you want to edit the list of available ontologies, you need to edit the metaproject. The metaproject is a frame-based ontology that models permissions and controls which projects are displayed to the user, as well as which users have access to which projects. A more detailed explanation of the metaproject is available in the Protégé Client-Server Tutorial.
Please note that this step is optional and only needs to be performed when you want users to have access to ontologies other than the examples provided with the default installation.
To edit the metaproject, launch the Protégé application and open metaproject.pprj, located in <your-servlet-container>/webprotege/projects/metaproject.
Any time you make edits to the metaproject, you must restart your Servlet container for WebProtégé to detect changes.
If you decided to make changes to the metaproject, please restart your Servlet container and then proceed to the section on testing your installation.
Install WebProtégé - External Server Mode
In External Server Mode, WebProtégé loads the ontologies from a Protégé server running outside of the servlet container, and acts as a web-based client connecting to the Protégé server (see more information about the server/client version of Protégé here).
Other clients, such as Collaborative Protégé can connect to the same Protégé server, and browse and edit the same ontology. All edits made in either client will immediately be seen in the other clients.
Protégé Standalone Application
You need to download the Protégé standalone application only if you decide to use the External Server Mode!
If you are using the External Server Mode, WebProtégé loads the ontologies from the Protégé server. If you want to run WebProtégé with the Protégé server, you need to install a version of the standalone Protégé application. If you are unfamiliar with the Protégé server and would like to learn more, a detailed tutorial is available on this wiki.
If you are a new user, please register before downloading Protégé. For existing users, Protégé is available on the download page of the main Protégé website.
Please make sure to download the proper compatible version of Protégé standalone:
| Protégé standalone | WebProtégé |
|---|---|
| Protégé 3.5 or newer release |
WebProtege 1.0 (2013-Apr-25) |
| Protégé 3.4.8 release Protégé 3.5 beta or newer release |
WebProtege 1.0 RC1 (2012-Sept-19) |
| Protégé 3.4.6 release |
0.5 beta, build 501 (2011-May-28) |
| Protégé 3.4.4 release |
0.5 alpha, build 300 (2010-May-12) |
| Protégé 3.4.1 release |
0.5 alpha, build 200 (2009-Aug-14) |
| Protégé 3.4 release |
0.5 alpha, build 102 (2009-Apr-03) |
| Protégé 3.4 beta, build 513 | 0.5 alpha, build 101 (2008-Oct-25) |
Configure the Protégé server's metaproject
The Protégé server controls the list of projects that users see in WebProtégé. It also controls which users have access to which projects. Administrators can modify this information in the "metaproject", which is a frame-based ontology that models permissions. A more detailed explanation of the metaproject is available in the Protégé Client-Server Tutorial.
Launch Protégé and open the metaproject.pprj file located in the examples/server directory. Please note that you must use a version of the Protégé application that is compatible with the build of WebProtégé you are using. There is a version dependency table at the top of this guide.
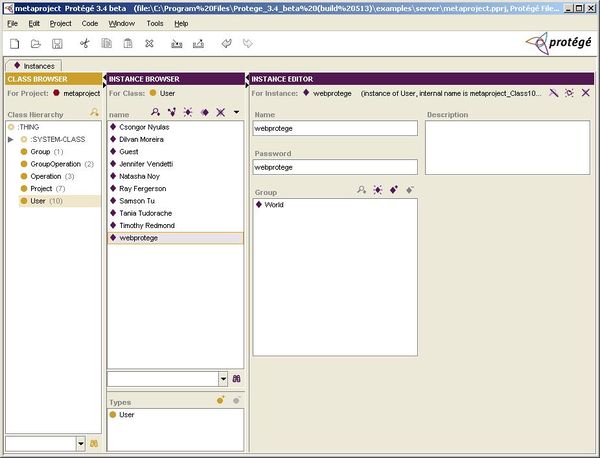
Select the User class in the Class Hierarchy and click the Create Instance button in the Instance Browser pane to create a new user. Fill in "webprotege" as the Name and Password for this user. This user is used internally by WebProtégé when communicating with the Protégé server. To follow is a screenshot of the metaproject after this edit:
At this point, you can also add new users and/or delete any example users that come with the default installation of Protégé. You can also click on the Project class to configure the list of projects that will be available to users of WebProtégé. Please note that the Location property for projects should be relative the the directory where the Protégé server is running (the root directory of your Protégé installation).
Don't forget to save your changes to the metaproject before continuing with the next steps.
Start the Protégé server
WebProtégé requires an instance of the Protégé server to be running. Detailed instructions for starting the server are provided in the Protégé Client-Server Tutorial.
There is a known issue with Java 1.6.0_29 and Java 1.7 related to starting the Protégé server. Read more here.
Deploy the WebProtégé WAR file
Deploy the WebProtégé WAR file into your Servlet container. The procedure for doing this will be specific to which Servlet container you are using. At BMIR, we are currently using the latest version of Tomcat 5.5. If you are also using Tomcat, you can use the following steps to deploy:
- Start Tomcat
- Copy webprotege.war into the webapps folder
Tomcat will unpack the WAR file and the exploded file structure should look like the following:
Edit the protege.properties file
Open the protege.properties file, located in <your-servlet-container>/webprotege. Edit the following property by changing the value from false to true:
load.ontologies.from.protege.server=true
Save your changes and restart your Servlet container.
Configure the Collaborative Protégé JNLP file (optional)
If you are running WebProtégé in the External Server Mode, users may launch a Protégé desktop client using Java Web Start technology. This means that users can browse and edit the same ontology both in a desktop application and in a web browser. Changes made in either client (desktop or WebProtégé) will immediately be seen by the other clients.
In order for this functionality to work properly, it is necessary to edit the collabProtege_OWL.jnlp file in the root directory of the WebProtégé application. Edit the codebase attribute in the JNLP file to match the base URL of WebProtégé on your server:
<jnlp spec="1.5+" codebase="http://localhost:8080/webprotege" href="collabProtege_OWL.jnlp">
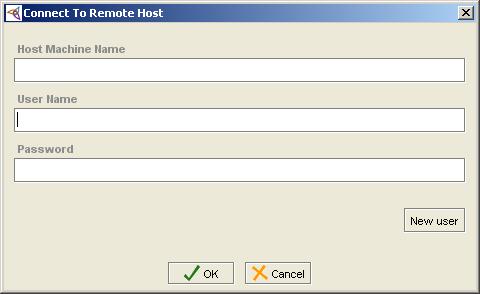
If a user launches a Protégé client, they are presented with a dialog that requires them to enter the host machine name:
It is easier for users if the host machine name is auto-filled. This can be configured by uncommenting the argument element in application-desc and filling in your host machine name. An example is provided in the default installation:
<application-desc main-class="edu.stanford.smi.protege.Application">
  <!-- <argument>-propedu.stanford.smi.protege.server.ServerPanel.host_name=bmir-protege-dev1.stanford.edu:5200</argument> -->
  <argument>-propui.welcomedialog.start.in.server.panel=true</argument>
  <argument>-propserver.client.preload.skip=true</argument>
  <argument>-propedu.stanford.smi.protege.server.ServerPanel.user_name=Your_user_name_here</argument>
</application-desc>
Test the WebProtégé installation
After you have completed all of the installation steps, launch a Web browser and enter the following URL:
http://your-host-name[:your-optional-port-name]/webprotege/WebProtege.html
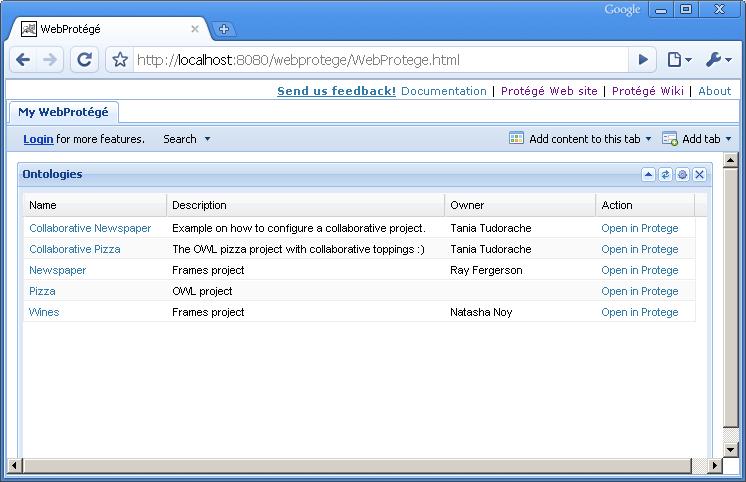
If you have successfully installed WebProtégé, you will see the My WebProtégé tab with the list of available ontologies for users to edit:
WebProtégé configuration
Configuring projects, users and access policies
In both running modes (local and external server), you may configure the projects loaded into WebProtégé (the ones shown in the My WebProtégé tab), the users and their groups, and the access policies for each project. These configurations are made in the metaproject file.
We have very detailed instructions on how to configure the metaproject in this user guide.
In Local Mode, the metaproject is located by default in <your-servlet-container>/webapps/webprotege/projects/metaproject. In External Server Mode, the metaproject is located by default in the Protégé installation directory where you started the Protégé server/examples/server subfolder.
The access policies currently enforced in WebProtégé are the Read,Write and DisplayInProjectsList policies.
Note. If you run WebProtégé in the External Server Mode, the metaproject from '<your-servlet-container>/webapps/webprotege/projects/metaproject has no function. This metaproject is only used if you run in Local Mode. The metaproject used by the External Server Mode is the one used by the Protégé server.
Configuring the WebProtégé operation
You may configure other parameters of the WebProtégé operation by editing the protege.properties from the <your-servlet-container>/webapps/webprotege/war folder.
Below is a list of supported properties.
# Set to true to use WebProtégé in external server (client-server) mode; default false
load.ontologies.from.protege.server=true

# In local mode, you may specify an alternative location for the metaproject
local.metaproject.path=/tmp/metaproject.pprj

# Hostname of the Protégé server to be used if WebProtégé runs in external server (client-server) mode. It can also contain a port number
server.hostname=localhost

# User name that WebProtégé uses to connect to the Protégé server, if WebProtégé runs in external server (client-server) mode
webprotege.user=webprotege

# Password that WebProtégé uses to connect to the Protégé server, if WebProtégé runs in external server (client-server) mode
webprotege.password=webprotege

# Automatic save interval for the projects, if WebProtégé runs in local mode (recommended to use database backend)
server.save.interval.sec=120
Configuring the user interface layout
All the layout in WebProtégé is configurable: all the tabs, the layout of the tabs, portlets, etc. can be configured, so that WebProtégé can be customized for different projects.
The layout configuration is described on this page.
Run WebProtege over https
To run WebProtege over https there are a few easy configurations that need to be done, which are documented on this page.
Troubleshooting
Always look first at the log files
WebProtégé tries to help you by writing out log messages when something goes wrong. If you report a problem on the mailing list, please make sure that you also include the log files, otherwise it is hard for us to help.
Location of log files:
- Servlet container: Check the documentation of your servlet container to get the log files location. In Tomcat, the logs are in the <tomcat_install_folder>/logs/catalina.out
- Protégé server: If you are running WebProtégé in External Server Mode, then the Protégé server will print out messages in the console where you have started the Protégé server using the run_protege_server script. Always look there first. The Protégé server log files are located in the folder where you started the Protégé server in the logs subfolder.
When start WebProtégé, you should see a message printed in the servlet container log file (catalina.out in Tomcat):
Local mode:
WebProtégé running in: /usr/share/tomcat5.5/webapps/web-protege/web-protege/war/
Path to local metaproject: /usr/share/tomcat5.5/webapps/web-protege/war/projects/metaproject/metaproject.pprj
WebProtégé server running with local projects
External server mode:
WebProtégé running in: /usr/share/tomcat5.5/webapps/web-protege/web-protege/war/
WebProtégé server running with remote projects loaded from the Protégé server: localhost
Troubleshooting the Local Mode
1. No ontologies are showing up in My WebProtégé tab
If this is a default configuration, then the metaproject used to configure the projects is located in: <your-servlet-container>/webapps/webprotege/projects/metaproject.
Check the servlet container log (e.g., catalina.out) to see where the metaproject is loaded from (see above). If you have changed the default location of the local metaproject in the protege.properties file, then make sure that the file exist and is loaded from that location. If it is not found, you will see an error log message.
Check the access policies in the metaproject. If you are not logged into WebProtégé, the projects shown in the My WebProtégé tab are the ones that the group World has access to. Make sure that the group World has the Read and DisplayInProjectList access policies attached to the projects you want to see by default in My WebProtégé tab.
Restart the servlet container to see the changes.
2. Cannot open project error, or project is empty
This usually happens when the path of a project in the metaproject is wrong. Check the servlet container log. You will see something like:
Loading project Pizza from file:/work/src/GWT/web-protege/web-protege/war/projects/pizza_does_not_exist/pizza.owl.pprj
SEVERE: Unable to load project from: file:/work/src/GWT/web-protege/web-protege/war/projects/pizza_does_not_exist/pizza.owl.pprj -- Project.getProjectInstancesReader()
WARNING: There were errors at loading project Pizza Errors: [edu.stanford.smi.protege.util.MessageError@300a3c] -- ProjectManager.openProjectLocal()
Fix the path of the project in the metaproject, restart WebProtégé and the servlet container, and try again.
Troubleshooting the External Server Mode
1. Cannot not start the Protégé server
Please refer to the troubleshooting section of the client-server Protégé.
2. No ontologies are showing up in My WebProtégé tab
Check the servlet container and the Protégé server logs for error messages.
Check the access policies in the metaproject. If you are not logged into WebProtégé, the projects shown in the My WebProtégé tab are the ones that the group World has access to. Make sure that the group World has the Read and DisplayInProjectList access policies attached to the projects you want to see by default in My WebProtégé tab.
Restart the Protégé server and the servlet container to see the changes.
3. You get a message in a window saying that "Load project XYZ failed."
Please check the following things in this order:
- Check the servlet container and the Protégé server logs for error messages.
- Check that the Protégé server is still running. Look in the Protégé server log for exceptions. You may see some of the following messages:
WARNING: Missing project at examples/newspaper/newspaper.pprj -- Server.getAvailableProjectNames()
This means that the project path is misconfigured in the metaproject. Fix the path and restart the Protégé server and the servlet container to see the changes.
WARNING: Failed to open project: Session(id=3, user=webprotege) tried to open project Collaborative Pizza, but project is closed for maintenance -- Server.openProject()
This means that the project is closed for maintainance. To check and change the status of a project on the Protégé server, you can use the Server Admin application
java.lang.OutOfMemoryError: Java heap space
This means that the Protégé server has run out of memory. You need to increase the heap size available to the Protégé server in the run_protege_server script. Edit the line that contains the -Xmx500M and increase the amount of memory. We have some recommendations about setting the heap size here. It is also not recommended that you use a file backend on the Protégé server, but rather use a database backend, that decreases the amount of memory needed and it is much safer in the case the Protégé server or the machine crashes. More information about this here.
In any of these cases, restart the Protégé server and the servlet container to see the changes.
You may see other exceptions in the log, which should give you an idea what went wrong. If you report a problem on the Protégé mailing lists, make sure to include the logs in your post.
- If you do not see any exceptions in the logs, then start a Protégé desktop client and connect to the Protege server that is also used by WebProtégé. Instructions on how to connect a Protégé client to a Protégé server are available here. Try to log in with the WebProtégé user and password (default user name: webprotege, password: webprotege). If you cannot log in, it means that you have forgot to create a user and password webprotege in the metaproject. (This only applies for the case in which you run WebProtégé in External Server Mode).
Another thing that might go wrong is that the Protégé jars used by WebProtégé and the Protégé server versions are not the same. Please look on this wiki page in the Install section for the table of correspondence between the WebProtégé release and the Protégé serve versionr. Make sure that you are running compatible Protégé server and WebProtégé versions.
4. Cannot log in WebProtégé
Probably you are trying to connect with the wrong user/password combination. To test this, start a Protégé desktop client and connect to the Protégé server that is also used by WebProtégé. Instructions on how to connect a Protégé client to a Protégé server are available here. Try to log in with the user name and password that you tried in WebProtégé. If you do not succeed, then check the Protégé server metaproject, to check the valid user/password combination. If you do succeed, then check the Protégé server logs and the servlet container logs for any other error messages.
Where to get more help
If you have trouble installing WebProtégé, please send email to the WebProtege mailing list.
It is difficult for us to help in the absence of error messages. Please check the log files for your Servlet container and include the text of any exceptions written out.
If you are unsure how to subscribe to our mailing lists, please see the Mailing Lists section of our FAQ.


