Difference between revisions of "Protege4GettingStarted"
Nickdrummond (talk | contribs) |
(performing incremental save of new edits) |
||
| Line 1: | Line 1: | ||
| − | < | + | <div class="orangeBox"> |
| + | <span class="orangeBoxTitle">Getting Started with Protege-OWL</span><br /><br /> | ||
| + | This page contains instructions for getting started with the Protege-OWL editor in Protege 4.0. | ||
| + | </div><br /> | ||
| − | + | __TOC__ | |
| − | + | ||
| − | < | + | == Download == |
| − | < | + | |
| − | < | + | If you haven't already done so, you need to download and install Protege 4.0 from the Protege website. If you are a new user, please go to the main download page and register first, which helps us to track the number of Protege users: http://protege.stanford.edu/download/download.html. |
| − | < | + | |
| − | < | + | If you are an existing user, you can proceed directly to the installer page: http://protege.stanford.edu/download/prerelease-alpha/index.html. |
| − | </ | + | |
| + | '''Note:''' On the main download page, you will also find links to a release notes page for each new build of Protege 4.0, as well as a link to the location of the source code: http://protege.stanford.edu/download/registered.html#p4. | ||
| + | |||
| + | <br /> | ||
| + | [[Image:download.png|frame|none|screenshot of protege 4.0 installer page]] | ||
| + | <br /> | ||
| + | |||
| + | == Install & Run Protege == | ||
| + | |||
| + | Once you have navigated to the installer page, click the "Download Installer for <xxx-platform>" button to run the installer: | ||
| + | |||
| + | <br /> | ||
| + | [[Image:install.png|frame|none|screenshot of protege 4.0 installer]] | ||
| + | <br /> | ||
| + | |||
| + | Run Protege from the location where you installed shortcuts or from the Protege installation directory specified during the installation process. On a <strong>Windows</strong> machine, you can double-click the Protege executable file (Protege.exe), or use the run batch file (run.bat). If you choose to use the batch file, please make sure the JAVA_PATH variable is set correctly. On the <strong>Mac</strong> there will be a Protege.app, or you can run using one of the scripts. <span style="color:#AF60AF;">Note: by default, Protege 4.0 is configured to run in a fairly small memory footprint ~200MB. To get optimum performance, you can change this using our [[Setting_Heap_Size|instructions on setting the heap size]].</span> | ||
| + | |||
| + | You will now be presented with the Welcome screen from which you can create a new ontology or open an existing ontology from your local machine or from the Web. We can start by opening an existing ontology. <span style="color:#AF60AF;">Note: once you have opened or saved an ontology, it will be easily available to click on in the "Open Recent" box.</span> | ||
<br /> | <br /> | ||
| − | + | [[Image:welcome.png|frame|none|screenshot of protege 4.0 welcome screen]] | |
<br /> | <br /> | ||
| − | + | Download the pizza ontology from http://www.co-ode.org/ontologies/pizza (the unclassified version in RDF syntax will work as an example). | |
| − | + | ||
| − | + | Select <span style="color:#B87A3D; font-weight:bold;">Open OWL ontology</span> from the Welcome screen and find the <code>pizza.owl</code> file on your filesystem. | |
| − | + | ||
| − | + | You will now be presented with the main Protege workspace, which opens by default to the <span style="color:#B87A3D; font-weight:bold;">Active Ontology</span>. This tab shows an overview of the pizza ontology, including metrics on its contents, annotations about the ontology as a whole, and other imported ontologies (if any imports exist). The dropdown on the toolbar displays the currently active ontology - that is the one into which all edits take place. When working on a single ontology this is not a concern. To find something interesting now switch to the <span class="feature">Entities Tab</span> <br /> | |
| − | |||
| − | |||
| − | |||
| − | |||
| − | |||
| − | |||
| − | |||
| − | |||
| − | |||
| − | |||
| − | |||
| − | |||
| − | |||
| − | |||
<br /> | <br /> | ||
[[Image:tab-ontologies.png]]<br /> | [[Image:tab-ontologies.png]]<br /> | ||
Revision as of 11:38, October 4, 2007
Getting Started with Protege-OWL
This page contains instructions for getting started with the Protege-OWL editor in Protege 4.0.
Contents
Download
If you haven't already done so, you need to download and install Protege 4.0 from the Protege website. If you are a new user, please go to the main download page and register first, which helps us to track the number of Protege users: http://protege.stanford.edu/download/download.html.
If you are an existing user, you can proceed directly to the installer page: http://protege.stanford.edu/download/prerelease-alpha/index.html.
Note: On the main download page, you will also find links to a release notes page for each new build of Protege 4.0, as well as a link to the location of the source code: http://protege.stanford.edu/download/registered.html#p4.

Install & Run Protege
Once you have navigated to the installer page, click the "Download Installer for <xxx-platform>" button to run the installer:

Run Protege from the location where you installed shortcuts or from the Protege installation directory specified during the installation process. On a Windows machine, you can double-click the Protege executable file (Protege.exe), or use the run batch file (run.bat). If you choose to use the batch file, please make sure the JAVA_PATH variable is set correctly. On the Mac there will be a Protege.app, or you can run using one of the scripts. Note: by default, Protege 4.0 is configured to run in a fairly small memory footprint ~200MB. To get optimum performance, you can change this using our instructions on setting the heap size.
You will now be presented with the Welcome screen from which you can create a new ontology or open an existing ontology from your local machine or from the Web. We can start by opening an existing ontology. Note: once you have opened or saved an ontology, it will be easily available to click on in the "Open Recent" box.

Download the pizza ontology from http://www.co-ode.org/ontologies/pizza (the unclassified version in RDF syntax will work as an example).
Select Open OWL ontology from the Welcome screen and find the pizza.owl file on your filesystem.
You will now be presented with the main Protege workspace, which opens by default to the Active Ontology. This tab shows an overview of the pizza ontology, including metrics on its contents, annotations about the ontology as a whole, and other imported ontologies (if any imports exist). The dropdown on the toolbar displays the currently active ontology - that is the one into which all edits take place. When working on a single ontology this is not a concern. To find something interesting now switch to the Entities Tab
</li>


- OWLViz - requires installation of Graphviz before anything will be visible. Shows a graphical representation of the class subsumption hierarchy. A full description of OWLViz is in the OWLViz manual.
- DL Query - requires the ontology has been classified before it will return results. An arbitrary class description can be entered and the reasoner is queried for the sub/super classes, infered members etc depending on what is selected.
- Select a class to make sure the Selected Entity view is showing class views.
- Select View->Class Views->Existential Tree - now when you float over the editor a blue outline shows where the new view will be dropped - either on top of, above, below, left or right of each of the current views.
- When happy with the position, click the left mouse button to drop the view (if you want to cancel this operation just click somewhere on the toolbar instead).
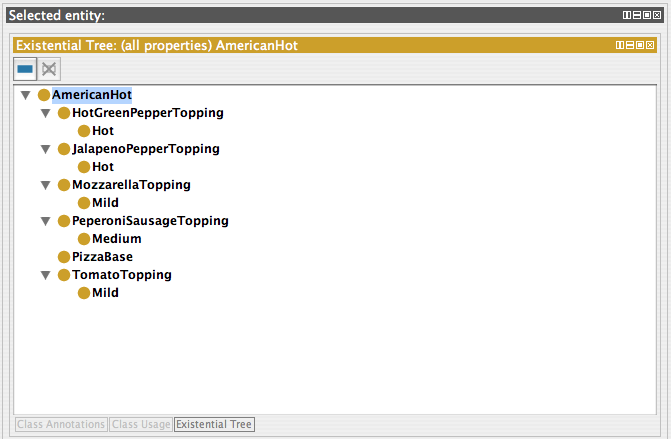
- The existential tree view is now visible (the tree follows existential restrictions along the specified properties and is useful for partonomic relations).

</ol>