Difference between revisions of "PrF UG files export html"
(Automated import of articles) |
|||
| (7 intermediate revisions by the same user not shown) | |||
| Line 2: | Line 2: | ||
== Exporting a Project to HTML == | == Exporting a Project to HTML == | ||
| − | {{PrF_UG_TOC_files}}<div id='prf_ug'> | + | <noinclude>{{PrF_UG_TOC_files}}<div id='prf_ug'></noinclude> |
You can generate an HTML view of a project. | You can generate an HTML view of a project. | ||
This allows you to view all or part of the class hierarchy and, | This allows you to view all or part of the class hierarchy and, | ||
| − | optionally, | + | optionally, all the instances. |
| − | all the instances. | ||
The output consists of an <b>index</b> page, | The output consists of an <b>index</b> page, | ||
which gives the class hierarchy for the project, | which gives the class hierarchy for the project, | ||
| Line 17: | Line 16: | ||
You can generate HTML pages for the entire project, | You can generate HTML pages for the entire project, | ||
or restrict the output to a subset of the project. | or restrict the output to a subset of the project. | ||
| − | |||
| − | |||
| − | |||
| − | |||
| − | |||
| − | |||
| − | |||
| − | |||
| − | |||
| − | |||
| − | |||
| − | |||
| − | |||
| − | |||
| − | |||
| − | |||
| − | |||
| − | |||
| − | |||
| − | |||
| − | |||
| − | |||
| − | |||
| − | |||
| − | |||
| − | |||
| − | |||
| − | |||
| − | |||
| − | |||
| − | |||
| − | |||
| − | |||
| − | |||
=== Generating HTML Output === | === Generating HTML Output === | ||
| Line 60: | Line 25: | ||
Select <b>File | Export to Format</b> and select <b>HTML</b> from the submenu. | Select <b>File | Export to Format</b> and select <b>HTML</b> from the submenu. | ||
The <b>Export HTML Configuration Options</b> dialog box will be displayed. | The <b>Export HTML Configuration Options</b> dialog box will be displayed. | ||
| − | |||
| − | |||
</p> | </p> | ||
| + | <div>[[Image:PrF_UG_files_html_general.png|frame|none| | ||
| + | Export HTML Configuration Options dialog box, General tab]]</div> | ||
<li><p> | <li><p> | ||
| − | Change your settings, | + | Change your settings, if desired. |
| − | + | The effect of the different settings is described below. | |
| − | The effect of the different settings is described below. (We recommend changing the output directory; | + | (We recommend changing the output directory; |
| − | otherwise, | + | otherwise, the files will be saved directly |
| − | + | in the {{#var:Pr}} application directory.) | |
</p> | </p> | ||
| Line 83: | Line 48: | ||
<ul class='a'> | <ul class='a'> | ||
<li><p> | <li><p> | ||
| − | an index page, | + | an index page, showing the class hierarchy; |
| − | |||
the example shown is for a subset of the newspaper project, | the example shown is for a subset of the newspaper project, | ||
with <b>Layout_info</b> selected as the root class | with <b>Layout_info</b> selected as the root class | ||
| − | |||
| − | |||
</p> | </p> | ||
| + | <div>[[Image:PrF_UG_files_html_news_index.png|frame|none| | ||
| + | index page, "Layout_info" selected]]</div> | ||
<li><p> | <li><p> | ||
a page for each class, | a page for each class, | ||
| − | showing its superclasses, | + | showing its superclasses, subclasses, slots, and instances; |
| − | |||
| − | |||
| − | |||
the selection of classes is customizable | the selection of classes is customizable | ||
| − | |||
| − | |||
</p> | </p> | ||
| + | <div>[[Image:PrF_UG_files_html_news_sectionclass.png|frame|none| | ||
| + | page for "Section" Class]]</div> | ||
<li><p> | <li><p> | ||
| Line 128: | Line 89: | ||
To save your settings, | To save your settings, | ||
enter a name and then click <b>Save</b>. | enter a name and then click <b>Save</b>. | ||
| − | This will save the current state of the <b>HTML Export Configuration Options</b> dialog box. | + | This will save the current state |
| + | of the <b>HTML Export Configuration Options</b> dialog box. | ||
Note that if you do not click <b>Save</b>, | Note that if you do not click <b>Save</b>, | ||
your settings will not be changed. | your settings will not be changed. | ||
| − | Also, | + | Also, if you make additional changes without clicking <b>Save</b>, |
| − | |||
they will not be saved. | they will not be saved. | ||
</p> | </p> | ||
<li><p> | <li><p> | ||
| − | <b>Output Directory</b>: (recommended) Allows you to choose a directory where the HTML files will be saved. | + | <b>Output Directory</b>: (recommended) |
| − | By default, | + | Allows you to choose a directory where the HTML files will be saved. |
| − | + | By default, they are saved directly in the {{#var:Pr}} application directory. | |
| − | You can type a pathname directly in the entry bar or use the button to navigate to the desired directory. | + | You can type a pathname directly in the entry bar |
| + | or use the button to navigate to the desired directory. | ||
</p> | </p> | ||
| Line 146: | Line 108: | ||
<b>Root Classes</b>: | <b>Root Classes</b>: | ||
Restricts the HTML output to the chosen classes and all their subordinate classes. | Restricts the HTML output to the chosen classes and all their subordinate classes. | ||
| − | By default, | + | By default, the root class is <b>:THING</b>, |
| − | |||
which will generate output for all classes in the hierarchy, | which will generate output for all classes in the hierarchy, | ||
including hidden system classes. | including hidden system classes. | ||
To restrict your view to a smaller section of the project, | To restrict your view to a smaller section of the project, | ||
first delete the <b>:THING</b> class using the Delete Class button, | first delete the <b>:THING</b> class using the Delete Class button, | ||
| − | then add one or more classes by clicking the Add Class button and selecting the classes you want in the dialog box. | + | then add one or more classes by clicking the Add Class button |
| + | and selecting the classes you want in the dialog box. | ||
Any class you choose will be included in the tree, | Any class you choose will be included in the tree, | ||
along with all of its subclasses. | along with all of its subclasses. | ||
| Line 159: | Line 121: | ||
<li><p> | <li><p> | ||
<b>Show Instances</b>: | <b>Show Instances</b>: | ||
| − | Select this option to generate a page for each instance subordinate to your chosen root classes. | + | Select this option to generate a page |
| + | for each instance subordinate to your chosen root classes. | ||
If you do not wish to include instance pages in your output, | If you do not wish to include instance pages in your output, | ||
deselect this option. | deselect this option. | ||
| Line 166: | Line 129: | ||
<li><p> | <li><p> | ||
<b>Sort Subclasses</b>: | <b>Sort Subclasses</b>: | ||
| − | Users can reorder classes manually in the Protege class tree and Protege will remember the order. | + | Users can reorder classes manually in the Protege class tree |
| + | and Protege will remember the order. | ||
To ensure that the project to be exported in alphabetical order, | To ensure that the project to be exported in alphabetical order, | ||
you'll need to use this option. | you'll need to use this option. | ||
| Line 180: | Line 144: | ||
This tab allows you to select which slots are displayed. | This tab allows you to select which slots are displayed. | ||
| − | A selected slot is shown at each class where it occurs and a page is generated for that slot. | + | A selected slot is shown at each class where it occurs |
| + | and a page is generated for that slot. | ||
| − | <div>[[Image:PrF_UG_files_html_slots.png| | + | <div>[[Image:PrF_UG_files_html_slots.png|frame|none| |
| + | HTML Exports Configuration Options, Slots tab]]</div> | ||
==== Facets Tab ==== | ==== Facets Tab ==== | ||
This tab allows you to select which slot facets are displayed. | This tab allows you to select which slot facets are displayed. | ||
| − | A selected facet, | + | A selected facet, and its value, |
| − | and its value, | ||
is shown for each slot where it appears. | is shown for each slot where it appears. | ||
| − | <div>[[Image:PrF_UG_files_html_facets.png| | + | <div>[[Image:PrF_UG_files_html_facets.png|frame|none| |
| + | HTML Exports Configuration Options, Facets tab]]</div> | ||
==== Customization Tab ==== | ==== Customization Tab ==== | ||
| − | This tab allows you to customize the header, | + | This tab allows you to customize the header, footer, |
| − | footer, | ||
and stylesheet of the output. | and stylesheet of the output. | ||
Note that the default style sheet displays the icons for you. | Note that the default style sheet displays the icons for you. | ||
| − | <div>[[Image:PrF_UG_files_html_customization.png| | + | <div>[[Image:PrF_UG_files_html_customization.png||frame|none| |
| + | HTML Exports Configuration Options, Customization tab]]</div> | ||
| + | |||
| − | </div> | + | <noinclude></div></noinclude> |
Latest revision as of 17:46, November 13, 2008
Exporting a Project to HTML
You can generate an HTML view of a project. This allows you to view all or part of the class hierarchy and, optionally, all the instances. The output consists of an index page, which gives the class hierarchy for the project, including links to individual pages for each the class. Class pages include slot descriptions and optional instances. If instances are selected, they have individual pages and appear in the index hierarchy and under each class.
You can generate HTML pages for the entire project, or restrict the output to a subset of the project.
Generating HTML Output
To generate HTML for a project:
Select File | Export to Format and select HTML from the submenu. The Export HTML Configuration Options dialog box will be displayed.
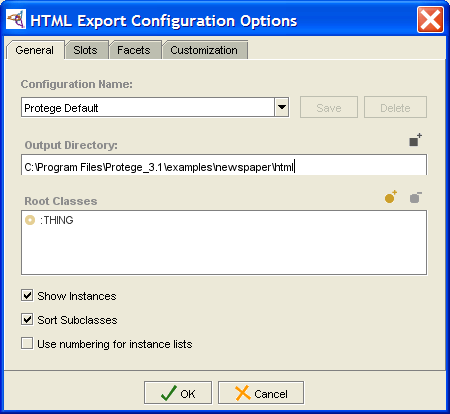 Export HTML Configuration Options dialog box, General tab
Change your settings, if desired. The effect of the different settings is described below. (We recommend changing the output directory; otherwise, the files will be saved directly in the Protege application directory.)
Click OK.

Output Format
Using the default options produces the following HTML output:
an index page, showing the class hierarchy; the example shown is for a subset of the newspaper project, with Layout_info selected as the root class
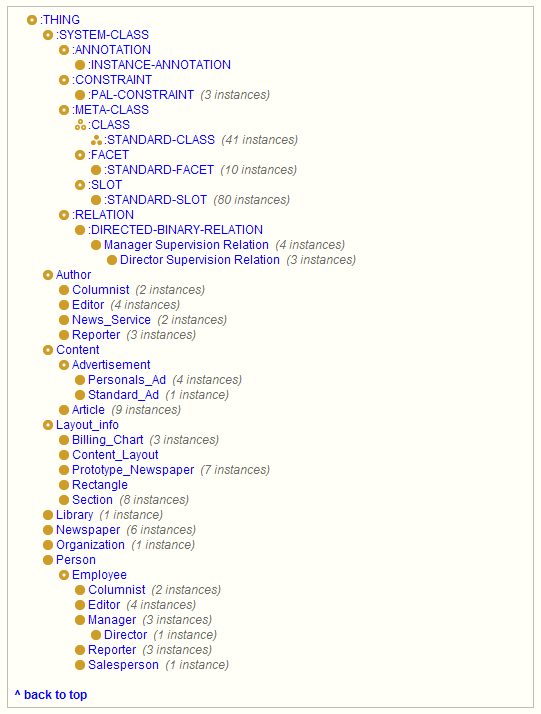 index page, "Layout_info" selected
a page for each class, showing its superclasses, subclasses, slots, and instances; the selection of classes is customizable
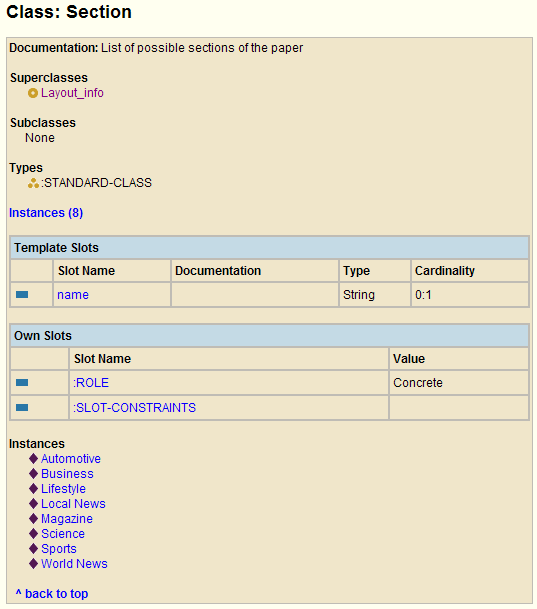 page for "Section" Class
a page for each slot, showing its facets and their values; the list of slots is customizable
a page for each instance of the chosen classes; you can choose to omit instances from the HTML web


Output Options
The effect of the different settings is described below.
General Tab
Configuration Name: Allows you to name and save the current settings in the dialog box. A saved setting is added to the menu; you can reload it by selecting it from the menu. To save your settings, enter a name and then click Save. This will save the current state of the HTML Export Configuration Options dialog box. Note that if you do not click Save, your settings will not be changed. Also, if you make additional changes without clicking Save, they will not be saved.
Output Directory: (recommended) Allows you to choose a directory where the HTML files will be saved. By default, they are saved directly in the Protege application directory. You can type a pathname directly in the entry bar or use the button to navigate to the desired directory.
Root Classes: Restricts the HTML output to the chosen classes and all their subordinate classes. By default, the root class is :THING, which will generate output for all classes in the hierarchy, including hidden system classes. To restrict your view to a smaller section of the project, first delete the :THING class using the Delete Class button, then add one or more classes by clicking the Add Class button and selecting the classes you want in the dialog box. Any class you choose will be included in the tree, along with all of its subclasses.
Show Instances: Select this option to generate a page for each instance subordinate to your chosen root classes. If you do not wish to include instance pages in your output, deselect this option.
Sort Subclasses: Users can reorder classes manually in the Protege class tree and Protege will remember the order. To ensure that the project to be exported in alphabetical order, you'll need to use this option.
Use numbering for instance lists: Numbers the instance lists shown for each class.
Slots Tab
This tab allows you to select which slots are displayed. A selected slot is shown at each class where it occurs and a page is generated for that slot.

Facets Tab
This tab allows you to select which slot facets are displayed. A selected facet, and its value, is shown for each slot where it appears.

Customization Tab
This tab allows you to customize the header, footer, and stylesheet of the output. Note that the default style sheet displays the icons for you.
