Difference between revisions of "PrF UG files database backend"
(Automated import of articles) |
|||
| (8 intermediate revisions by one other user not shown) | |||
| Line 2: | Line 2: | ||
== {{#var:Pr}} Database Format == | == {{#var:Pr}} Database Format == | ||
| − | {{PrF_UG_TOC_files}}<div id='prf_ug'> | + | <noinclude>{{PrF_UG_TOC_files}}<div id='prf_ug'></noinclude> |
| − | You can save the ontology-related information for a {{#var:PrF}} project as a single table in a | + | You can save the ontology-related information for a {{#var:PrF}} project |
| − | [ | + | as a single table in a [{{#var:P_D}}/design/jdbc_backend.html JDBC database]. |
| − | Note that this is a "flat" table that does not use any special database constructs to represent the information. | + | Note that this is a "flat" table that does not use any special database constructs |
| − | Information specific to the {{#var:PrF}} user interface is stored in a separate {{#var:Pr}} project | + | to represent the information. |
| − | (<b>.pprj</b>) | + | Information specific to the {{#var:PrF}} user interface is stored |
| − | file. | + | in a separate {{#var:Pr}} project (<b>.pprj</b>) file. |
| − | See | + | See [[PrF_UG_files_project_types|Understanding Project Types]] |
| − | [[PrF_UG_files_project_types|Understanding Project Types]] | ||
for more information about these files. | for more information about these files. | ||
| − | |||
| − | |||
| − | |||
| − | |||
| − | |||
| − | |||
| − | |||
| − | |||
| − | |||
| − | |||
| − | |||
| − | |||
| − | |||
| − | |||
| − | |||
| − | |||
=== Requirements === | === Requirements === | ||
| Line 41: | Line 24: | ||
<li><p> | <li><p> | ||
| − | Make sure you have a JDBC driver that is compatible with your database and the version of the Java VM that you are using. | + | Make sure you have a JDBC driver that is compatible with your database |
| + | and the version of the Java VM that you are using. | ||
</p> | </p> | ||
| Line 48: | Line 32: | ||
If you are using Microsoft Access, | If you are using Microsoft Access, | ||
you don't need to acquire a JDBC driver; | you don't need to acquire a JDBC driver; | ||
| − | it's already bundled into the JDK. | + | it's already bundled into the JDK. (not recommended option due to slow performance) |
</p> | </p> | ||
<li><p> | <li><p> | ||
Otherwise, | Otherwise, | ||
| − | acquire a driver and rename it to "<tt>driver.jar</tt>" (or "<tt>driver1.jar</tt>" or "<tt>driver2.jar</tt>", | + | acquire a driver and rename it to "<tt>driver.jar</tt>" |
| − | + | (or "<tt>driver1.jar</tt>" or "<tt>driver2.jar</tt>", if you have several). | |
| − | Add this driver to the {{#var:Pr}} installation directory ( | + | Add this driver to the {{#var:Pr}} installation directory |
| + | (<b>not</b> the plugins directory). | ||
</p> | </p> | ||
</ul> | </ul> | ||
</ul> | </ul> | ||
| − | You can store multiple projects in the same database by giving their tables different names. | + | You can store multiple projects in the same database |
| + | by giving their tables different names. | ||
| − | <b>Note:</b> When a project is saved in a JDBC database, | + | <b>Note:</b> |
| + | When a project is saved in a JDBC database, | ||
backend changes to the database | backend changes to the database | ||
| − | (for example, | + | (for example, changes to slots, classes, and instances) |
| − | changes to slots, | ||
| − | classes, | ||
| − | and instances) | ||
are committed as soon as they are made. | are committed as soon as they are made. | ||
| − | However, | + | However, changes to the User Interface |
| − | changes to the User Interface | ||
(stored in the <b>.pprj</b> file) | (stored in the <b>.pprj</b> file) | ||
are not committed until you save the project, | are not committed until you save the project, | ||
| Line 81: | Line 64: | ||
Select <b>New Project</b> from the <b>File</b> menu. | Select <b>New Project</b> from the <b>File</b> menu. | ||
The <b>Create New Project</b> dialog box will open. | The <b>Create New Project</b> dialog box will open. | ||
| − | |||
| − | |||
</p> | </p> | ||
| + | <div>[[Image:PrF_UG_projects_create_from_database.png|frame|none| | ||
| + | Create New Project dialog box, "Protege Database" selected]]</div> | ||
<li><p> | <li><p> | ||
| − | To | + | To [[PrF_UG_projects_import_project|import]] |
| − | |||
a project from existing files, | a project from existing files, | ||
select <b>Create from Existing Sources</b>. | select <b>Create from Existing Sources</b>. | ||
| − | To create a <i>new</i>, | + | To create a <i>new</i>, <i>empty</i> {{#var:PrF}} project, |
| − | |||
leave this blank (the default). | leave this blank (the default). | ||
| − | |||
| − | |||
</p> | </p> | ||
| + | <div>[[Image:PrF_UG_files_create_from_existing_checkbox.png|frame|none| | ||
| + | Create from Existing Sources checkbox (checked)]]</div> | ||
<li><p> | <li><p> | ||
| − | Select <b>{{#var:Pr}} | + | Select <b>{{#var:Pr}}</b> Database as the project type. |
</p> | </p> | ||
| Line 107: | Line 88: | ||
<li><p> | <li><p> | ||
A <b>{{#var:Pr}} Database</b> dialog box will be displayed. | A <b>{{#var:Pr}} Database</b> dialog box will be displayed. | ||
| − | |||
| − | |||
</p> | </p> | ||
| + | <div>[[Image:PrF_UG_files_database_create.png|frame|none| | ||
| + | {{#var:Pr}} Database dialog box]]</div> | ||
<li><p> | <li><p> | ||
| − | Enter the class name of your JDBC driver in the <b>JDBC Driver</b> line of the dialog box. | + | Enter the class name of your JDBC driver |
| − | The class name can be found in the documentation provided with your particular driver. (For Microsoft Access, | + | in the <b>JDBC Driver</b> line of the dialog box. |
| − | + | The class name can be found in the documentation provided with your particular driver. | |
| + | (For Microsoft Access, use: <tt>sun.jdbc.odbc.JdbcOdbcDriver</tt>) | ||
</p> | </p> | ||
<li><p> | <li><p> | ||
Enter the URL for your database in the <b>JDBC URL</b> line. | Enter the URL for your database in the <b>JDBC URL</b> line. | ||
| − | |||
</p> | </p> | ||
| − | <p> <b>Note:</b> For Microsoft Access, | + | <p> |
| − | navigate to the "ODBC Data Source Administrator" dialog via the Control Panel and add a User DSN for your Access database. | + | <b>Note:</b> |
| + | For Microsoft Access, | ||
| + | navigate to the "ODBC Data Source Administrator" dialog via the Control Panel | ||
| + | and add a User DSN for your Access database. | ||
If you're unfamiliar with how to find this dialog or how to add a User DSN, | If you're unfamiliar with how to find this dialog or how to add a User DSN, | ||
please refer to Microsoft Windows Help. | please refer to Microsoft Windows Help. | ||
| Line 147: | Line 131: | ||
To save your project and give it a name, | To save your project and give it a name, | ||
select <b>Save</b> from the <b>File</b> menu. | select <b>Save</b> from the <b>File</b> menu. | ||
| − | See | + | See [[PrF_UG_projects_saving_a_project|Saving a Project]] |
| − | [[PrF_UG_projects_saving_a_project|Saving a Project]] | ||
for more information. | for more information. | ||
| Line 160: | Line 143: | ||
<li><p> | <li><p> | ||
Select <b>{{#var:Pr}} Database</b> in the <b>Select Format</b> dialog box. | Select <b>{{#var:Pr}} Database</b> in the <b>Select Format</b> dialog box. | ||
| − | |||
| − | |||
</p> | </p> | ||
| + | <div>[[Image:PrF_UG_files_database_convert.png|frame|none| | ||
| + | Select Format dialog, "Protege Database" selected]]</div> | ||
<li><p> | <li><p> | ||
In the <b>{{#var:Pr}} Database</b> dialog box, | In the <b>{{#var:Pr}} Database</b> dialog box, | ||
| − | fill out the required information, | + | fill out the required information, as described above. |
| − | |||
</p> | </p> | ||
</ol> | </ol> | ||
| − | </div> | + | <noinclude></div></noinclude> |
Latest revision as of 18:45, March 5, 2009
Database Format
You can save the ontology-related information for a Protege-Frames project as a single table in a JDBC database. Note that this is a "flat" table that does not use any special database constructs to represent the information. Information specific to the Protege-Frames user interface is stored in a separate Protege project (.pprj) file. See Understanding Project Types for more information about these files.
Requirements
Before you create a Protege Database project, you will need to do the following:
Make sure you have a database program installed on your system.
Make sure you have a JDBC driver that is compatible with your database and the version of the Java VM that you are using.
If you are using Microsoft Access, you don't need to acquire a JDBC driver; it's already bundled into the JDK. (not recommended option due to slow performance)
Otherwise, acquire a driver and rename it to "driver.jar" (or "driver1.jar" or "driver2.jar", if you have several). Add this driver to the Protege installation directory (not the plugins directory).
You can store multiple projects in the same database by giving their tables different names.
Note: When a project is saved in a JDBC database, backend changes to the database (for example, changes to slots, classes, and instances) are committed as soon as they are made. However, changes to the User Interface (stored in the .pprj file) are not committed until you save the project, for example by clicking Save.
Creating or Importing a Database Project
Select New Project from the File menu. The Create New Project dialog box will open.
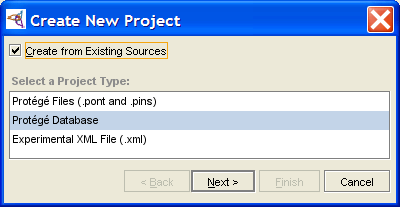 Create New Project dialog box, "Protege Database" selected
To import a project from existing files, select Create from Existing Sources. To create a new, empty Protege-Frames project, leave this blank (the default).
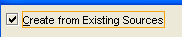 Create from Existing Sources checkbox (checked)
Select Protege Database as the project type.
Click Next.
A Protege Database dialog box will be displayed.
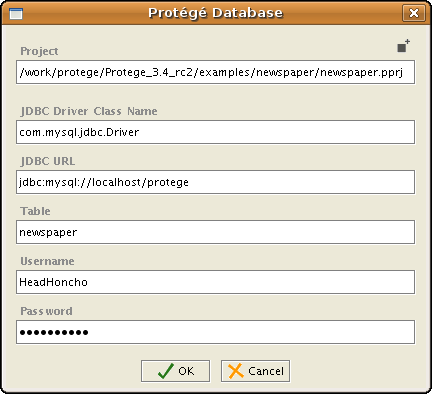 Protege Database dialog box
Enter the class name of your JDBC driver in the JDBC Driver line of the dialog box. The class name can be found in the documentation provided with your particular driver. (For Microsoft Access, use: sun.jdbc.odbc.JdbcOdbcDriver)
Enter the URL for your database in the JDBC URL line.
Note: For Microsoft Access, navigate to the "ODBC Data Source Administrator" dialog via the Control Panel and add a User DSN for your Access database. If you're unfamiliar with how to find this dialog or how to add a User DSN, please refer to Microsoft Windows Help. Your URL will look like: jdbc:odbc:<User DSN name>
Enter the name for the database table where you will be storing the information. If you are importing a file, enter the name of the table that contains the information you wish to import. This field is required.
If your database requires a username and/or password, enter these in the appropriate lines of the dialog box.
Click Finish.


To save your project and give it a name, select Save from the File menu. See Saving a Project for more information.
Converting a Protege-Frames Project to a Database
Select File | Convert Project to Format...
Select Protege Database in the Select Format dialog box.
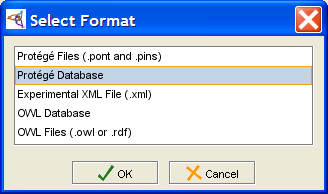 Select Format dialog, "Protege Database" selected
In the Protege Database dialog box, fill out the required information, as described above.
