Difference between revisions of "PrF UG classes creating multiple classes"
(Automated import of articles) |
|||
| (8 intermediate revisions by the same user not shown) | |||
| Line 2: | Line 2: | ||
== Creating Multiple Subclasses == | == Creating Multiple Subclasses == | ||
| − | {{PrF_UG_TOC_classes}}<div id='prf_ug'> | + | <noinclude>{{PrF_UG_TOC_classes}}<div id='prf_ug'></noinclude> |
| − | {{#var:PrF}} supplies a wizard that lets you quickly create multiple subclasses of a selected class. | + | {{#var:PrF}} supplies a wizard |
| + | that lets you quickly create multiple subclasses of a selected class. | ||
<ol class='a'> | <ol class='a'> | ||
<li><p> | <li><p> | ||
| − | At the | + | At the [[PrF_UG_classes_classes_tab|Classes tab]], |
| − | |||
select the class you want as a superclass for the classes you create. | select the class you want as a superclass for the classes you create. | ||
</p> | </p> | ||
| Line 16: | Line 16: | ||
Select <b>Tools | Wizards</b>, | Select <b>Tools | Wizards</b>, | ||
then select <b>Create multiple subclasses</b> from the submenu. | then select <b>Create multiple subclasses</b> from the submenu. | ||
| − | |||
| − | |||
</p> | </p> | ||
| Line 29: | Line 27: | ||
enter an optional prefix. | enter an optional prefix. | ||
</p> | </p> | ||
| + | <div>[[Image:PrF_UG_classes_wizard_multi_class.png|frame|none| | ||
| + | Create multiple subclasses dialog, entering a prefix]]</div> | ||
<li><p> | <li><p> | ||
| Line 34: | Line 34: | ||
enter an optional suffix. | enter an optional suffix. | ||
</p> | </p> | ||
| − | + | ||
<li><p> | <li><p> | ||
If you select <b>Tab indent to create hierarchy</b>, | If you select <b>Tab indent to create hierarchy</b>, | ||
| Line 53: | Line 53: | ||
<li><p> | <li><p> | ||
| − | You can edit or delete the name of any class you have already entered by moving the cursor to that name. | + | You can edit or delete the name of any class you have already entered |
| + | by moving the cursor to that name. | ||
You can also cut and paste text within and between class names. | You can also cut and paste text within and between class names. | ||
</p> | </p> | ||
| Line 61: | Line 62: | ||
the name will be highlighted in red. | the name will be highlighted in red. | ||
You can edit the class name from the keyboard, | You can edit the class name from the keyboard, | ||
| − | or you can click <b>Tidy</b> to have {{#var:Pr}} automatically substitute an underscore (_) for each invalid character. | + | or you can click <b>Tidy</b> |
| + | to have {{#var:Pr}} automatically substitute an underscore (_) | ||
| + | for each invalid character. | ||
</p> | </p> | ||
</ul> | </ul> | ||
| Line 68: | Line 71: | ||
To create subclasses of a class, | To create subclasses of a class, | ||
make sure that <b>Tab indent to create hierarchy</b> is selected. | make sure that <b>Tab indent to create hierarchy</b> is selected. | ||
| − | Then, | + | Then, use the <b>tab</b> key to create a hierarchy: |
| − | |||
</p> | </p> | ||
| Line 78: | Line 80: | ||
<li><p> | <li><p> | ||
| − | A single tab means the class will be a subclass of the nearest untabbed class above it in the list. | + | A single tab means the class will be a subclass |
| + | of the nearest untabbed class above it in the list. | ||
</p> | </p> | ||
<li><p> | <li><p> | ||
| − | N tabs means the class will be a subclass of the nearest class with N-1 tabs above it in the list.For example, | + | N tabs means the class will be a subclass of the nearest class |
| − | + | with N-1 tabs above it in the list. | |
| + | For example, suppose you are creating subclasses of Superclass | ||
| + | and you enter the following: | ||
</p> | </p> | ||
</ul> | </ul> | ||
| Line 105: | Line 110: | ||
<li><p> | <li><p> | ||
| − | SubSubclass_III <i>direct subclass of Superclass</i><b>Note:</b> Extra <b>Tab</b> characters will be ignored. | + | SubSubclass_III <i>direct subclass of Superclass</i> |
| + | </p> | ||
| + | <p> | ||
| + | <b>Note:</b> Extra <b>Tab</b> characters will be ignored. | ||
For example, | For example, | ||
if you insert a <b>Tab</b> before the first class name in the list, | if you insert a <b>Tab</b> before the first class name in the list, | ||
| Line 116: | Line 124: | ||
The wizard will display a list of classes that have been added. | The wizard will display a list of classes that have been added. | ||
This is informational only - you cannot cancel at this point. | This is informational only - you cannot cancel at this point. | ||
| − | |||
| − | |||
</p> | </p> | ||
| + | <div>[[Image:PrF_UG_classes_wizard_multi_class_finish.png|frame|none| | ||
| + | Create multiple subclasses dialog, result display]]</div> | ||
<li><p> | <li><p> | ||
Click <b>Finish</b> to exit the wizard. | Click <b>Finish</b> to exit the wizard. | ||
| − | |||
| − | |||
</p> | </p> | ||
| + | <div>[[Image:PrF_UG_classes_wizard_multi_class_result.png|frame|none| | ||
| + | wizard exited; result appears]]</div> | ||
</ol> | </ol> | ||
The new classes will inherit all the properties of their superclass. | The new classes will inherit all the properties of their superclass. | ||
| − | If you wish to make any additional edits to your classes (e.g., | + | If you wish to make any additional edits to your classes |
| − | [[PrF_UG_slots_attach_slot|attach]] | + | (e.g., [[PrF_UG_slots_attach_slot|attach]] an additional slot |
| − | an additional slot or | + | or [[PrF_UG_slots_override_slot|override]] an inherited slot), |
| − | [[PrF_UG_slots_override_slot|override]] | + | use the [[PrF_UG_classes_class_editor|Class Editor]]. |
| − | an inherited slot), | + | |
| − | use the | ||
| − | [[PrF_UG_classes_class_editor|Class Editor]]. | ||
| − | </div> | + | <noinclude></div></noinclude> |
Latest revision as of 17:29, November 13, 2008
Creating Multiple Subclasses
Protege-Frames supplies a wizard that lets you quickly create multiple subclasses of a selected class.
At the Classes tab, select the class you want as a superclass for the classes you create.
Select Tools | Wizards, then select Create multiple subclasses from the submenu.
Set your options:
To have all classes you create begin the same way, enter an optional prefix.
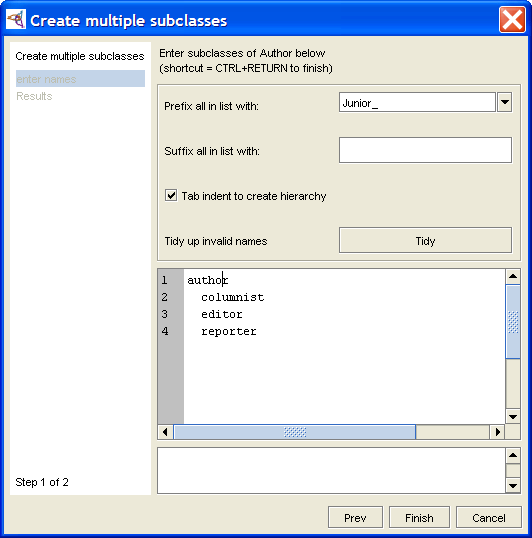 Create multiple subclasses dialog, entering a prefix
To have all classes you create end the same way, enter an optional suffix.
If you select Tab indent to create hierarchy, you can use tab indents, as described in Step 5.
Enter your class names:
Type the name of a class, then press Enter to begin entering a second class.
You can edit or delete the name of any class you have already entered by moving the cursor to that name. You can also cut and paste text within and between class names.
If you enter an invalid character (e.g., /) in a class name, the name will be highlighted in red. You can edit the class name from the keyboard, or you can click Tidy to have Protege automatically substitute an underscore (_) for each invalid character.
To create subclasses of a class, make sure that Tab indent to create hierarchy is selected. Then, use the tab key to create a hierarchy:
No tabs means the class will be a direct subclass of the selected superclass.
A single tab means the class will be a subclass of the nearest untabbed class above it in the list.
N tabs means the class will be a subclass of the nearest class with N-1 tabs above it in the list. For example, suppose you are creating subclasses of Superclass and you enter the following:
Subclass direct subclass of Superclass
Subclass_II direct subclass of Superclass
SubSubclass subclass of Subclass_II
SubSubSubclass subclass of SubSubclass
SubSubclass_III direct subclass of Superclass
Note: Extra Tab characters will be ignored. For example, if you insert a Tab before the first class name in the list, it will still be created as a direct subclass of the selected superclass.
Click Finish or type Ctrl-Enter (Cmd-Enter). The wizard will display a list of classes that have been added. This is informational only - you cannot cancel at this point.
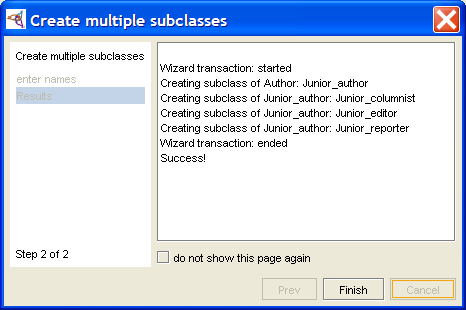 Create multiple subclasses dialog, result display
Click Finish to exit the wizard.
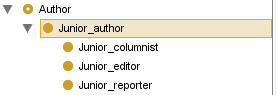 wizard exited; result appears


The new classes will inherit all the properties of their superclass. If you wish to make any additional edits to your classes (e.g., attach an additional slot or override an inherited slot), use the Class Editor.