Difference between revisions of "CompileProtege5InEclipseWithMaven"
(→Configuring Eclipse: adding more section headers for clarity) |
(→Create Eclipse workspace: incremental save) |
||
| Line 47: | Line 47: | ||
===== Create Eclipse workspace ===== | ===== Create Eclipse workspace ===== | ||
| − | + | Launch Eclipse and create a new workspace called "protege-desktop", or any name of your choice. We recommend creating the workspace in a separate but parallel directory to the "protege" directory that contains the Protege source code. This ensures that changes to Eclipse workspace files don't show up as modifications to the Protege source tree. | |
| − | + | With the new Eclipse workspace open, we need to do some minor configuration steps before importing our projects. | |
| + | |||
| + | Open the Preferences dialog, navigate to ''General -> Workspace -> Linked Resources'' and click the New... button to define a new path variable. Create a new variable called M2_REPO and set the location to your local Maven repository, which is usually located at .m2/repository in your home directory. Defining this variable allows the Protege team to provide preconfigured Eclipse project files that don't have pointers to system-specific locations for dependencies. The location of your Maven repository is configured once in the Eclipse workspace, rather than several times for each project. | ||
| − | |||
[[File:MavenEclipseSetREPO.png]] | [[File:MavenEclipseSetREPO.png]] | ||
| − | |||
First you need to import the owl api as an eclipse plugin project. Click on File->Import... and select Plug-in Development->Plug-ins and Fragments. | First you need to import the owl api as an eclipse plugin project. Click on File->Import... and select Plug-in Development->Plug-ins and Fragments. | ||
Revision as of 18:20, December 2, 2013
Contents
Building with Eclipse
This guide describes one possible approach to configuring the Eclipse Platform for working with the Protege Desktop source code. Feel free to make adjustments to suit your needs.
Prerequisites
To follow this guide, you must have the following software tools installed:
- A version of the Eclipse Platform that includes the Plug-in Development Environment (PDE). The Compare & Combine Packages page on the Eclipse website indicates which versions of Eclipse include the PDE package.
- A tool for checking out a Git repository.
- Apache Maven
Configuring Eclipse
This guide describes two ways of loading the core Protege bundles into Eclipse. The first method includes the Protege source code, which is useful for developers interested in understanding the inner workings of Protege. The second method doesn't include the Protege source code, and is generally sufficient for Protege plug-in developers to write, test, and run plug-ins.
Configure Eclipse with Protege sources
Clone the source code
Clone the Protege source code to your local machine:
git clone https://github.com/protegeproject/protege.git protege
Build with Maven
Launch the Protege Maven build from the command line:
    cd protege
    mvn clean install
Building with Maven results in a fully functional copy of Protege in the protege-distribution/target subdirectory. The directory name will be something like:
protege-distribution/target/protege-distribution-5.0.0-beta-05-SNAPSHOT-bin/Protege
At completion of the Maven build, all generated source directories needed by Eclipse are present.
Set up Eclipse projects
Now we can move forward with setting up the Eclipse projects. Rather than asking developers to do this manually, we provide a ZIP file with a preconfigured set of Eclipse projects. The ZIP file is called "eclipse-by-tim.zip", and is located in the protege/ide directory. Unzip the file to the top-level protege directory. This will add the necessary .project, .classpath, and META-INF/MANIFEST.MF files to the relevant subdirectories.
Create Eclipse workspace
Launch Eclipse and create a new workspace called "protege-desktop", or any name of your choice. We recommend creating the workspace in a separate but parallel directory to the "protege" directory that contains the Protege source code. This ensures that changes to Eclipse workspace files don't show up as modifications to the Protege source tree.
With the new Eclipse workspace open, we need to do some minor configuration steps before importing our projects.
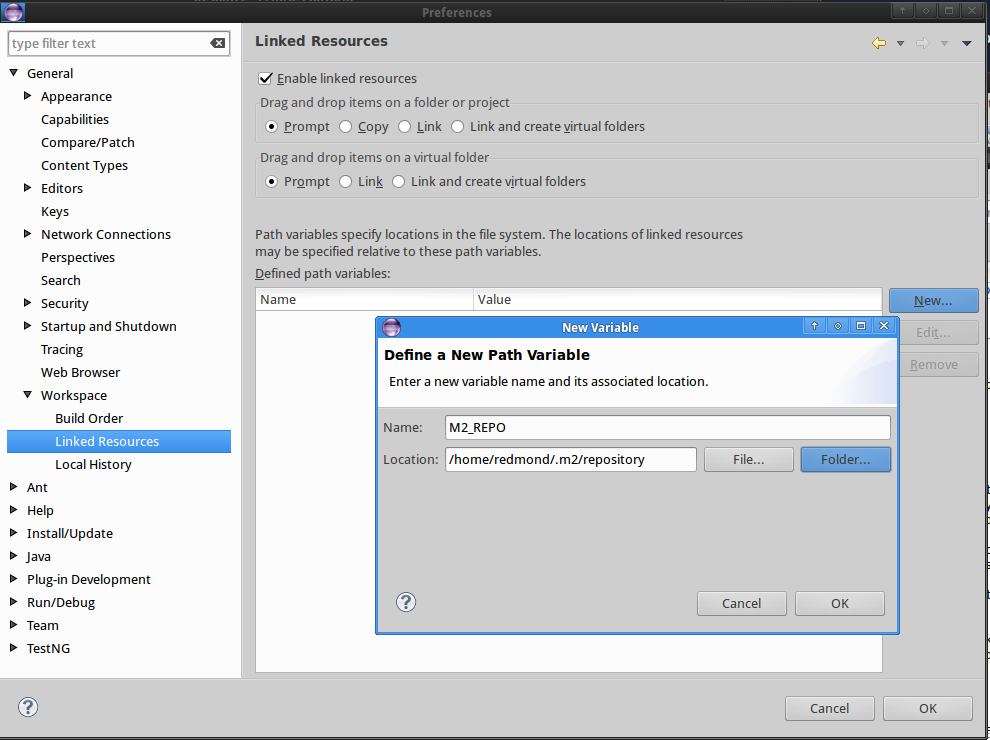
Open the Preferences dialog, navigate to General -> Workspace -> Linked Resources and click the New... button to define a new path variable. Create a new variable called M2_REPO and set the location to your local Maven repository, which is usually located at .m2/repository in your home directory. Defining this variable allows the Protege team to provide preconfigured Eclipse project files that don't have pointers to system-specific locations for dependencies. The location of your Maven repository is configured once in the Eclipse workspace, rather than several times for each project.
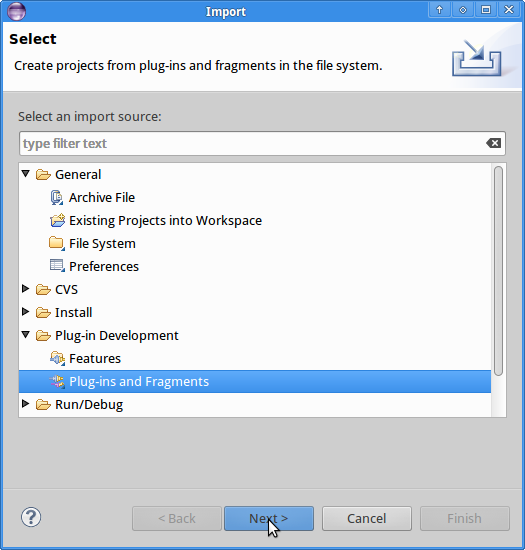
First you need to import the owl api as an eclipse plugin project. Click on File->Import... and select Plug-in Development->Plug-ins and Fragments.
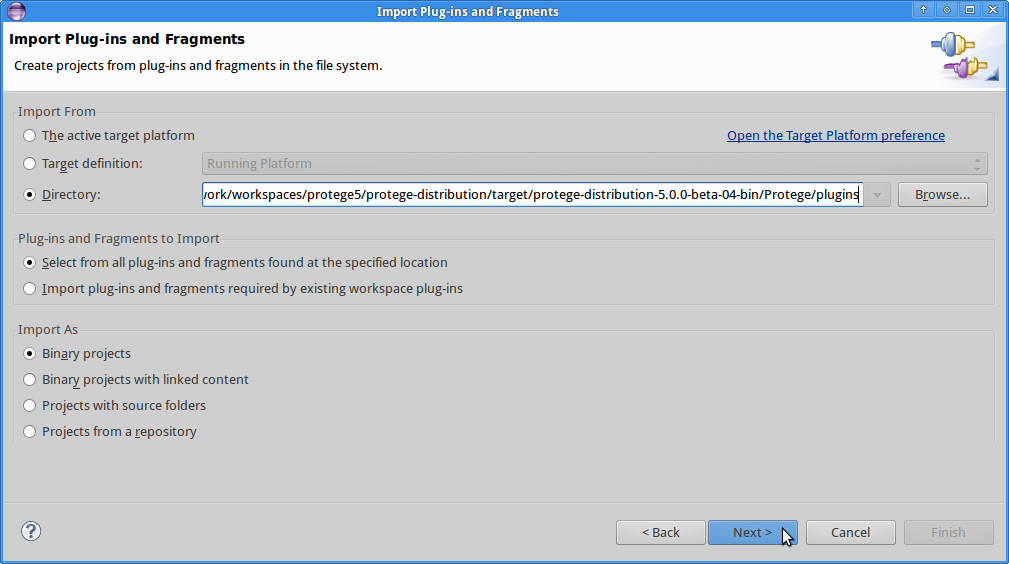
In the next screen you can set the directory to import from to be
protege5/protege-distribution/target/protege-distribution-5.0.0.beta-04-bin/Protege/plugins.
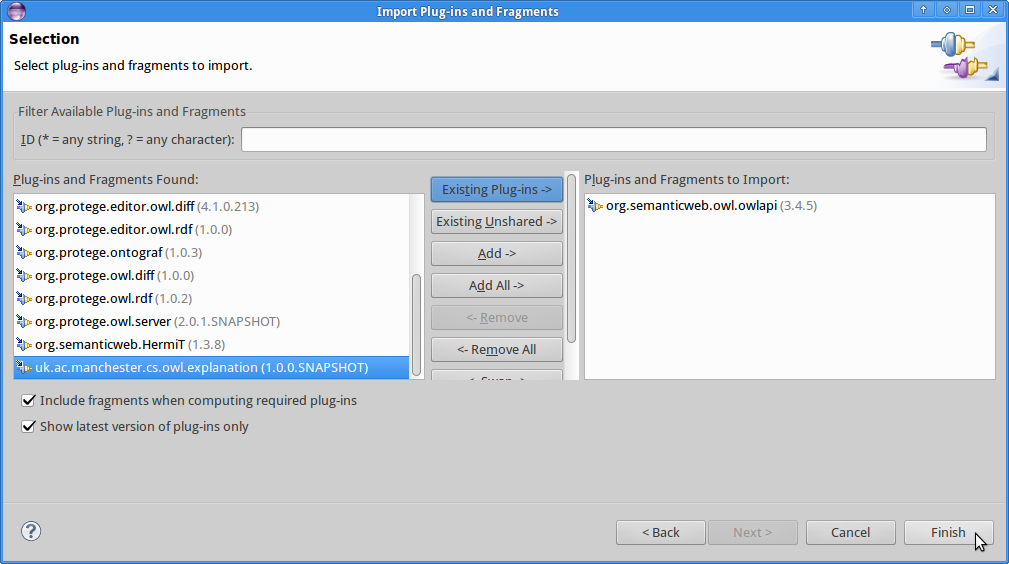
Finally on the next screen, you can select the OWL api for import.
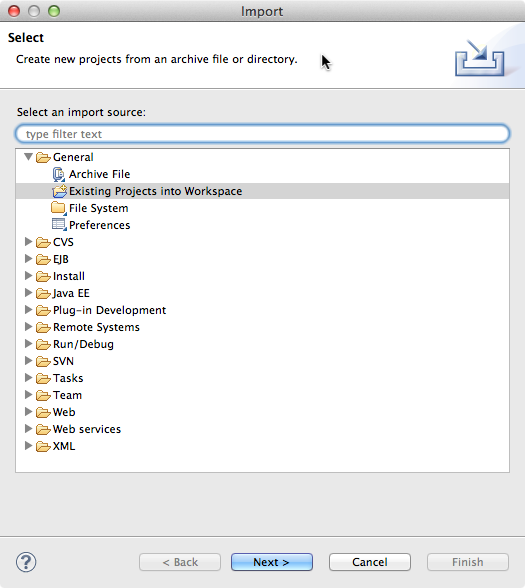
Now we can import the eclipse projects from the protege5 directory. From the file menu click Import, select General/Existing Projects into Workspace, and click next:
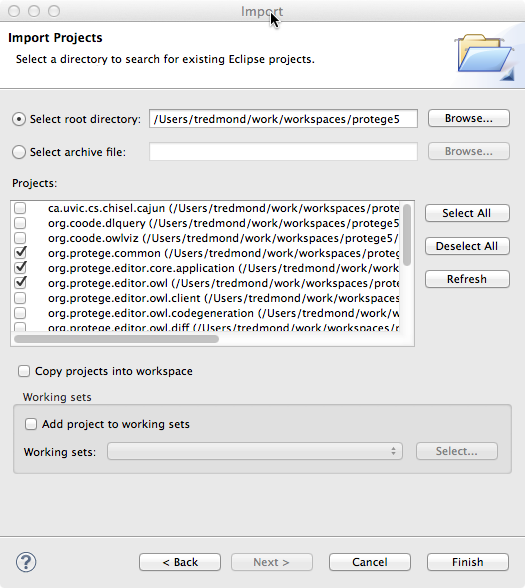
In the next screen, make sure that "Select root directory" is selected, browse to the protege5 directory that we were working on before, select the plugins that you want to include and click finish:
The important projects to select are org.protege.common, org.protege.editor.core.application, org.protege.editor.owl and protege-distribution. You may need to wait a moment before looking at the errors because it takes a moment to build. The build progress is displayed in the lower right hand corner. At this point in the "Problems" view there will be a single compilation error:
Access restriction: The method render() from the type RDFRendererBase is not accessible due to restriction on required library org.semanticweb.owl.owlapi/owlapi-distribution.jar
I don't know what this error means yet but it appears to be harmless.
Configure Eclipse without Protege sources
Download Protege 4 or 5 distribution.
File->Import and then Plug-in Development->Plug-ins and Fragments.
Then get org.protege.common.jar and org.protege.editor.core.application.jar bundles from the bundles directory of the Protege distribution. Repeat and get org.semanticweb.owl.owlapi.jar and org.protege.editor.owl from the plugins directory of the distribution.
Running Protege
Run Protege with OSGi Framework launcher
This is the easiest type of runnable to create, run and debug. But there are two issues with this approach. First, if you are running mac os x, it won't work. The Mac has some long standing problems with java and eclipse and there appear to be troubles. But it works just fine on linux and windows. Second, this type of runnable may hide or change issues that would occur when the plugin is run in a true Protege deployment. I don't know exactly what eclipse does to make this type of runnable work but suffice it to say that eclipse is being a bit tricky. It is a good idea to at least occasionally the runnable in a more Protege-like environment such as is created by runnable that I describe in the next section.
- Create a new OSGi runnable
- Select all the Workspace plugins that you want.
- Deselect all the Target Platform plugins
- Click "Add Required Bundles"
Then add some jvm options to specify a logger and memory such as, for example:
-Declipse.ignoreApp=true -Dosgi.noShutdown=true
-Xmx512M
-Dlog4j.configuration=file:${workspace_loc:org.protege.editor.owl/log4j.xml}
This setup is generating an exception for me
org.osgi.framework.BundleException: Could not find bundle: org.eclipse.equinox.console
	at org.eclipse.osgi.framework.internal.core.ConsoleManager.checkForConsoleBundle(ConsoleManager.java:211)
	at org.eclipse.core.runtime.adaptor.EclipseStarter.startup(EclipseStarter.java:297)
	at org.eclipse.core.runtime.adaptor.EclipseStarter.run(EclipseStarter.java:176)
	at sun.reflect.NativeMethodAccessorImpl.invoke0(Native Method)
	at sun.reflect.NativeMethodAccessorImpl.invoke(NativeMethodAccessorImpl.java:57)
	at sun.reflect.DelegatingMethodAccessorImpl.invoke(DelegatingMethodAccessorImpl.java:43)
	at java.lang.reflect.Method.invoke(Method.java:606)
	at org.eclipse.equinox.launcher.Main.invokeFramework(Main.java:629)
	at org.eclipse.equinox.launcher.Main.basicRun(Main.java:584)
	at org.eclipse.equinox.launcher.Main.run(Main.java:1438)
	at org.eclipse.equinox.launcher.Main.main(Main.java:1414)
When I tried to fix this I got into some problems but it doesn't seem too important.
On a linux machine this works perfectly but on the mac it failed with the exception
java.lang.UnsupportedClassVersionError: org/protege/editor/owl/ProtegeOWL : Unsupported major.minor version 51.0
This is a serious problem but if it only happens on the mac it may be irrelevant because historically the macs have been unable to run swing programs in eclipse-OSGi mode even after the bug about the problem was closed.
Run Protege in native mode
In this mode we run protege with the same configuration as is used by the end users of eclipse. In some ways, problems with this runnable are easier to debug than problems with the eclipse method given above because there is no hidden magic. But on the other hand, this approach requires more manual steps between debug steps.
Adding the OWL API
       git clone git://owlapi.git.sourceforge.net/gitroot/owlapi/owlapi
       cd owlapi
       mvn -Declipse.workspace=../protege5-workspace eclipse:add-maven-repo
       mvn eclipse:clean eclipse:eclipse
Import the Existing projects into workspace.
Adding your own plug-in
Now we assume that a developer wants to introduce a plugin into eclipse. We have determined that this can be done in a reasonable manner without requiring that we commit either the META-INF directory or the libraries used by the plugin to our git repository. Since these files are visible to eclipse, it makes sense that we add an entry for them in the .gitignore file. In fact I would suggest that the .gitignore file contain at least the following entries:
.classpath
.project
.settings/
META-INF/
build.properties
target/
The easy way
In this note, I assume that the plugin is maven project. The simplest way to do this would to use the maven eclipse support that is described here. Unfortuately we have had bad experience with this technique but it is sweet when it works and is worth a try. Essentially the two core commands are
    mvn -Declipse.workspace=<path-to-eclipse-workspace> eclipse:add-maven-repo
    mvn eclipse:eclipse
After these commands the project will be ready to import. Also you can arrange that the project that is created is a plugin project by including the following configuration in the pom.xml file:
    <plugin>
        <artifactId>maven-eclipse-plugin</artifactId>
        <version>2.9</version>
        <configuration>
            <pde>true</pde>
        </configuration>
    </plugin>
But if this doesn't work you can try the approach described below.
A manual method
I will describe how I made this approach work with a particular plugin project. I chose the org.protege.owl.rdf project as this is project that includes some libraries.
Temporary workaround
The org.protege.owl.rdf project still has some remnants from the ant build days and these will probably be removed shortly. In the mean time, I manually removed the lib, META-INF directories and the build.xml file.
End of temporary workaround
The first step is to setup the .gitignore file so that git will ignore files that are only meaningful to an eclipse developer and are not of general interest. I suggest the following configuration:
.classpath
.project
.settings/
META-INF/
build.properties
target/
Now I am ready to start eclipse. In eclipse I create a new plugin project called org.protege.owl.rdf making sure that it is based on the files in the gir project org.protege.owl.rdf that I just checked out. If I checked out the org.protege.owl.rdf file into the protege workspace then this usually simply works. In addition try to remember to set the source path to
src/main/java
or you will have to fix this later.
Now I need to replace the MANIFEST.MF that eclipse created with a project-specific manifest.mf that can be used by eclipse. I first need to build the project with maven
mvn clean install
and then I extract the MANIFST.MF file from the built artifact:
jar -xf target/org.protege.owl.rdf-1.0.3-SNAPSHOT.jar META-INF/MANIFEST.MF
You might want to run
git status
at this point to make sure that there are no other files that eclipse has created or modified. Another common file to get changed or modified is the activator. After doing this I refresh eclipse so that it sees the new manifest.
In many cases you will be done at this point. For the org.protege.owl.rdf project there is one more hurdle (which is why I chose it) because it uses libraries that are included in the jar bundle.
Dealing with libraries
If you have a lot of dependencies, the steps below are more than a bit tedious. Is there a maven-eclipse plugin that can help here?
At this point the org.protege.owl.rdf project still has a bunch of errors (342). These errors are caused because eclipse does not know about the dependency of the org.protege.owl.rdf project on some libraries that it uses, the most obvious of which is the openrdf sesame project. One of the typical errors looks like this:
BNode cannot be resolved to a type
and if I go to the file where this error occurs and then go to the top of the file to see the imports, I see that eclipse is unable to see the package org.openrdf.
Now, since the project builds properly with the command 'mvn clean install' I know that I have all the needed libraries on my machine. The libraries are in my repository. What I need to do is to make eclipse think that the libraries are in the place that it expects them to be and to add them to my class path. The first step to doing this is to add a linked resource variable that makes it easy to link items in my repository to the eclipse workspace. To do this, click on Window->Preferences (Eclipse->Preferences on a mac), select General->Workspace->Linked Resources and click on the button that defines a new path variable.
In this window configure the M2_REPO variable so that it points to the local maven repository which is usually (always?) located at '.m2/repository' in your home directory. This allows me to set up the eclipse projects so that they do not require pointers to system specific locations. The system specific location of the repository is set once in the eclipse workspace rather than once for each project.
Now I work through the list of dependencies so that I can add them all to eclipse. The first dependency looks like this:
		<dependency>
			<groupId>org.openrdf.sesame</groupId>
			<artifactId>sesame-repository-sail</artifactId>
			<version>2.7.0</version>
		</dependency>
To satisfy this dependency I need to link the appropriate version of the sesame-repository-sail jar file in my repository to the org.protege.owl.rdf project directory and add it to my class path. To do this I perform the following steps:
- I select the top directory of the project.
- I click File->New->File and I get a dialog.
- I make sure that the parent folder is the top level directory of the org.protege.owl.rdf project.
- I click on "Advanced" because I want to make a file link and that is advanced.
- There is then a checkbox near the bottom of the dialog that says link to the file system and I click on that.
- I click on variables which causes a sub-dialog to come up.
- In that subdialog I select the M2_REPO variable.
- I click extend and I get a file browser dialog where the top of the file tree is given by the location pointed to by my M2_REPO variable. The path that I select in this browser is governed by the fields in the dependency record for sesame-repository-sail that I am trying to incorporate into eclipse. I explore my way to org/openrdf/sesame (which is derived from the group id in the pom.xml dependency). From that subdirectory I open sesame-repository-sail (which comes from the artifactId. From that subdirectory I open the directory 2.7.0 which comes from the version. Finally in that directory I select the jar file and I click ok for the file browser dialog.
- I make one more check of the parameters in the "New File" dialog. The parent directory should be the top level directory of the org.protege.owl.rdf project, the filename should be sesame-repository-sail-2.7.0.jar and the text in the text box under "link to the file system" should be M2_REPO/org/openrdf/sesame/sesame-repository-sail/2.7.0/sesame-repository-sail-2.7.0.jar.
- I click ok to the new file dialog and I have a link.
After all this work I can look in the "Package Explorer" and see that the sesame-repository-sail-2.7.0.jar file has indeed been linked into the workspace. To add this file to the class path, I right click on the file in the "Package Explorer", move the mouse to "Build Path" and then click on "Add to Build Path".
I then repeat these steps for each of the dependencies in the pom, excluding the core protege plugins and libraries that are imported by the manifest. On the mac I keep getting this error dialog that says it cannot launch all these jars but I think that this can be ignored. I don't know what it is trying to launch and everything appears to be working fine. If all this pointing and clicking is getting you down then it may be possible to avoid some of this by editing the .project file directly and then refreshing the project in eclipse. The specifications of linked resources in the .project file looks like this:
	<linkedResources>
		<link>
			<name>logback-classic-1.0.12.jar</name>
			<type>1</type>
			<locationURI>M2_REPO/ch/qos/logback/logback-classic/1.0.12/logback-classic-1.0.12.jar</locationURI>
		</link>
                ...
The corresponding entry in the .classpath looks like this:
<classpathentry kind="lib" path="logback-classic-1.0.12.jar"/>
After doing all this work there were a few dependencies of dependencies that were missing:
    sesame-rio-api-2.7.0.jar
    sesame-query-2.7.0.jar
    sesame-repository-api-2.7.0.jar
    sesame-sail-api-2.7.0-jar
I found these by applying advanced unix search tools to the maven repository. One such command was:
          for i in `find . -name "*protege*" -prune -o -name *.jar -print`
          do
               echo $i ; jar -tf $i |grep Sail
          done
I don't know of a generally accessible way of finding the missing dependencies but I suspect that this problem is rare.
Then eclipse has some problems with the manifest. I suspect that these errors are due to a difference of opinion between eclipse and bnd (the MANIFEST was made by maven which uses bnd). The best solution would be to convince eclipse to ignore these errors. Alternatively I opened the manifest in eclipse and applied all the fixes.
I couldn't try the osgi runnable because I am on a mac. But I will try the project that I made later on a unix machine.
