PluginAnatomy
The Anatomy of a Plugin
The purpose of this web page is to describe some of the key ingredients of a Protege plugin. Even though the page is written for plugins of Protege 4, most things apply also for developing plugins for Protege 5 and newer versions.
Back to Protege Developer Documentation
Contents
Introduction
The purpose of this web page is to describe some of the key ingredients of a plugin. The page will be directed by the quick development of a plugin and can indeed be used as a quick start guide. In order to focus attention on the core plugin concepts we will use the lowest common denominator of Java development tools and this tutorial will not use a Java IDE. We will assume that the reader has an understanding of Java development and knows how to follow along in his favorite IDE. For more information about how to work with Protege in an IDE, I will direct the reader to this page. It is possible for an experienced developer to skip the ant scripts simply follow along in an IDE but we would still recommend a build file for the final version.
The sources for the first plugin (the example tab) can be found here. You can either check these out from svn and use this as a guide for reading the text or build this project in a series of step by step stages as described below. If you start from the checked out version then you can build the project by following the directions here.
The vacuous plugin in five minutes
I created a (vacuous) plugin from scratch, installed it and ran it in just under four minutes. There is also a new experimental quick-start guide for starting a new Protege 5 plugin with maven which will probably evolve into the new recommended strategy.
The simplest (trivial) plugin can be built from sources in the following layout:
   build.xml
   META-INF
      MANIFEST.MF
   lib
   resources
   src
As we will see - even without any java sources - this is a sufficient basis for building a plugin that is recognized by Protege. There are only two files in this source tree - the build.xml file and the MANIFEST.MF. These files can be quickly put together from templates.
Build.xml
The template for the build.xml file can be downloaded from here. Only two things need to be changed in this build file. They can be found by searching for the string "CHANGE ME" in the file. The first thing to change is the name of the project. I will call the project the plugin tutoiral project:<project name = "plugin tutorial" default = "install" basedir = ".">The next setting that must almost always be changed is the name of the plugin. In this case, the build.xml already has the right name for the plugin but this is the only plugin for which this will be true:
<property name = "plugin" value = "org.protege.editor.owl.examples.tab"/>
With these adjustments the build.xml file is ready.
MANIFEST.MF
The template for the MANIFEST.MF file can be downloaded from here. Only five things need to be changed in this file to make it useable and two are optional. These can be found by searching for the string "CHANGE ME" in the file. The first change is to set the display name for the plugin:Bundle-Name: Tutorial PluginThis is the name that is seen when Protege starts up and in several plugin configuration screens. The seccond thing to change is the symbolic name of the plugin. The usual default is to uses the same name as the plugin name in the build.xml file:
Bundle-SymbolicName: org.protege.editor.owl.examples.tab;singleton:=trueNote the "singleton:=true" line - this is important since most Protege plugins will only work if they are instantiated exactly once. The next things to change are the bundle description, the vendor and the documentation url:
Bundle-Description: A simple plugin for a plugin development tutorial
Bundle-Vendor: The Protege Development Team
Bundle-DocURL: www.perhaps.i.donthaveoneyet.com
Actually the vendor and the docurl are optional and can be deleted. The MANIFEST.MF file is now ready.
Compile and Run
Before we can start, we must set the PROTEGE_HOME environment variable to point to a Protege 4 distribution. This page has directions on how to do this in different operating systems but for now I will assume that we are on a unix (or os x) system. In that case, the system variable can be set with a simple commandexport PROTEGE_HOME=/Users/tredmond/Desktop/Protege_4.1_betaThis vacuous plugin is now ready to compile and run. Assuming that the PROTEGE_HOME environment variable is set correctly, this plugin can be compiled with the simple command
ant installThe full text of the build session is as follows:
[tredmond@Andromeda org.protege.editor.owl.examples.tab]$ ant install
Buildfile: build.xml

init:
    [mkdir] Created dir: /private/tmp/org.protege.editor.owl.examples.tab/build
    [mkdir] Created dir: /private/tmp/org.protege.editor.owl.examples.tab/build/classes
    [mkdir] Created dir: /private/tmp/org.protege.editor.owl.examples.tab/build/classes/lib
    [mkdir] Created dir: /private/tmp/org.protege.editor.owl.examples.tab/build/lib

checkProtegeLibs:
     [echo] Using Protege Home = /Andromeda/Users/tredmond/dev/workspaces/protege4/owleditor/build/dist/equinox to find protege jars

checkProtegeLibsAndReport:

buildlibs:
    [unjar] Expanding: /Andromeda/Users/tredmond/dev/workspaces/protege4/owleditor/build/dist/equinox/bundles/org.protege.common.jar into /private/tmp/org.protege.editor.owl.examples.tab/build

compile:

build.manifest:
     [copy] Copying 1 file to /private/tmp/org.protege.editor.owl.examples.tab/build

copy.resources:
    [mkdir] Created dir: /private/tmp/org.protege.editor.owl.examples.tab/build/classes/META-INF
     [copy] Copying 1 file to /private/tmp/org.protege.editor.owl.examples.tab/build/classes/META-INF

jar:
      [jar] Building jar: /private/tmp/org.protege.editor.owl.examples.tab/build/org.protege.editor.owl.examples.tab.jar

install:
   [delete] Deleting directory /Andromeda/Users/tredmond/dev/workspaces/protege4/owleditor/build/dist/equinox/configuration/org.eclipse.core.runtime
   [delete] Deleting directory /Andromeda/Users/tredmond/dev/workspaces/protege4/owleditor/build/dist/equinox/configuration/org.eclipse.osgi
     [copy] Copying 1 file to /Andromeda/Users/tredmond/dev/workspaces/protege4/owleditor/build/dist/equinox/plugins

BUILD SUCCESSFUL
Total time: 2 seconds
[tredmond@Andromeda org.protege.editor.owl.examples.tab]$
If the PROTEGE_HOME environment variable is not set correctly the user will instead see the following:BUILD FAILED /private/tmp/org.protege.editor.owl.examples.tab/build.xml:74: missing protege libraries
We can now look at what the build has done by exploring the project directory tree.
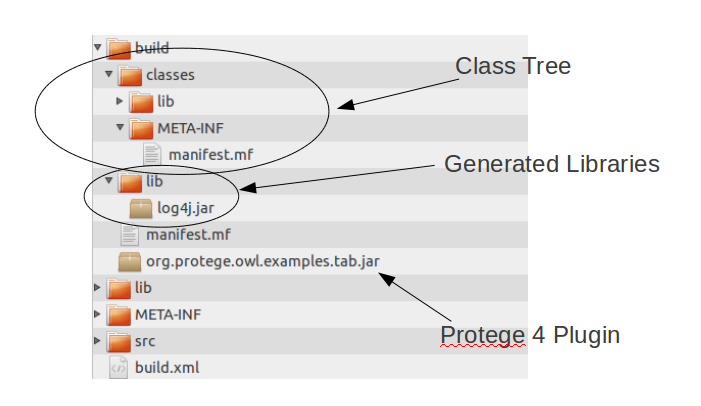
We see the following elements:
- The Class Tree is (approximately) a flattened view of the plugin (the jar file). Generally this largely consists of the .class files that have been compiled from the java. But since we have not written any java yet this is not found. In addition, this will contain resources needed by the plugin and libraries that the plugin needs but which cannot be found in other Protege plugins.
- The Generated Libraries which are extracted from Protege plugins. This is needed because of a difference between how Java and OSGi get resources out of Jar files. OSGi allows a bundle (which is a implemented as a jar file) to contain other jar files. If the bundle classpath is configured correctly, OSGi will load classes from those jars in jars. But Java does not have this capability. So the build script extracts the jar files out of the OSGi bundles that will be needed to compile the bundle. Note that these jar files are not copied to the class tree because the Protege 4/OSGi environment will make the classes and resources of these jar files available.
- The Protege 4 Plugin this is the final artifact of the build process. Because we have run "ant install" it has also been installed in the Protege distribution.
Starting Protege 4 OWL Editor (Version 4.1.111)
Platform:
    Java: JVM 1.5.0_16-b06-284 Memory: 207M
    Language: en, Country: US
    Framework: Eclipse (1.4.0)
    OS: MacOSX (10.5.6)
    Processor: ppc
Installed plugin Pellet Reasoner
Installed plugin DL Query Tab
Installed plugin Owlviz Plug-in
Installed plugin owleditor
Installed plugin Tutorial Plugin
Installed plugin The OWL API
Installed plugin Factplusplus Plug-in
	Tutorial Plugin Plugin has no plugin.xml resource
In this output we see that the Tutorial Plugin has been recognized and installed. In addition there is a informational message that the plugin.xml file has not been found. This is almost always indicates a problem because most Protege 4 plugins depend on a plugin.xml resource. We will describe how the plugin.xml file is generated in the next sections.
Writing View and Tab Plugins
The previous plugin added no functionality to Protege. We are now going to describe how to remedy this situation. So far we have not missed the Java IDE but it is now when we start writing a bit of Java code that the Java IDE would really shine. But to illustrate the main concepts, we will continue to show how to build the plugin without any development environment other than that provided by the core Java tools.
Adding a View Plugin to the Plugin.xml file
Recall that previously when we ran our plugin, Protege 4 complained that there was no plugin.xml file. The plugin.xml file contains a declaration of the ways in which the plugin will extend the Protege 4 capabilities and (more advanced) the ways in which the plugin capabilities can be extended by other plugins. We will start by adding a declaration that this plugin will implement a Protege View.
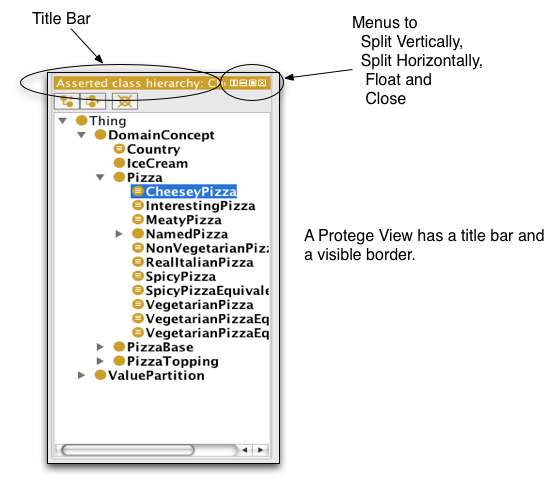
So first we will give a definition of a Protege view. The purpose of a Protege view is to provide a view of some aspect of an ontology. In the Protege interface, a Protege view is easily recognized. It has a clearly defined border. At the top of a Protege view is a title bar and a collection of buttons allowing the user to
- split the protege view into two copies of the same view one above the other,
- split the protege view into two copies of the same view one beside the other,
- float the view above the Protege client so that it is visible in any context,
- close the view removing it from the tab that contains it.
An example of a typical Protege view is shown below.
In order to declare our intent that this plugin implement a Protege view, we add the following plugin.xml file to the root of the project tree:
<?xml version="1.0" encoding="UTF-8" standalone="no"?>
<?eclipse version="3.0"?>

<plugin>
   <extension id="ExampleViewComponent"
              point="org.protege.editor.core.application.ViewComponent">
      <label value="Example View Component"/>
      <class value="org.protege.editor.owl.examples.tab.ExampleViewComponent"/>
      <category value="@org.protege.ontologycategory"/>
   </extension>
</plugin>
This plugin.xml file states that this plugin is making a single extension to the Protege 4 capabilities. We will cover the meaning of the parts of this extension declaration line by line. The first line defines the id of the extension. This particular extension is called the ExampleViewComponent. The second decleration,
point="org.protege.editor.core.application.ViewComponent",
states what the extension is trying to do. This extension is attempting to implement the functionality represented by the extension point with the name
org.protege.editor.core.application.ViewComponent.
The label declaration tells Protege what to put in the title bar of the view. The class declaration indicates which class implements the functionality needed by this view. We will go into the implementation of that class shortly. Finally the category declaration tells Protege which menu under the View menu should contain this view.
A very simple view can be written by extending the class AbstractOWLViewComponent and implementing the methods initialiseOWLView and disposeOWLView. A very simple such implementation can be found
here.
Now this plugin depends on a library that can be found
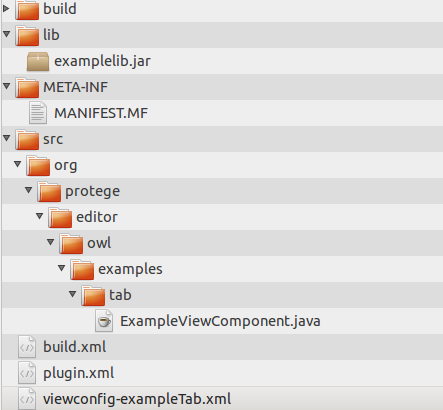
here. This library should be deposited in the lib directory of the project. This library is trivial and its only purpose is to show how to use a library in a plugin. The directory tree of the project should now look like this:
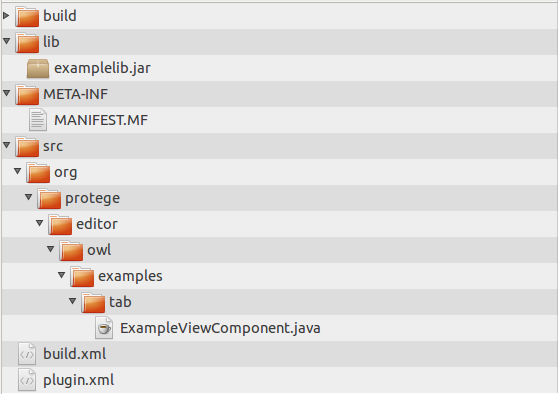
At this point the ant install operation will compile, build and install the new plugin with the "ant install" command. But the installed plugin won't run correctly and we will show how to fix this below.
Libraries and the Bundle Classpath
After we install the plugin, we can start Protege to try to use the "Example View Component". If you click on the View menu and then select "Ontology Views" you will see the "Example View Component" listed there. However on selecting this view and trying to place on the Protege screen, the following error will arise:
Error logged
java.lang.NoClassDefFoundError: org/protege/owl/example/Metrics
	at java.lang.Class.getDeclaredConstructors0(Native Method)
	at java.lang.Class.privateGetDeclaredConstructors(Class.java:2357)
	at java.lang.Class.getConstructor0(Class.java:2671)
	at java.lang.Class.newInstance0(Class.java:321)
	at java.lang.Class.newInstance(Class.java:303)
        ...
If we look at the plugin contents with the "jar -tf " command then we will see that the build file correctly put the examplelib.jar into the plugin:
[tredmond@BlackHole org.protege.editor.owl.examples.tab]$ jar -tf build/org.protege.editor.owl.examples.tab.jar
META-INF/
META-INF/MANIFEST.MF
lib/
org/
org/protege/
org/protege/owl/
org/protege/owl/examples/
org/protege/owl/examples/tab/
lib/examplelib.jar
org/protege/owl/examples/tab/ExampleViewComponent.class
plugin.xml
[tredmond@BlackHole org.protege.editor.owl.examples.tab]$
The problem at this point is in the MANIFEST.MF file. The Bundle-Classpath line is as follows:
Bundle-ClassPath: .
To include the examplelib.jar in the jar file, the Bundle-Classpath line must be modified to include this library:
Bundle-ClassPath: .,lib/examplelib.jar
Note that using a colon or a semi-colon instead of the comma does not work. Also entering ./lib/examplib.jar does not work either. This is the osgi mechanism for making this library available to this plugin. Note that since the MANIFEST.MF file does not have an Export-Package declaration, these classes will only be visible within the plugin and will not be exported to any other plugin in the Protege environmeht. This is part of the plugin isolation provided by OSGi that allows different plugins to use different libraries without conflicts.
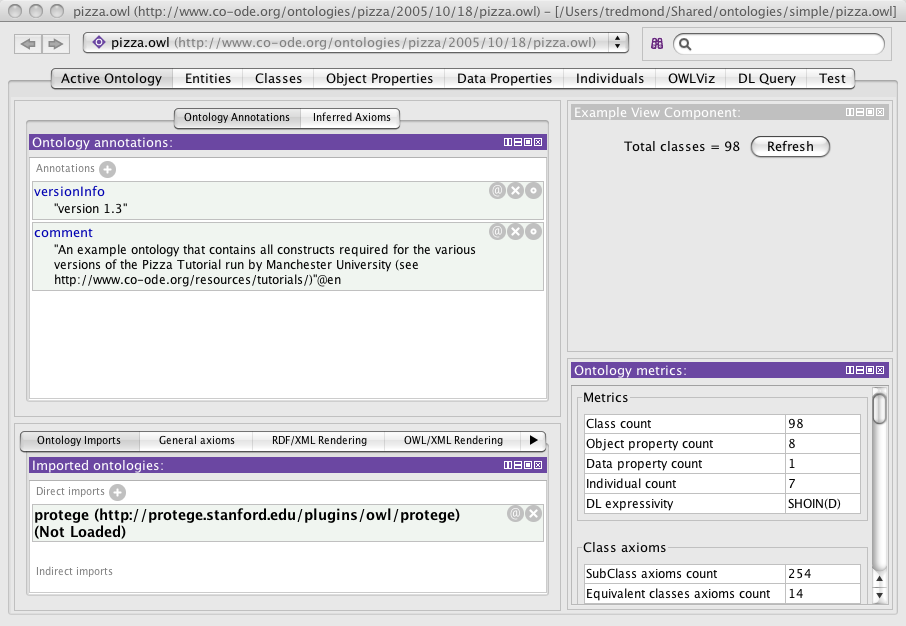
Now the plugin works correctly and I can install the view into the Active Ontology Tab:
 .
.
Tab Plugins and the Viewconfig.xml File
The other most common plugin type is the Protege tab. In order to make a Protege tab, the developer needs to generate and use a viewconfig.xml file for the project. In this section we will show how to do this. It turns out that a tab can usually be put together without writing any Java code. The steps for writing a tab plugin are
- add a declaration of the tab plugin in the plugin.xml file.
- start Protege and graphically configure the tab in question.
- save the configuration and include it with the source files for the tab.
- test by restarting Protege and running the tab with the default configuration.
These steps are described in more detail below.
Step 1: Declare the plugin
The first thing that that needs to be done is to declare the tab in the plugin.xml file.
<?xml version="1.0" encoding="UTF-8" standalone="no"?>
<?eclipse version="3.0"?>

<plugin>
   <extension id="ExampleViewComponent"
              point="org.protege.editor.core.application.ViewComponent">
      <label value="Example View Component"/>
      <class value="org.protege.editor.owl.examples.tab.ExampleViewComponent"/>
      <category value="@org.protege.ontologycategory"/>
   </extension>
   <extension id="ExampleWorkspaceTab"
              point="org.protege.editor.core.application.WorkspaceTab">
      <label value="Example Tab"/>
      <class value="org.protege.editor.owl.ui.OWLWorkspaceViewsTab"/>
      <index value="X"/>
      <editorKitId value="OWLEditorKit"/>
      <defaultViewConfigFileName value="viewconfig-exampleTab.xml"/>
   </extension>
</plugin>
An important line in the above declaration of the tab is the defaultViewConfigFileName. This names a resource that the protege plugin will look for to create the default layout of the tab.
Step 2: Layout the views in the plugin
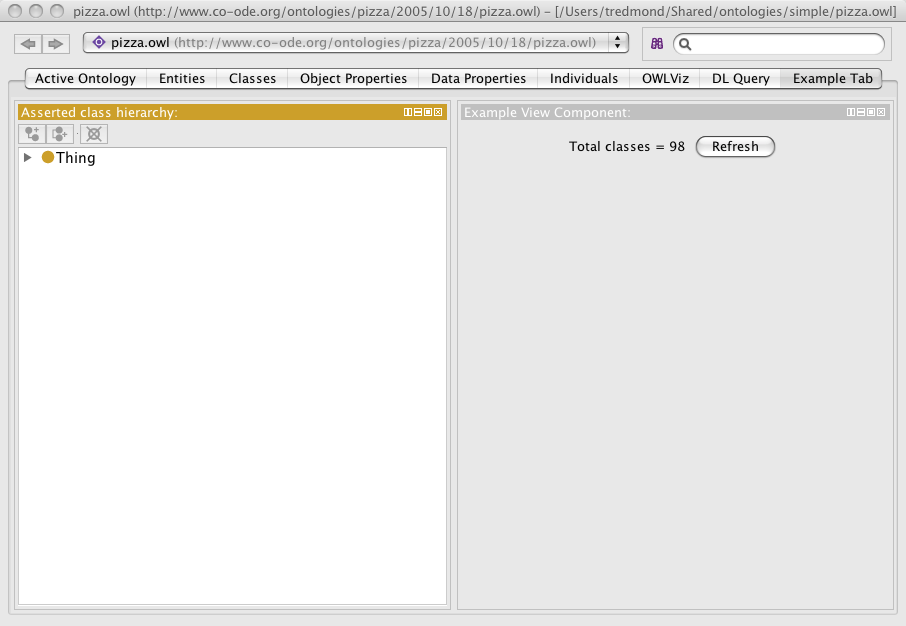
We can now compile this plugin and install it as before. Now when we run Protege, we will see a new tab called the "Example Tab" in the tabs menu (Window->Tabs). Enable this tab. Since we have not yet created the viewconfig-exampleTab.xml file, you will see that the tab is empty.
Now install and layout some views into this tab. In my case I made the views look like this:
Step 3: Save a configuration file
Now in the Window menu select "Export Current Tab" and save the file as
viewconfig-exampleTab.xml
in the project directory. In my case the viewconfig-exampleTab file looked like this:
<?xml version="1.0" encoding="UTF-8"?>
<layout>
    <VSNode splits="0.5 0.5">
        <CNode>
            <Component label="Asserted class hierarchy">
                <Property id="pluginId" value="org.protege.editor.owl.OWLAssertedClassHierarchy"/>
            </Component>
        </CNode>
        <CNode>
            <Component label="Example View Component">
                <Property id="pluginId" value="org.protege.editor.owl.examples.tab.ExampleViewComponent"/>
            </Component>
        </CNode>
    </VSNode>
</layout>
Now before we complete this Protege session, go to the Window menu and click "Reset selected tab to default state". You will see that the tab is now empty again. Now exit Protege.
The directory tree of the project should now look like this:
Step 4: Test the results
Install the plugin again. Note that the build script automatically found the viewconfig-exampleTab.xml file and put it into the plugin:
[tredmond@BlackHole org.protege.editor.owl.examples.tab]$ jar -tf build/org.protege.editor.owl.examples.tab.jar
META-INF/
META-INF/MANIFEST.MF
lib/
org/
org/protege/
org/protege/owl/
org/protege/owl/examples/
org/protege/owl/examples/tab/
lib/examplelib.jar
org/protege/owl/examples/tab/ExampleViewComponent.class
plugin.xml
viewconfig-exampleTab.xml
[tredmond@BlackHole org.protege.editor.owl.examples.tab]$
Run Protege and go to the Example Tab. It is empty? The reason for this is that the tab has been customized to have nothing in it from the last session. Click on the tabs menu and click on "Reset selected tab to default state". Now you will see the views that we configured in the tab before. This is now the default state for the tab and it will be what other users see when they use this plugin for the first time.
Adding Menu Plugins
I have created a small menu project here that shows how to create several different menu types. Later we will use this project as the example that drives this wiki page.
Adding a new menu to Protege is very easy. The two things that the developer needs to accomplish are to write the code for the menu action and to add an entry to the plugin.xml. I will take a real world example to illustrate the process. In this example, I am writing a plugin that causes Protege to display an ontology that is stored in a database format. I want to put this in the file menu of Protege just under other items such as "New", "Open", "Open Recent" and "Open from URL".
To write the code for the menu plugin, the developer merely needs to extend ProtegeOWLAction. The three methods that the developer needs to write are initialise, dispose and actionPerformed. I think that the meaning of these three methods is pretty clear and this can be a very easy task.
Now the developer needs to add an entry to the plugin.xml file. In my case the entry looks like this:
    <extension id="loadDatabase"
               point="org.protege.editor.core.application.EditorKitMenuAction">
        <name value="Load Database Ontology"/>
        <class value="org.protege.owlapi.bridge.LoadDatabaseProjectMenu"/>
        <toolTip value="Loads ontologies from a database into Protege"/>
        <path value="org.protege.editor.core.application.menu.FileMenu/SlotAA-Z"/>
        <editorKitId value="OWLEditorKit"/>
    </extension>
The "id" attribute of loadDatabase is simply a short identifier for the plugin that is not seen by the user. The "point" attribute indicates that the plugin being declared here is a menu plugin. The
<class value="org.protege.owlapi.bridge.LoadDatabaseProjectMenu"/>
line indicates the class that implements the action that this menu performs and the
<editorKitId value="OWLEditorKit"/>
line indicates that the menu is to be used in the context of the owl editor. The only other line in this plugin.xml that is a bit mysterious is the line that says:
<path value="org.protege.editor.core.application.menu.FileMenu/SlotAA-Z"/>
The purpose of this line is to indicate exactly where the menu should be placed. The first part of the value,
org.protege.editor.core.application.menu.FileMenu
indicates that the parent of my "Load Database Ontology" menu is the file menu. The string is making a reference to the file menu declaration
   <extension
         id="menu.FileMenu"
         name="FileMenu"
         point="org.protege.editor.core.application.EditorKitMenuAction">
      <name value="File"/>
      <toolTip value="File menu tool tip!"/>
      <path value="/SlotA-A"/>
      <editorKitId value="any"/>
   </extension>
from the plugin.xml file for the org.protege.editor.core.application plugin. The first part of the string
org.protege.editor.core.application.menu.FileMenu
is
org.protege.editor.core.application
which is the identifier of the plugin declaring the menu and "menu.FileMenu" is the id of the plugin from the plugin.xml file.
But now I need to explain the meaning of the SlotAA-Z portion of the path in my original menu declaration:
    <extension id="loadDatabase"
               point="org.protege.editor.core.application.EditorKitMenuAction">
        <name value="Load Database Ontology"/>
        <class value="org.protege.owlapi.bridge.LoadDatabaseProjectMenu"/>
        <toolTip value="Loads ontologies from a database into Protege"/>
        <path value="org.protege.editor.core.application.menu.FileMenu/SlotAA-Z"/>
        <editorKitId value="OWLEditorKit"/>
    </extension>
The SlotAA-Z string indicates exactly where the "Load Database Ontology" should appear in the File menu. This string (SlotAA-Z) is parsed as a group (Slot-AA) and an index (Z). First the group and the index are used to sort the children of the File menu. The children are sorted first by group but when two children have the same group they are then sorted by group index. In addition to this, children with the same group are grouped together in the menu.
In particular, if I track down the declarations of the "New", "Open", "Open Recent" and "Open from URL" menus I find that they all have a group identifier of SlotAA. This is why they appear in the file menu together followed by a separator bar. By specifying that my menu should have a group of SlotAA, I am telling Protege that I want my menu to be grouped with these menus. By giving my menu an index of Z I am telling Protege that I want my menu to go at the end of the list.
The algorithm used by Protege to determine the location of the plugin can be observed by turning on logging for the menu builder. This can easily be done by editing the log4j.xml in the Protege installation directory. First modify the section that says
        <appender name="console" class="org.apache.log4j.ConsoleAppender">
           <param name="Threshold" value="INFO"/>
           <layout class="org.apache.log4j.PatternLayout">
             <param name="ConversionPattern" value="%m%n"/>
           </layout>
        </appender>
to say
        <appender name="console" class="org.apache.log4j.ConsoleAppender">
           <param name="Threshold" value="INFO"/>
           <layout class="org.apache.log4j.PatternLayout">
             <param name="ConversionPattern" value="%m%n"/>
           </layout>
        </appender>
This allows the console to show debug messages. Then add the lines
        <category name="org.protege.editor.core.ui.menu">
        	<priority value="debug"/>
        </category>
This will cause Protege to generate somewhat verbose logs to the console (these logs also show up in a log file in ${home directory}/.Protege/logs/protege-###.log). The relevant lines for my menu plugin are as follows. First
Parsed: [Menu: Load Database Ontology -- <SlotAA, Z>] parentId = org.protege.editor.core.application.menu.FileMenu
indicates that Protege was able to parse the path for my menu plugin and determine that the id of the parent is
org.protege.editor.core.application.menu.FileMenu
the group is SlotAA and the group index is Z. Next we see the line
[Menu: File -- <SlotA, A>] parent of [Menu: Load Database Ontology -- <SlotAA, Z>]
which indicates that Protege was successfully able to find a declared menu with the right id to be the parent of my menu. This line also indicates that Protege successfully deciphered the group (SlotAA) and the index (Z). Finally there are the lines:
Adding [Menu: File -- <SlotA, A>] to menu bar
Giving File the child[Menu: New... -- <SlotAA, E>]
Giving File the child[Menu: Open... -- <SlotAA, F>]
Giving File the child[Menu: Open recent -- <SlotAA, G>]
Giving File the child[Menu: Open from URL... -- <SlotAA, G>]
Giving File the child[Menu: Load Database Ontology -- <SlotAA, Z>]
Giving File the child[Menu: Save -- <SlotAB, A>]
Giving File the child[Menu: Save as... -- <SlotAB, B>]
Giving File the child[Menu: Gather ontologies... -- <SlotAB, C>]
Giving File the child[Menu: Export inferred axioms as ontology... -- <SlotAB, D>]
Giving File the child[Menu: Ontology libraries... -- <SlotD, A>]
Giving File the child[Menu: Loaded ontology sources... -- <SlotD, B>]
Giving File the child[Menu: Check for plugins... -- <SlotP, A>]
Giving File the child[Menu: Close -- <SlotY, M>]
that indicate that the File menu was successfully populated.
Using a Reasoner
Usually when a plugin wants to use a reasoner, the plugin should use the reasoner that is initialized and used by Protege. This reasoner could be the FaCT++, HermiT, Pellet or other reasoners and is selected and initialized at the users request. To explain how this works we will explain how the following (not too useful) code from a menu plugin works.
    public void actionPerformed(ActionEvent e) {
        OWLClass lastSelectedClass = getOWLWorkspace().getOWLSelectionModel().getLastSelectedClass();
        if (lastSelectedClass != null) {
            OWLReasonerManager reasonerManager = getOWLModelManager().getOWLReasonerManager();
            ReasonerUtilities.warnUserIfReasonerIsNotConfigured(getOWLWorkspace(), reasonerManager);
            if (reasonerManager.getReasonerStatus() == ReasonerStatus.INITIALIZED) {
                OWLReasoner reasoner = reasonerManager.getCurrentReasoner();
                Set<OWLClass> subClasses = reasoner.getSubClasses(lastSelectedClass, true).getFlattened();
                if (!subClasses.isEmpty()) {
                    LOGGER.info("Inferred subclasses of " + getOWLModelManager().getRendering(lastSelectedClass) + " are:");
                    for (OWLClass subClass : subClasses) {
                        LOGGER.info("\t" + getOWLModelManager().getRendering(subClass));
                    }
                }
                else {
                    LOGGER.info(getOWLModelManager().getRendering(lastSelectedClass) + " has no inferred subclasses.");
                }
            }
        }
    }
This code creates an action that when invoked will print some messages about inferred subclasses to the log. The first thing to notice is that the OWLReasonerManager is the central class for accessing the Protege reasoner and it can be obtained from the OWLModelManager. This class can be used to determine the status of the reasoner, get the current Protege reasoner or get a reasoner factory for creating new instances of a Protege reasoner.
Once the reasoner manager is obtained code above informs the user if the reasoner is not initialized or is in inconsistent state. This warning has been included as a standard Protege utility so that the user will get a consistent message when the reasoner is not ready for inference. This is the approach taken by the DLQuery plugin for instance because it does not make sense to use the DLQuery plugin if the reasoner is not initialized. However an alternative approach is to quietly check the status of the reasoner and only use the reasoner if it is in a good enough state. This is the strategy taken by the code that displays inferences such as the inferred super classes and the consistency of classes and properties as the user navigates through the Protege interface.
The next thing that happens is that the code checks the status of the current reasoner with the call reasonerManager.getReasonerStatus(). This call returns a ReasonerStatus enumeration which currently can take on the following values:
- NO_REASONER_FACTORY_CHOSEN: the user has not yet selected a type of reasoner.
- REASONER_NOT_INITIALIZED: the user has selected what type of reasoner he wants but has not initialized it yet.
- INITIALIZATION_IN_PROGRESS: the reasoner is in the process of being initialized. Plugins should not see this state.
- INITIALIZED: the reasoner is ready for use.
- INCONSISTENT: the reasoner was initialized but the ontology is inconsistent. In this state, reasoners are not usable.
- OUT_OF_SYNC: the reasoner is ready but it is not up to date with the latest changes in the ontology. The reasoner is usable in this state but it may produce misleading results. It can be brought up to date with a reasoner.flush() call.
Finally the code above obtains the Protege reasoner (which implements the OWL api OWLReasoner interface) and uses OWL api calls to obtain information.
In some cases the above strategy is not sufficient. For example, the explanation plugins need to create their own reasoners and so they need a reasoner factory. In this case the plugin can make the call:
reasonerManager.getCurrentReasonerFactory().getReasonerFactory()
to obtain the reasoner factory (an instance of the OWL api interface OWLReasonerFactory).
Advanced Topics
Adding New Plugin Types
Work in Progress
One of the advantages of using the OSGi/Eclipse framework is that it naturally allows developers to define their own plugin types. For example, the SWRL tab, being written by Martin O'Connor, delegates the work of executing the SWRL rules to a rule engine plugin. It is anticipated that there will be two rule engine plugins that are are compatible with the SWRL tab. One of these plugins will be based on the Jess rule engine and the other plugin will be based on the DROOLS rule engine.
We will illustrate how this is done with two Protege bundles. The sources for these bundles can be found
http://smi-protege.stanford.edu/repos/protege/protege4/misc/examples/custom.extension/trunk/consumer
and
http://smi-protege.stanford.edu/repos/protege/protege4/misc/examples/custom.extension/trunk/producer
Both bundles can be quickly installed through the included ant scripts.
The consumer bundle behaves as follows. It adds a menu item to a running Protege environment. This menu is found at the bottom of the edit menu. When the user clicks on this menu item, the consumer bundle performs the following actions:
- it looks for all custom_extension_point plugins in the running Protege environment,
- it instantiates each plugin found and finally
- it calls the doSomething() method on that plugin instance.
This behavior is provided through the interaction of four components:
- the consumer code that is responsible for looping through a set of plugins and invoking them.
- the plugin loader that is responsible for calculating and returning a set of plugins that match a specifiction.
- the plugin that is a java encoding of data encoded in plugin.xml files provided by the bundles.
- the plugin instance that is an instantiation of a plugin that does the actual work of the plugin.
The Plugin Consumer
The Plugin consumer essentially uses the plugin loader (described below) to loop through a series of plugins and instantiate and invoke them. The code that does this work can be found in the MyPluginConsumer class and looks like the following:
    public void actionPerformed(ActionEvent e) {
        MyPluginLoader loader = new MyPluginLoader(getOWLModelManager());
        for (MyPlugin plugin : loader.getPlugins()) {
            try {
                MyPluginInstance i = plugin.newInstance();
                i.doSomething();
            }
            catch (Exception ex) {
                ProtegeApplication.getErrorLog().logError(ex);
            }
        }
    }
This is a typical example of how a plugin consumer will work. It uses a plugin loader to find a set of plugins that are then instantiated (plugin.newInstance()) and then invoked (i.doSomething()). For the most part, the plugin consumer does not have to worry too much about the details of the Protege plugin infrastructure. The logic of the Plugin consumer is defined by the task at hand.
The Plugin Loader
The plugin loader is responsible for searching for plugins of the custom_extension_point type. The plugin loader extends the AbstractPluginLoader class which handles most of the logic of creating and finding plugins. Minimally, all the developer needs to do to implement the plugin loader is to implement a constructor and a create instance method. The constructor looks like this:
    public MyPluginLoader(OWLModelManager owlModelManager) {
        super(MyPlugin.CONSUMER_ID, MyPlugin.ID);
        this.owlModelManager = owlModelManager;
    }
and this is typical. The significance of the two arguments to the super constructor will be explained when I describe the Plugin implementation. Essentially they define which type of plugin is being searched for by this loader. In addition, the constructor for this plugin loader takes an owlModelManager argument so that he can pass this argument to the constructor for the plugins. The createInstance method then is responsible for constructing the plugin:
    protected MyPlugin createInstance(IExtension extension) {
        return new MyPlugin(owlModelManager, extension);
    }
In addition there is a getExtensionMatcher method that can be used to restrict the set of plugins that are returned by this plugin loader. Generally it is not necessary to implement the getExtensionMatcher interface.
The Plugin
Essentially the plugin is a POJO representing a declaration of a plugin in a plugin.xml file. To understand this we need to look at the two declarations in two separate plugin.xml files. The first declaration is found in the bundle for the consumer plugin. This declaration represents a request for a particular type of service. In our case the declaration looks like this:
   <extension-point id="custom_extension_point"
                    name="Custom Extension Point"
                    schema="schema/custom_extension_point.exsd"/>
This declaration defines
- the identifier of the plugin type, custom_extension_point, which is the name by which plugin developers refer to this plugin type, This string corresponds to the MyPlugin.ID that we passed to the AbstractPluginLoader constructor above. Note that it is possible for different bundles to declare an extension point
- the user friendly name of the plugin type and
- a pointer to the xml schema for the plugin type.
I believe that the last item, the schema, is not mandatory but it is extremely useful for developers and it is created naturally when plugins are developed using the eclipse IDE.
The plugin producer provided a declaration for his extension that matches the extension point declaration above. In our example the extension declaration looks like this:
   <extension id="SimpleImplementation"
         	  point="org.protege.example.extension.point.custom_extension_point">
      <class value="org.protege.example.extension.PluginImplementation"/>
      <type value="Logger Type"/>
   </extension>
The plugin class, MyPlugin, extends the AbstractProtegePlugin class. The AbstractProtegePlugin class provides many utilities that make it easy to write the plugin class. In particular, to get the "type" field the MyPlugin class provides an accessor:
    /**
     * gets the declared type field for the plugin
     */
    public String getType() {
        return getPluginProperty(TYPE_PARAM, "null type");
    }
In addition, the AbstractProtegePlugin class does the tricky aspects of instantiating the plugin leaving only the task of initializing the instantiated plugin to the MyPlugin class:
    /**
     * Creates an instance of the plugin.  It is expected that
     * this instance will be "setup", but the instance's
     * initialise method will not have been called in the instantiation
     * process.
     */
    public MyPluginInstance newInstance() throws ClassNotFoundException, IllegalAccessException,
                                                          InstantiationException {
    	MyPluginInstance mpi = super.newInstance();
        mpi.setup(modelManager, getType());
        return mpi;
    }
The Plugin Instance
The plugin instance class is responsible for performing whatever task it is that the plugin is supposed to perform. In our case the plugin instance will implement the doSomething() method. This class must implement the ProtegePluginInstance interface though it is not clear that this is really needed anymore. The ProtegePluginInstance interface has only one method, initialise(), but many plugins, such as the one in this example, have their own initailization methods that are called by the Plugin Loader.
Frames, Frame Sections, and Rows
In Progress
It is not clear that this needs to be here but this is an extremely central Protege concept. In general plugin developers will not need to build custom Frame lists and can simply use the top level OWL Frame List concepts.
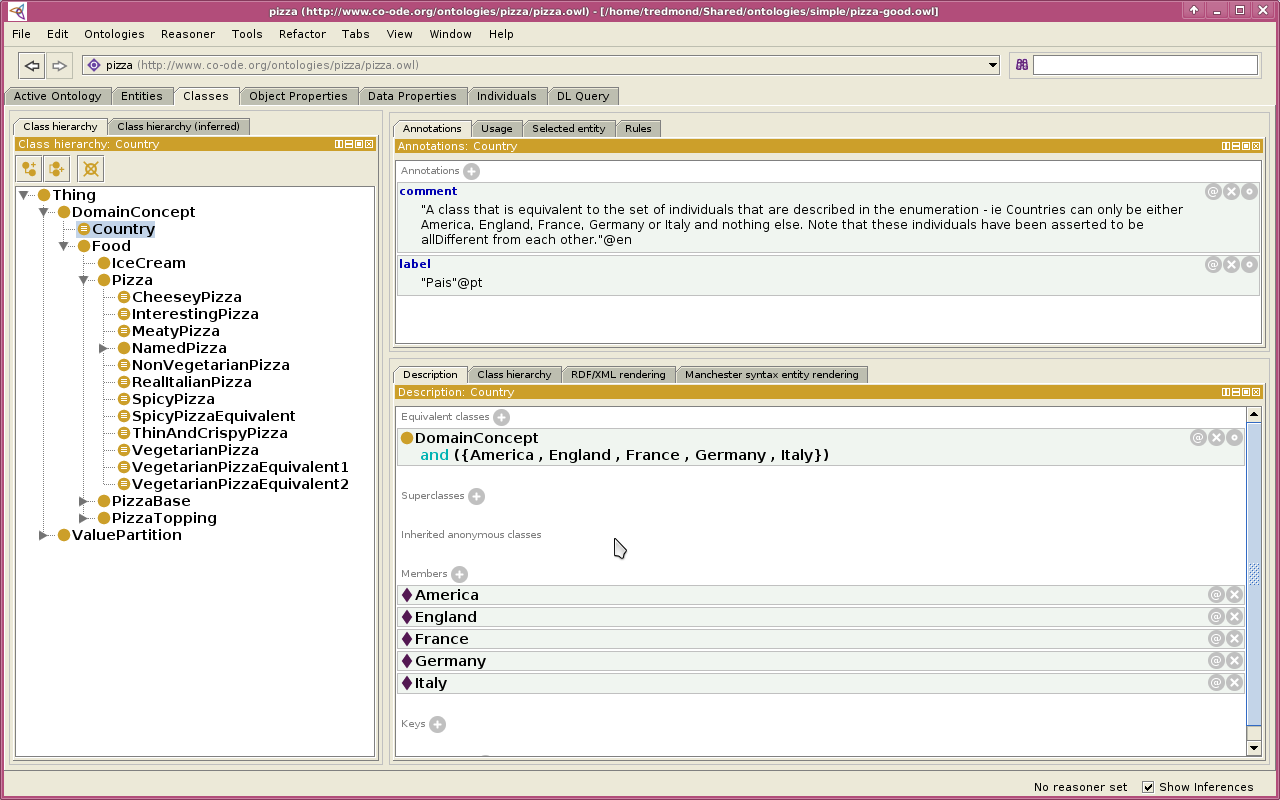
Most of the discussion will focus on a smaller and smaller section of the the following Protege 4.1 screen. This diagram shows the standard Protege 4.1 classes tab as it displays some information about the selected class which is the Country class in the pizza ontology.
FrameLists and Frames
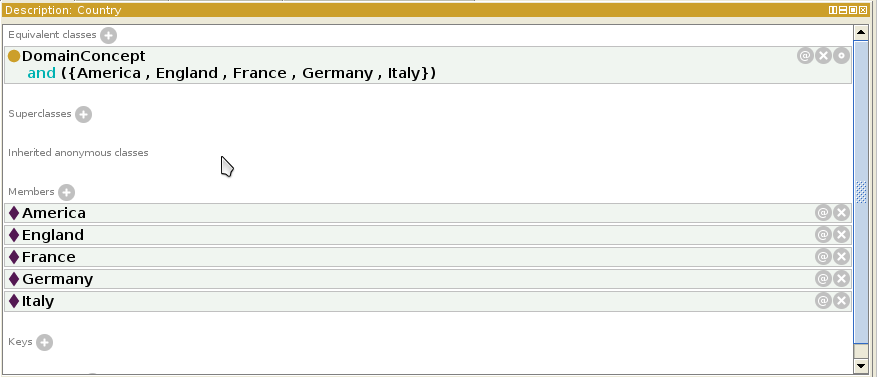
The diagram below shows a FrameList showing a description of the Country class. The OWLFrameList is the swing object that is responsible for displaying some object called the root object for the OWLFrameList. In this case, the root object for this frame list is the Country OWL class. Frequently the root object of the for a frame list is an OWL entity but this is not required. The constructor for the OWLFrameList object takes an OWLFrame object which manages the content model of the OWLFrameList. The associated OWLFrame object also has a root object and in this case the root object is the Country class.
While it may not be visually immediately apparent, the information being displayed is actually a rendition of a list of axioms. Thus for instance, the class expression represented in the section underneath Equivalent Classes represents the axiom
Country SubClassOf DomainConcept and {America, England, France, Germany, Italy}.
Similarly the first individual displayed under Members represents the axiom
America Type Country.
The fact that these are not displayed simply as the associated axioms is an key part of the purpose of the OWLFrameList. The task of the OWLFrameList below is to describe the Country class. For a user it makes sense that in the Members section of that OWLFrameList he would see a list of the individuals in that class. It would make less sense to the user if a set of axioms was displayed there.
Frame Sections
OWLFrames are grouped into a series of sections each of which shows a particular type of axioms. In the diagram below we have a frame section that is rendering a list of class assertion axioms.
Frame Section Rows
Glossary
There are some terms that come up naturally in the discussion of Protege plugin development that require a bit of explanation. The Protege plugin mechanism has three layers and the terms used to describe plugins is slightly different at each of these layers:
- Extension Point is the eclipse term for what Protege folks often call a plugin.
- OSGi is the bottom layer of the Protege plugin architecture. It is a powerful industry standard framework which provides modularity and services beyond that provided by the Java specifications. In OSGi, the term OSGi bundle is used to represent a self-contained unit of code that can be introduced into the OSGi framework and which will import and export classes and resources in a controlled way.
- An OSGi Bundle is collection of software grouped into a single jar file. When this software runs in the OSGi environment, it runs in a protected space where it can define exactly what java classes from the surrounding environment are needed and what java classes are incompatible with its operation. Bundles have names, version numbers, developer contact information and activation entry points
- A Plugin is a declared service that implements some functionality of use to the Protege platform. The Protege Plugin mechanism is based on the Eclipse plugin mechanism where plugins are declared in a file called plugin.xml.
- The Eclipse Rich Client Platform is an environment built on top of OSGi which provides additional features to ease the building of a "Rich" client. Protege only uses some of the features of this rich client platform. In particular, Protege does not use SWT and many of the graphical related capabilities. But Protege does use the declarative plugin capabilities provided by eclipse. It is here that some of the power of the OSGi platform becomes manifest, because we have been able to use only those bundles from the eclipse Rich Client platform that we need. In this setting, OSGi bundles created according to certain conventions become Eclipse Plugins.
- The Protege Plugin layer provides some additional convenience methods over the Eclipse Plugin framework. Certain eclipse plugins that extend Protege capabilities are called Protege plugins.
Back to Protege Developer Documentation
