Difference between revisions of "WebProtegeDevelopersGuide GWT 1 5"
(Created page with 'testing') |
(making a copy of webprotege dev guide under a new name because we upgraded to gwt 1.7 and we will need very different instructions now) |
||
| Line 1: | Line 1: | ||
| − | + | <p style="padding:0; margin:0; font-size:1.9em; font-weight:bold; word-spacing:-2px;">WebProtege Developer's Guide</p> | |
| + | |||
| + | |||
| + | __TOC__ | ||
| + | |||
| + | |||
| + | == Compile and run WebProtege with Eclipse == | ||
| + | To follow is some documentation on how one would go about compiling and running WebProtege from the [http://www.eclipse.org/ Eclipse development environment]. There is more than one way to compile and run WebProtege from Eclipse. This page documents one possibility, but is not meant to be exhaustive. | ||
| + | |||
| + | The version of Eclipse used for the writing of this documentation is 3.4.0 (Ganymede), build id I20080617-2000. | ||
| + | |||
| + | |||
| + | === Prerequisites === | ||
| + | |||
| + | ==== GWT ==== | ||
| + | The user interface of WebProtege is implemented with the [http://code.google.com/webtoolkit/ Google Web Toolkit (GWT)]. In order to compile and run WebProtege, you need to download and install the proper version of GWT. To determine which version to install, please refer to the "readme.txt" file in the root directory of the WebProtege source tree. This file can easily be viewed using our ViewVC repository browser: | ||
| + | |||
| + | http://smi-protege.stanford.edu/svn/web-protege/trunk/readme.txt | ||
| + | |||
| + | ==== GWT-Ext ==== | ||
| + | On the client side, WebProtege uses many of the rich widgets available from the [http://gwt-ext.com/ GWT-Ext library]. In order to compile WebProtege, you must download and install the proper version of GWT-Ext. To determine which version to install, please refer to the "readme.txt" file in the root directory of the WebProtege source tree. This file can easily be viewed using our ViewVC repository browser: | ||
| + | |||
| + | http://smi-protege.stanford.edu/svn/web-protege/trunk/readme.txt | ||
| + | |||
| + | ==== Java 5 ==== | ||
| + | As of the writing of this documentation (10 November 2008), WebProtege requires Java 5, which is [http://java.sun.com/javase/downloads/index_jdk5.jsp available for download] from Sun's website. Please make sure to configure your Eclipse environment to use Java 5 as the default JRE. This is done via the Window | Preferences dialog as shown in the screenshot below: | ||
| + | |||
| + | <div style="padding-top:10px; padding-bottom:10px;"> | ||
| + | [[Image:Webprotege-compile-default-jre.jpg]] | ||
| + | </div> | ||
| + | |||
| + | In addition, please set your compiler compliance level to 1.5 (also in the Preferences dialog): | ||
| + | |||
| + | <div style="padding-top:10px;"> | ||
| + | [[Image:Webprotege-compile-compliance.jpg]] | ||
| + | </div> | ||
| + | |||
| + | |||
| + | === Checkout WebProtege source code === | ||
| + | Launch Eclipse and go to the SVN Repository Exploring perspective. (This step assumes that you have already installed an Eclipse plug-in called [http://subclipse.tigris.org/ Subclipse] that adds Subversion integration to the Eclipse IDE). Click the "Add SVN Repository" button to bring up the "Add SVN Repository" dialog. In the "Url" text box, type the following URL: | ||
| + | |||
| + | http://smi-protege.stanford.edu/repos/protege/ | ||
| + | |||
| + | ... and click Finish. Eclipse should look like the following screenshot at this point: | ||
| + | |||
| + | <div style="padding-top:10px; padding-bottom:10px;"> | ||
| + | [[Image:Svn-repos-perspective.jpg]] | ||
| + | </div> | ||
| + | |||
| + | Once you have successfully connected to the Protege Subversion repository, navigate to the folder '''webprotege/trunk''' and right click to bring up the context menu. Choose the "Checkout..." option to bring up the "Checkout from SVN" dialog. Select the options indicated in the screenshot below and click Finish. | ||
| + | |||
| + | <div style="padding-top:10px; padding-bottom:10px;"> | ||
| + | [[Image:Webprotege-checkout-dialog.jpg]] | ||
| + | </div> | ||
| + | |||
| + | In the resulting "New Project" wizard, select "Java Project" and click Next. In the "New Java Project" dialog, type a project name (for this documentation, we will use "web-protege"). The dialog should look something like the following: | ||
| + | |||
| + | <div style="padding-top:10px; padding-bottom:10px;"> | ||
| + | [[Image:Webprotege-new-project-dialog.jpg]] | ||
| + | </div> | ||
| + | |||
| + | Click Finish to begin checking out WebProtege source code. | ||
| + | |||
| + | <div style="padding-top:10px; padding-bottom:10px;"> | ||
| + | [[Image:Webprotege-checkout-complete.jpg|frame|none|Eclipse IDE after successful checkout of WebProtege sources]] | ||
| + | </div> | ||
| + | |||
| + | After you have successfully checked out the source code, close the Eclipse IDE before proceeding to the next step. | ||
| + | |||
| + | |||
| + | === Run the GWT projectCreator script === | ||
| + | <ol> | ||
| + | <li>Open a Command Prompt (or equivalent on other platforms) and change to the root directory of the "web-protege" Eclipse project that was created in the [[#Checkout WebProtege source code|previous step]].</li> | ||
| + | <li>Run the GWT projectCreator script using the syntax:<br /><br /> | ||
| + | |||
| + | <code>projectCreator -eclipse <your-project-name> -overwrite</code><br /><br /> | ||
| + | |||
| + | More documentation about the [http://code.google.com/docreader/#p=google-web-toolkit-doc-1-5&s=google-web-toolkit-doc-1-5&t=DevGuideProjectCreator projectCreator tool] can be found on the GWT website. You should see something like the following after running the script: | ||
| + | |||
| + | <div style="padding-top:10px; padding-bottom:10px;"> | ||
| + | [[Image:Webprotege-projectcreator.jpg]] | ||
| + | </div> | ||
| + | </li> | ||
| + | </ol> | ||
| + | |||
| + | |||
| + | === Run the GWT applicationCreator script === | ||
| + | <ol> | ||
| + | <li>In the same directory in the Command Prompt, run the GWT applicationCreator script using the syntax:<br /><br /> | ||
| + | |||
| + | <code>applicationCreator -eclipse <your-project-name> -ignore edu.stanford.bmir.protege.web.client.WebProtege</code><br /><br /> | ||
| + | |||
| + | More documentation about the [http://code.google.com/docreader/#p=google-web-toolkit-doc-1-5&s=google-web-toolkit-doc-1-5&t=DevGuideApplicationCreator applicationCreator tool] can be found on the GWT Web site. It is very important to use the "-ignore" option, otherwise this script will overwrite the source code that you checked out using Eclipse. | ||
| + | |||
| + | You should see something like the following after running the script: | ||
| + | |||
| + | <div style="padding-top:10px; padding-bottom:10px;"> | ||
| + | [[Image:Webprotege-appcreator.jpg]] | ||
| + | </div> | ||
| + | </li> | ||
| + | |||
| + | <li>If you successfully executed both the projectCreator and applicationCreator scripts, your file structure should now look something like the following: | ||
| + | |||
| + | <div style="padding-top:10px; padding-bottom:10px;"> | ||
| + | [[Image:Webprotege-file-structure.jpg]] | ||
| + | </div> | ||
| + | </li> | ||
| + | </ol> | ||
| + | |||
| + | |||
| + | === Import your project into Eclipse === | ||
| + | <ol> | ||
| + | <li>Reopen your Eclipse development environment</li> | ||
| + | <li>Right-click on the web-protege project that was created in [[#Checkout WebProtege source code|step 1.2]] as a result of checking out WebProtege source code.</li> | ||
| + | <li>Choose Delete from the context menu.</li> | ||
| + | <li>In the resulting "Delete Resources" dialog box, '''leave the "Delete project contents on disk" check box blank''', and click OK.</li> | ||
| + | <li>Select File | Import.</li> | ||
| + | <li>In the Import dialog, choose General -> Existing Projects into Workspace and click Next.</li> | ||
| + | <li>Select the root directory of the "web-protege" project: | ||
| + | <div style="padding-top:10px; padding-bottom:10px;"> | ||
| + | [[Image:Webprotege-import-project.jpg]] | ||
| + | </div> | ||
| + | </li> | ||
| + | <li>Click the Finish button.</li> | ||
| + | </ol> | ||
| + | |||
| + | |||
| + | === Fix project compilation errors === | ||
| + | |||
| + | <ol> | ||
| + | |||
| + | <li>Right-click on the "web-protege" project and choose Properties from the context menu.</li> | ||
| + | |||
| + | <li>In the Properties dialog, select Java Build Path on the left, and click the Libraries tab on the right.</li> | ||
| + | |||
| + | <li>The gwt-user.jar is already on the classpath (added by GWT scripts), but you need to add gwtext.jar by hand. Click Add External JARs... button and add gwtext.jar from wherever you installed it on your system.</li> | ||
| + | |||
| + | <li>Use the Add JARs... button to add all JAR files from the "lib" subdirectory to the classpath, such as xstream-1.3.jar, etc.</li> | ||
| + | |||
| + | <li>WebProtege depends on the sources from the Protege application and several Protege plug-ins. These items are listed below, with the directory names where you can find the corresponding JAR files in your Protege installation folder. There are several different ways these JAR files could be added to your classpath. Once of the easiest ways is probably to create a User Library called something like "Protege" and then add this library to your classpath. You could also create separate User Libraries for Protege and each Protege plug-in and add all of these libraries to your classpath. This is simply a matter of personal preference and also assumes that you have the Protege application installed on your system. | ||
| + | |||
| + | <ul style="padding-top:7px; padding-bottom:7px;"> | ||
| + | <li> Core Protege application (root directory of your Protege installation - need protege.jar, unicode_panel.jar, and looks-2.1.3.jar) | ||
| + | <li> Protege-OWL editor (plugins/edu.stanford.smi.protegex.owl - need all JARS) | ||
| + | <li> Changes Tab (plugins/edu.stanford.smi.protegex.changes - need all JARS) | ||
| + | <li> Chat Plug-in (plugins/edu.stanford.smi.protegex.chatPlugin - need all JARS) | ||
| + | <li> Collaborative Protege (plugins/edu.stanford.smi.protege.collab - need all JARS) | ||
| + | <li>RDF Backend (plugins/edu.stanford.smi.protegex.rdf_backend - need all JARS) | ||
| + | <li>Standard Extensions Library (plugins/edu.stanford.smi.protegex.standard_extensions - need all JARS) | ||
| + | </ul> | ||
| + | |||
| + | <div style="padding-top:10px; padding-bottom:10px;"> | ||
| + | [[Image:Webprotege-libraries.jpg|frame|none|Screenshot of Properties dialog with all necessary libraries for WebProtege]] | ||
| + | </div> | ||
| + | |||
| + | </li> | ||
| + | |||
| + | <li>Once all of the needed JAR files are on the classpath, click OK and the "web-protege" project should compile successfully.</li> | ||
| + | </ol> | ||
| + | |||
| + | |||
| + | === Modify launch configuration === | ||
| + | |||
| + | # Bring up the Run Configurations dialog and select the WebProtege launch configuration under Java Application on the left-hand side. | ||
| + | # Select the Arguments tab and pass a VM argument to give WebProtege more memory, such as "-Xmx550M". | ||
| + | # Click Apply and Close. | ||
| + | |||
| + | |||
| + | === Get ready to run WebProtege from Eclipse === | ||
| + | At this point, there are a few things that are important to understand about WebProtege's internals: | ||
| + | |||
| + | <ul> | ||
| + | <li>WebProtege leverages existing functionality from the Protege RMI server, and thus requires an installation of the [http://protege.stanford.edu/overview/ Protege application]. If you are unfamiliar with the client-server version of Protege and would like to learn more, a [[Protege_Client-Server_Tutorial|detailed tutorial is available]] on this wiki. Before running WebProtege from Eclipse, you need to start the Protege server. Instructions for doing this are [[Protege_Client-Server_Tutorial#Start_the_Server|available]] in the above mentioned tutorial.</li> | ||
| + | |||
| + | <li>When working with the WebProtege source code, you need to make sure that you have a compatible build of the Protege application on your system. You can find out which build to install in the [[WebProtegeAdminGuide#Requirements|requirements section]] of the WebProtege Administrator's Guide. If you run the Protege server using a Protege build that is incompatible with WebProtege, you will get strange errors that will be hard to diagnose</li> | ||
| + | |||
| + | <li>The Protege server controls the list of projects that users see in WebProtege. You modify this information in the "metaproject", which is a frame-based ontology that models permissions (a more [[Protege_Client-Server_Tutorial#The_Metaproject|detailed explanation of the metaproject]] is available in the Protege Client-Server Tutorial). Before running WebProtege from Eclipse, you need to properly configure the metaproject, which involves the following: | ||
| + | |||
| + | <ol style="padding-top:7px; padding-bottom:7px;"> | ||
| + | <li>Please [[WebProtegeAdminGuide#Configure_the_Protege_server.27s_metaproject|read and perform]] the steps outlined in the WebProtege Administrator's Guide for configuring the metaproject.</li> | ||
| + | <li>Once you have finished editing the metaproject, make a copy of the metaproject files (metaproject.pprj, metaproject.pins, metaproject.pont) and paste them into the tomcat/webapps/ROOT/projects/metaproject directory under your web-protege Eclipse project. You may need to run WebProtege once before the tomcat/webapps/ROOT directory is created, and then you will have to create the projects/metaproject directories by hand. Your directory structure should now look something like the following: | ||
| + | <div style="padding-top:10px; padding-bottom:10px;"> | ||
| + | [[Image:Webprotege-file-structure2.jpg|Webprotege-file-structure2.jpg]] | ||
| + | </div> | ||
| + | </li> | ||
| + | </ol> | ||
| + | |||
| + | </li> | ||
| + | </ul> | ||
| + | |||
| + | |||
| + | === Run WebProtege in hosted mode === | ||
| + | |||
| + | Assuming you have succeeded in getting the Protege server running, you can now run WebProtege from Eclipse. Click the Run button and choose WebProtege to launch the WebProtege application: | ||
| + | |||
| + | <div style="padding-top:10px; padding-bottom:10px;"> | ||
| + | [[Image:Webprotege-hosted-mode.jpg|Webprotege-file-structure2.jpg]] | ||
| + | </div> | ||
| + | |||
| + | |||
| + | === Enabling Collaborative Protege functionality === | ||
| + | WebProtege allows users to launch a Protege client using [http://java.sun.com/javase/technologies/desktop/javawebstart/index.jsp Java Web Start technology]. In order for this functionality to work when running from the Eclipse IDE, it is necessary to copy the webapp/collabProtege_OWL.jnlp file and paste the copy to the src/edu/stanford/bmir/protege/web/public directory.<br /><br /><br /> | ||
| + | |||
| + | |||
| + | [[Category:WebProtege documentation]] | ||
Revision as of 16:54, July 29, 2009
WebProtege Developer's Guide
Contents
- 1 Compile and run WebProtege with Eclipse
- 1.1 Prerequisites
- 1.2 Checkout WebProtege source code
- 1.3 Run the GWT projectCreator script
- 1.4 Run the GWT applicationCreator script
- 1.5 Import your project into Eclipse
- 1.6 Fix project compilation errors
- 1.7 Modify launch configuration
- 1.8 Get ready to run WebProtege from Eclipse
- 1.9 Run WebProtege in hosted mode
- 1.10 Enabling Collaborative Protege functionality
Compile and run WebProtege with Eclipse
To follow is some documentation on how one would go about compiling and running WebProtege from the Eclipse development environment. There is more than one way to compile and run WebProtege from Eclipse. This page documents one possibility, but is not meant to be exhaustive.
The version of Eclipse used for the writing of this documentation is 3.4.0 (Ganymede), build id I20080617-2000.
Prerequisites
GWT
The user interface of WebProtege is implemented with the Google Web Toolkit (GWT). In order to compile and run WebProtege, you need to download and install the proper version of GWT. To determine which version to install, please refer to the "readme.txt" file in the root directory of the WebProtege source tree. This file can easily be viewed using our ViewVC repository browser:
http://smi-protege.stanford.edu/svn/web-protege/trunk/readme.txt
GWT-Ext
On the client side, WebProtege uses many of the rich widgets available from the GWT-Ext library. In order to compile WebProtege, you must download and install the proper version of GWT-Ext. To determine which version to install, please refer to the "readme.txt" file in the root directory of the WebProtege source tree. This file can easily be viewed using our ViewVC repository browser:
http://smi-protege.stanford.edu/svn/web-protege/trunk/readme.txt
Java 5
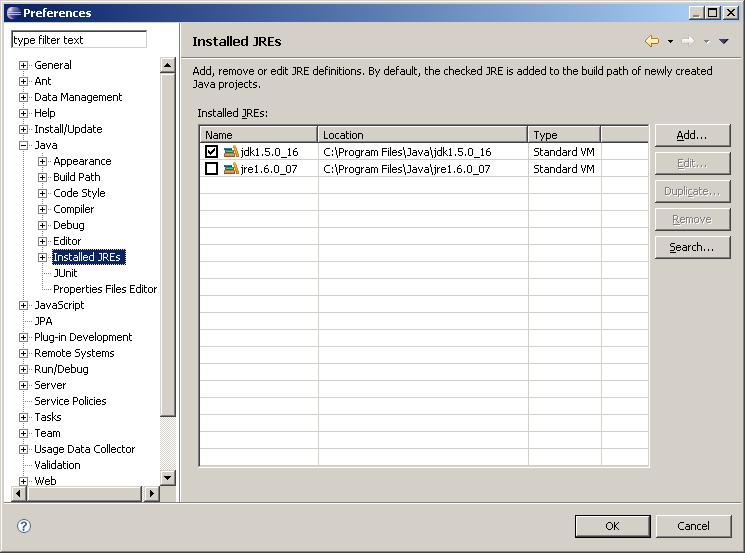
As of the writing of this documentation (10 November 2008), WebProtege requires Java 5, which is available for download from Sun's website. Please make sure to configure your Eclipse environment to use Java 5 as the default JRE. This is done via the Window | Preferences dialog as shown in the screenshot below:
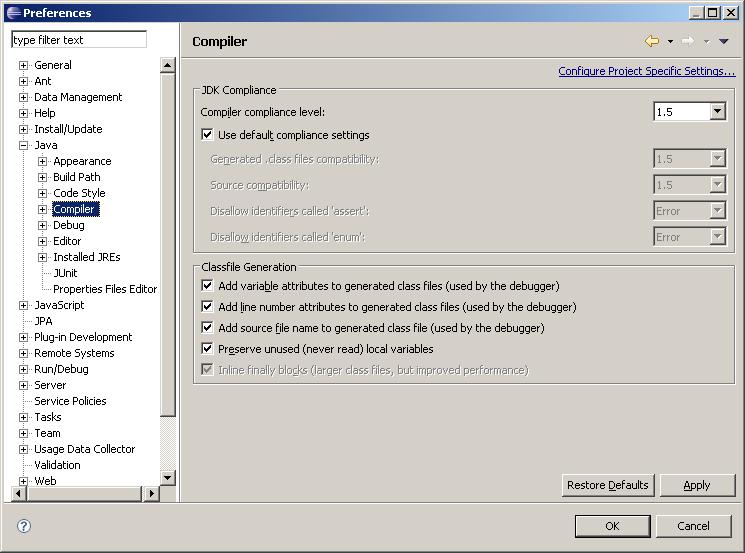
In addition, please set your compiler compliance level to 1.5 (also in the Preferences dialog):
Checkout WebProtege source code
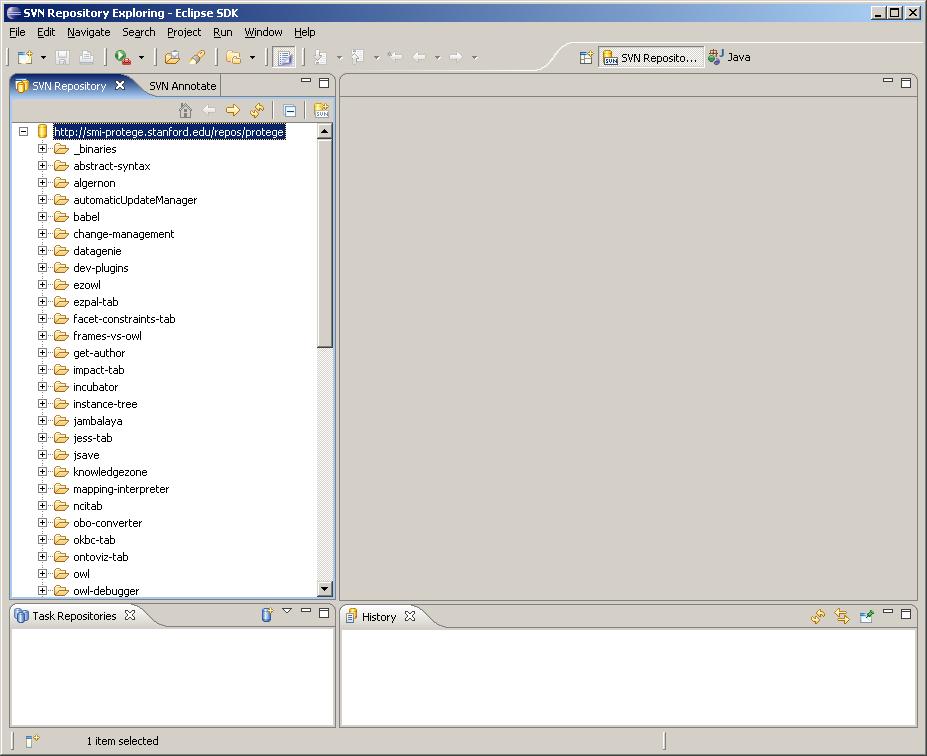
Launch Eclipse and go to the SVN Repository Exploring perspective. (This step assumes that you have already installed an Eclipse plug-in called Subclipse that adds Subversion integration to the Eclipse IDE). Click the "Add SVN Repository" button to bring up the "Add SVN Repository" dialog. In the "Url" text box, type the following URL:
http://smi-protege.stanford.edu/repos/protege/
... and click Finish. Eclipse should look like the following screenshot at this point:
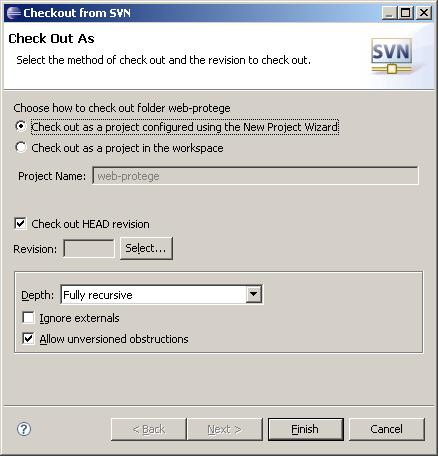
Once you have successfully connected to the Protege Subversion repository, navigate to the folder webprotege/trunk and right click to bring up the context menu. Choose the "Checkout..." option to bring up the "Checkout from SVN" dialog. Select the options indicated in the screenshot below and click Finish.
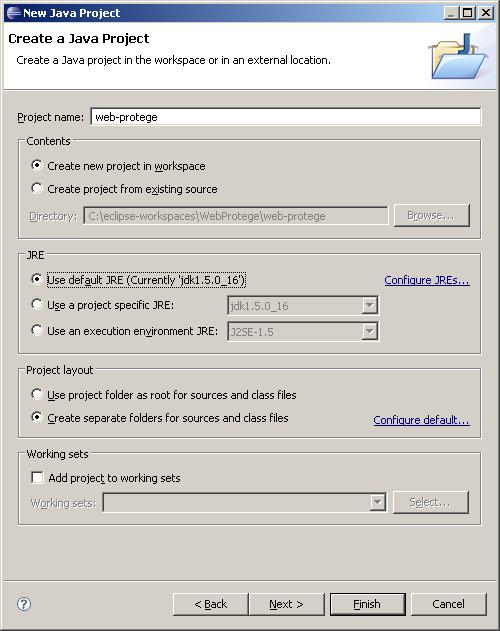
In the resulting "New Project" wizard, select "Java Project" and click Next. In the "New Java Project" dialog, type a project name (for this documentation, we will use "web-protege"). The dialog should look something like the following:
Click Finish to begin checking out WebProtege source code.
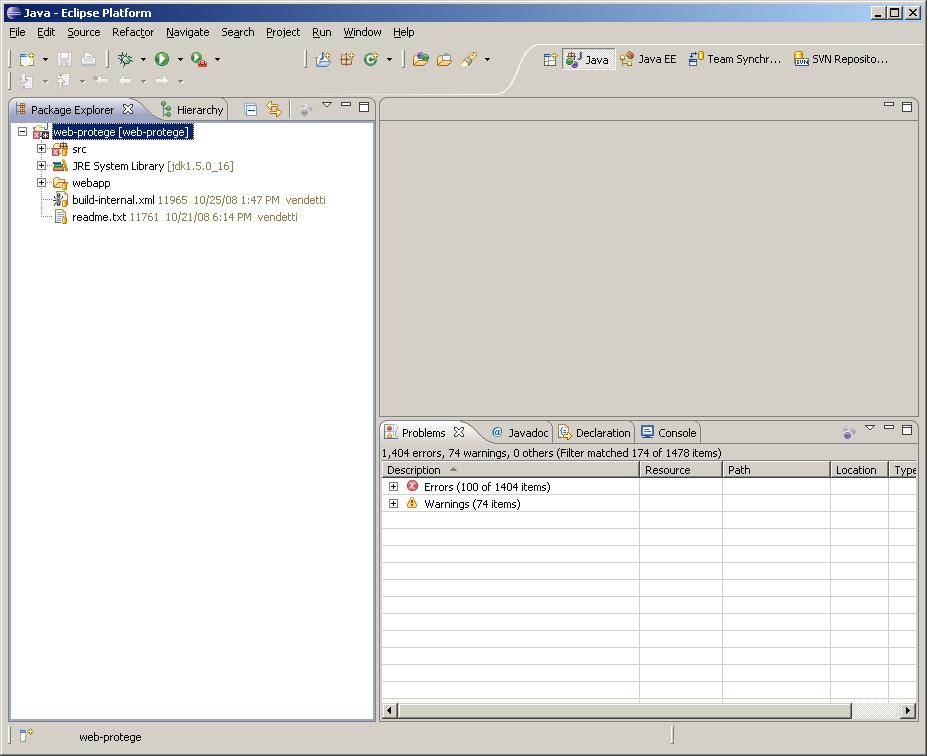
After you have successfully checked out the source code, close the Eclipse IDE before proceeding to the next step.
Run the GWT projectCreator script
- Open a Command Prompt (or equivalent on other platforms) and change to the root directory of the "web-protege" Eclipse project that was created in the previous step.
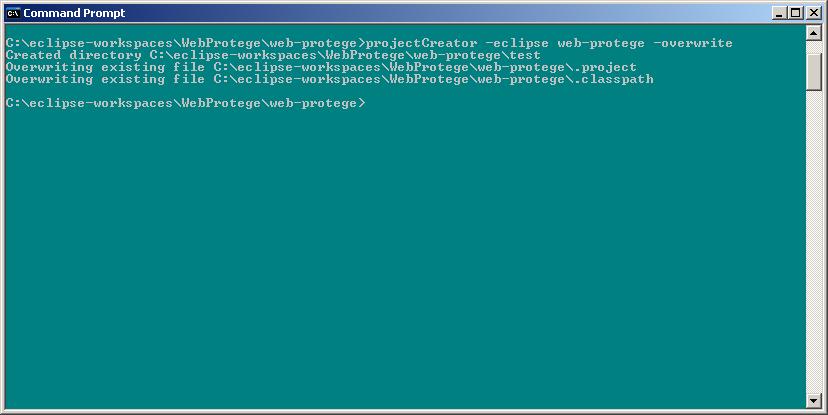
- Run the GWT projectCreator script using the syntax:
projectCreator -eclipse <your-project-name> -overwrite
More documentation about the projectCreator tool can be found on the GWT website. You should see something like the following after running the script:
Run the GWT applicationCreator script
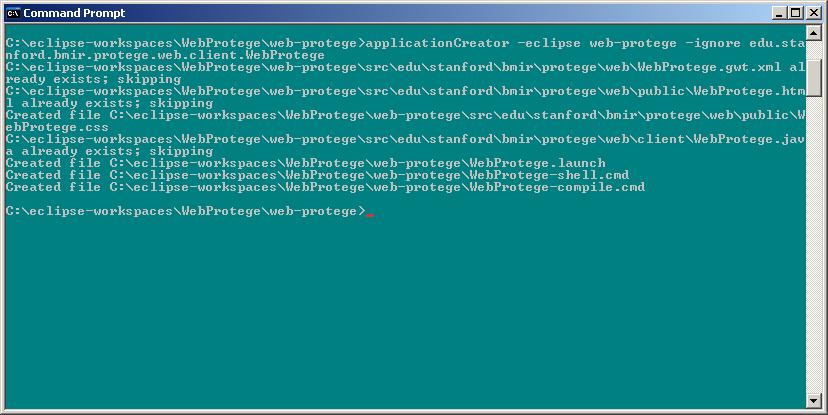
- In the same directory in the Command Prompt, run the GWT applicationCreator script using the syntax:
applicationCreator -eclipse <your-project-name> -ignore edu.stanford.bmir.protege.web.client.WebProtege
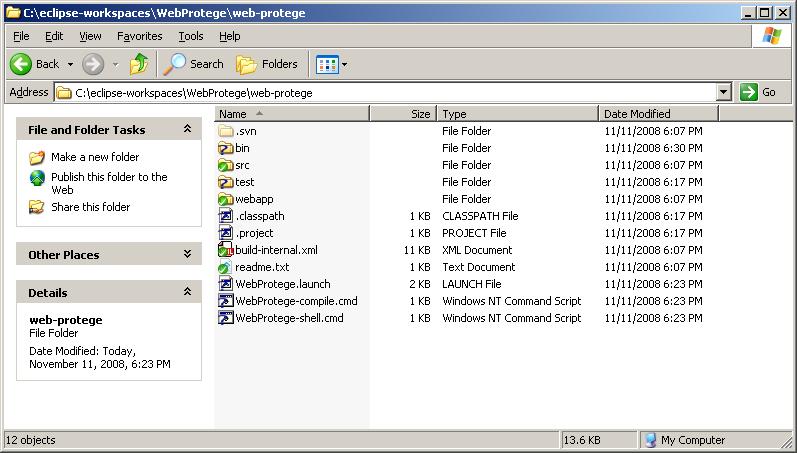
More documentation about the applicationCreator tool can be found on the GWT Web site. It is very important to use the "-ignore" option, otherwise this script will overwrite the source code that you checked out using Eclipse. You should see something like the following after running the script: - If you successfully executed both the projectCreator and applicationCreator scripts, your file structure should now look something like the following:
Import your project into Eclipse
- Reopen your Eclipse development environment
- Right-click on the web-protege project that was created in step 1.2 as a result of checking out WebProtege source code.
- Choose Delete from the context menu.
- In the resulting "Delete Resources" dialog box, leave the "Delete project contents on disk" check box blank, and click OK.
- Select File | Import.
- In the Import dialog, choose General -> Existing Projects into Workspace and click Next.
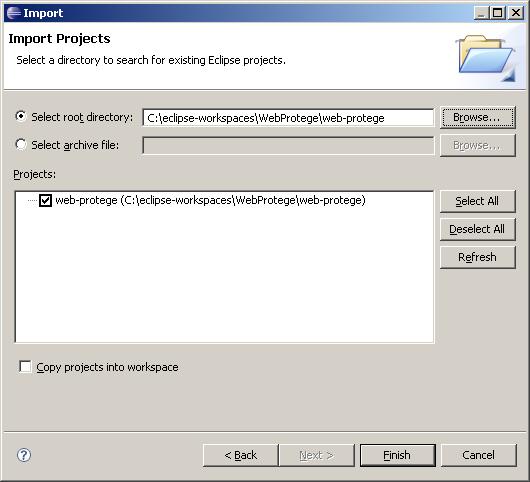
- Select the root directory of the "web-protege" project:
- Click the Finish button.
Fix project compilation errors
- Right-click on the "web-protege" project and choose Properties from the context menu.
- In the Properties dialog, select Java Build Path on the left, and click the Libraries tab on the right.
- The gwt-user.jar is already on the classpath (added by GWT scripts), but you need to add gwtext.jar by hand. Click Add External JARs... button and add gwtext.jar from wherever you installed it on your system.
- Use the Add JARs... button to add all JAR files from the "lib" subdirectory to the classpath, such as xstream-1.3.jar, etc.
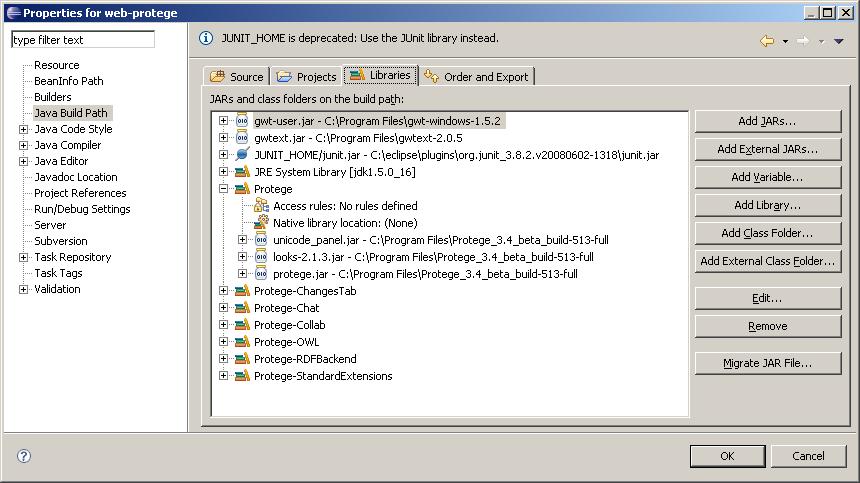
- WebProtege depends on the sources from the Protege application and several Protege plug-ins. These items are listed below, with the directory names where you can find the corresponding JAR files in your Protege installation folder. There are several different ways these JAR files could be added to your classpath. Once of the easiest ways is probably to create a User Library called something like "Protege" and then add this library to your classpath. You could also create separate User Libraries for Protege and each Protege plug-in and add all of these libraries to your classpath. This is simply a matter of personal preference and also assumes that you have the Protege application installed on your system.
- Core Protege application (root directory of your Protege installation - need protege.jar, unicode_panel.jar, and looks-2.1.3.jar)
- Protege-OWL editor (plugins/edu.stanford.smi.protegex.owl - need all JARS)
- Changes Tab (plugins/edu.stanford.smi.protegex.changes - need all JARS)
- Chat Plug-in (plugins/edu.stanford.smi.protegex.chatPlugin - need all JARS)
- Collaborative Protege (plugins/edu.stanford.smi.protege.collab - need all JARS)
- RDF Backend (plugins/edu.stanford.smi.protegex.rdf_backend - need all JARS)
- Standard Extensions Library (plugins/edu.stanford.smi.protegex.standard_extensions - need all JARS)
- Once all of the needed JAR files are on the classpath, click OK and the "web-protege" project should compile successfully.
Modify launch configuration
- Bring up the Run Configurations dialog and select the WebProtege launch configuration under Java Application on the left-hand side.
- Select the Arguments tab and pass a VM argument to give WebProtege more memory, such as "-Xmx550M".
- Click Apply and Close.
Get ready to run WebProtege from Eclipse
At this point, there are a few things that are important to understand about WebProtege's internals:
- WebProtege leverages existing functionality from the Protege RMI server, and thus requires an installation of the Protege application. If you are unfamiliar with the client-server version of Protege and would like to learn more, a detailed tutorial is available on this wiki. Before running WebProtege from Eclipse, you need to start the Protege server. Instructions for doing this are available in the above mentioned tutorial.
- When working with the WebProtege source code, you need to make sure that you have a compatible build of the Protege application on your system. You can find out which build to install in the requirements section of the WebProtege Administrator's Guide. If you run the Protege server using a Protege build that is incompatible with WebProtege, you will get strange errors that will be hard to diagnose
- The Protege server controls the list of projects that users see in WebProtege. You modify this information in the "metaproject", which is a frame-based ontology that models permissions (a more detailed explanation of the metaproject is available in the Protege Client-Server Tutorial). Before running WebProtege from Eclipse, you need to properly configure the metaproject, which involves the following:
- Please read and perform the steps outlined in the WebProtege Administrator's Guide for configuring the metaproject.
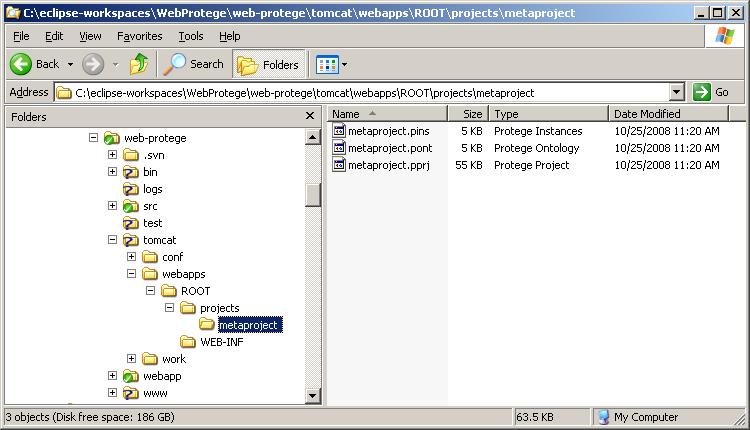
- Once you have finished editing the metaproject, make a copy of the metaproject files (metaproject.pprj, metaproject.pins, metaproject.pont) and paste them into the tomcat/webapps/ROOT/projects/metaproject directory under your web-protege Eclipse project. You may need to run WebProtege once before the tomcat/webapps/ROOT directory is created, and then you will have to create the projects/metaproject directories by hand. Your directory structure should now look something like the following:
Run WebProtege in hosted mode
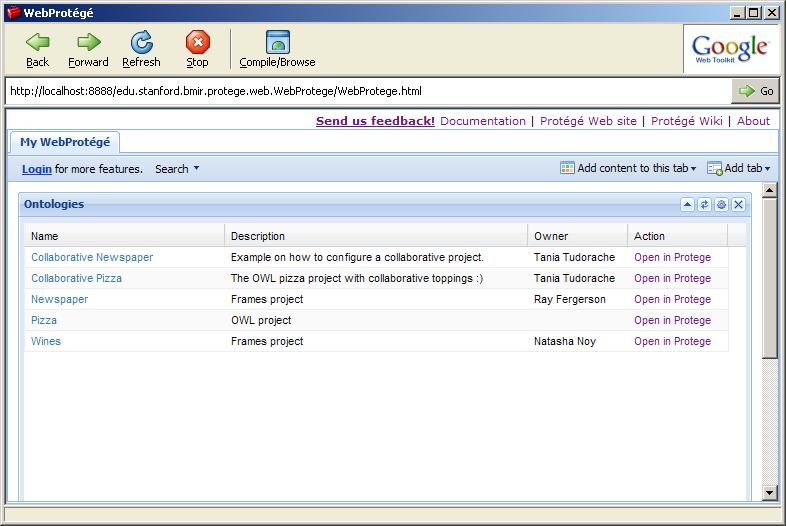
Assuming you have succeeded in getting the Protege server running, you can now run WebProtege from Eclipse. Click the Run button and choose WebProtege to launch the WebProtege application:
Enabling Collaborative Protege functionality
WebProtege allows users to launch a Protege client using Java Web Start technology. In order for this functionality to work when running from the Eclipse IDE, it is necessary to copy the webapp/collabProtege_OWL.jnlp file and paste the copy to the src/edu/stanford/bmir/protege/web/public directory.
