Difference between revisions of "Protege4Pizzas10Minutes"
Nickdrummond (talk | contribs) (→Setup the entities tab) |
Nickdrummond (talk | contribs) (→Create your top classes) |
||
| Line 113: | Line 113: | ||
* Select '''Independent_entity''' | * Select '''Independent_entity''' | ||
| − | * Select | + | * Select '''Tools | Create Class Hierarchy...''' |
| − | * Create Pizza, | + | * Create Pizza, Pizza_topping, and Pizza_base |
(If you want you can create the entire hierarchy here using tabs to indicate the hierarchy, but if you do you can’t take advantage of the automatic suffix mechanism and will have to type “_base”, “_topping”, “_pizza” for each entity by hand.) | (If you want you can create the entire hierarchy here using tabs to indicate the hierarchy, but if you do you can’t take advantage of the automatic suffix mechanism and will have to type “_base”, “_topping”, “_pizza” for each entity by hand.) | ||
* Finish the wizard and leave '''Make classes disjoint''' box ticked | * Finish the wizard and leave '''Make classes disjoint''' box ticked | ||
Revision as of 08:31, May 14, 2009
Pizzas in 10 Minutes
A Quick Demonstration of Handy Shortcuts and Features.
by Alan Rector
WORK IN PROGRESS
Back to Protege4UserDocs
Contents
[hide]- 1 Introduction
- 2 We assume you have a basic structure already defined “on paper”
- 3 Start Protégé and configure it
- 4 Build the ontology
- 5 Save, Classify and check
- 6 Making corrections
Introduction
Protégé 4.0 is a powerful editing environment with many features. So many features that many users have not found most of them. This is a quick trip through how to build our standard Pizza ontology in 10 minutes or less of actual typing.
If you have any problems with this walkthrough it is advised that you download and run through the much more substantial Protege OWL tutorial. That tutorial is intended to teach you about OWL. This brief note is to show how to use Protégé efficiently.
We assume you already know what you are doing and have a list of the main elements of the ontology written down in pencil or sketched in a text editor, mind-map, concept map or whatever tool you prefer. (Of course you have to have done the thinking first. This is just how to get the results of thinking into Protégé as easily as possible.)
We assume you have a basic structure already defined “on paper”
Main categories
- Pizza
- Pizza_base
- Pizza_topping
Lists of each kind of main topic
- Pizza_base ← Thick_crust, Thin_crust,…
- Pizza_topping ← Tomato_topping, Mozarella_topping, Spicy_beef_toping, Pepperoni_topping, …
- Pizzas (primitive) ← Margherita, Hot_and_spicy, Seafood, …
- Pizzas (define) Vegetarian*, Cheesey*
It is useful for a very fast version to know which are going to be defined classes deal with primitive and defined classes separately.
A list of the properties and their domain and ranges
- has_topping
- has_base
Start Protégé and configure it
Before beginning this part of the tutorial please familiarise yourself with P4 with the Quick start Guide.
Install the appropriate plugins
If you don’t already have them, download and unzip the following plugins into your plugins directory
Start P4 and create a new ontology
- Start P4 (preferably from a shell using one of the scripts provided, as this will give you additional feedback)
- Select Create new OWL ontology
- Give the ontology a pizza-related URI
- Specify where you wish to save the ontology
Configure the UI
Setup tabs you will need (and not need)
- Enable the matrix views Tabs | Matrix and Tabs | Property Matrix that will be used later for fast entry
- Disable the individuals, object and data property and classes tabs (you can use the entities tab for all of these)
Setup the renderer and how new entities will be created
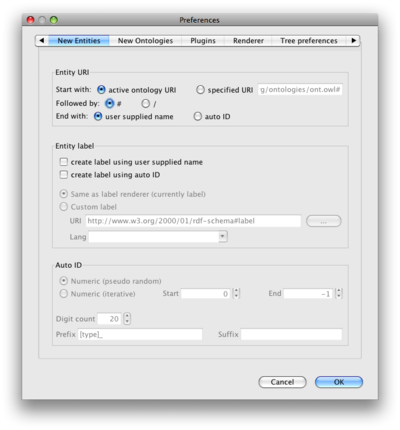
- Open preferences (File | Preferences on windows, Protege | Preferences on mac)
- Select the new entities tab
- In the Entity URI pane, select auto ID. When you create a new class, property or individual P4 will give it a meaningless URI and a readable label. That way if you exchange ontologies, correcting spelling mistakes (by merely changing labels) won’t cause the links between the ontologies to break
- Select the renderer tab
- Select Render entities using annotation values
Setup the entities tab
- Select the entities tab
- Add the annotation template view from View | Misc Views | “Annotation Template in the top part of the right hand pane (see Protege4GettingStarted#Reconfigure_the_User_Interface if you've not done this before).
The default fields in the annotations view should be suitable but if you wish to change them you can do this in Preferences | Annotation Template
If you want to save this set up, use Tabs | Store current layout. Note when you quit P4 this is automatically stored and will persist for future versions of P4.
Build the ontology
Create the top hierarchy
You don’t need to do this, but for a variety of reasons it is “good practice”.
- Select the entities tab
- Make sure Thing is selected in the class hierarchy
- Select Tools | Create class hierarchy
- Create the hierarchy with tab indenting to denote subclasses:
Domain_entity
  Independent_entity
  Value
Create the skeleton hierarchy
Create your top classes
- Select Independent_entity
- Select Tools | Create Class Hierarchy...
- Create Pizza, Pizza_topping, and Pizza_base
(If you want you can create the entire hierarchy here using tabs to indicate the hierarchy, but if you do you can’t take advantage of the automatic suffix mechanism and will have to type “_base”, “_topping”, “_pizza” for each entity by hand.)
- Finish the wizard and leave Make classes disjoint box ticked
Create each branch of the taxonomy
- Select Pizza_topping
- Select Tools | Create Class Hierarchy…
- In the Suffix box type “_topping”
- Enter the list of toppings and finish as before, using tabs to indicate subclasses
- Repeat for Pizza_base
- Repeat for Pizza, but untick Make classes disjoint because we will make some of these classes defined, so we will add the disjoints afterwards.
- Select Value and create the hierarchy for Spiciness← Hot, Medium, Mild, all with the suffix “_value”
- Close the value partition by selecting Spiciness_value and select Edit | Add covering axiom
Open the class hierarchy and check
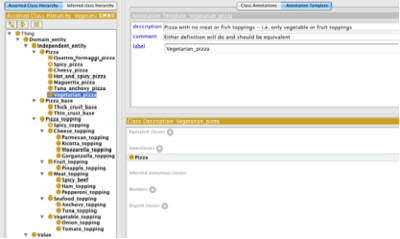
- If you have made any spelling errors you can just correct them in the label field
- Type convenient descriptions in the kinds of pizzas and anything else that is not unambiguous or will be defined.
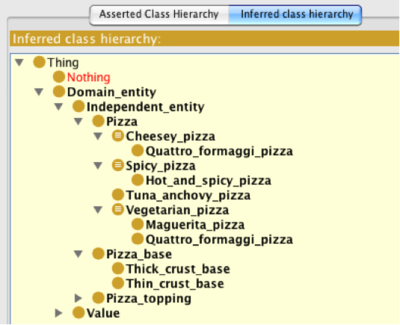
The ontology now looks as show below for one choice of toppings and kinds of pizza.
Create the object properties
- In the object properties view create two top object properties
 relational_property
 modifier_property
- Create subproperties of relational_property
 has_topping
 has_base
- Create a subproperty of modifier_property
has_spiciness
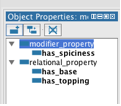
The object properties tab should now look roughly like
Add the property characteristics
- Go the Property Matrix tab
- Make has_spiciness and has_base both functional
- Fill in the appropriate domains and ranges for each property (You can drag and drop classes from the classes palette into the domain and range)
The whole tab should then look roughly as shown below:
Add the toppings and the spiciness of toppings
- Go to the Matrix tab
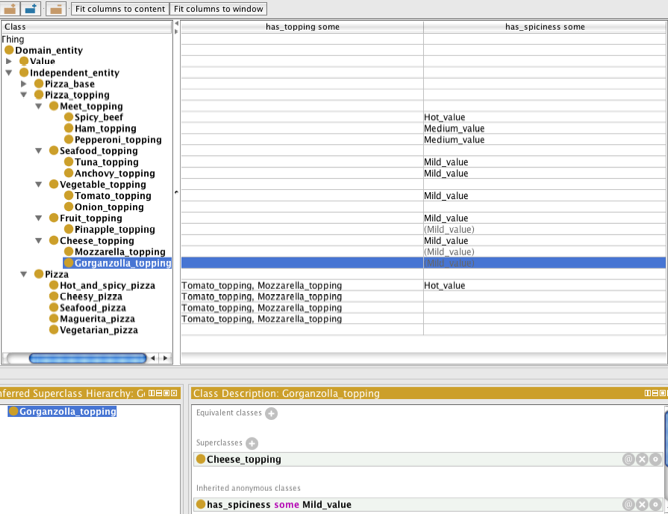
Optional additional setup. You may find it easier to have an additional class description view at the bottom of the matrix tab as shown at the end of this section. If so, go to View | Class views | Class Description, and place it in the bottom half so it goes under the main part of the matrix tab.
- Add columns for the properties has_topping and has_spiciness to the matrix
- Find the properties in the Object properties palette on the right of the tab and drag them to the central pane
- Add Mild, Medium or Hot for the various pizza toppings
- You can now drag and drop values into the matrix - each comma-separated value in a cell is the filler of a someValuesFrom restriction on the class along the property
- You can multiselect the target classes in order to add the same value to multiple cells at once
- You can multiselect filler classes to be dragged
- It might be quicker to edit the cells in place - click a cell and start typing
- the editor support autocomplete just like expression editors (Ctrl-Space)
- separate fillers with commas
- If you make a mistake you can either delete the item in place, or you can change it in the class description window if you have placed it at the bottom
- You only need to drag values to parent classes as they will be inherited.
- You can now drag and drop values into the matrix - each comma-separated value in a cell is the filler of a someValuesFrom restriction on the class along the property
- Add the basic toppings to the Pizzas as well, except for the classes that will have definitions, Vegetarian Pizza, Spicy Pizza, and Cheesy Pizza.
At the end you should see roughly as below:
Finish off the pizza definitions
- Return to the class tab
- Close the pizzas toppings so that no others can be added
- Close Margherita_pizza
- Select Margherita_pizza
- right click on one of the has_topping restrictions in the Description view (on the mac you might need to first select the restriction, then right click).
- In the menu that appears select Create closure axiom. This creates an AllValuesFrom restriction along the property in the restriction you selected. The filler of this new restriction will be a union of all the fillers along this property.
- Repeat for Quatro_formaggi_pizza and Seafood_pizza.
- Close Margherita_pizza
Add the definitions for the defined classes based on existentials
It is usually easier to create defined classes by creating the restrictions individually and then convert it the result to a defined class. If you don’t want to use all the restrictions in the definitions, just select the ones you do want to convert, right click and use the convert).
- Create a sublclass of Pizza_topping, Spicy_topping
- Add a superclass in the description view, has_spiciness some Hot_value
- Choose Edit | Convert to defined class (or press the short cut key – CMD-D on the Mac, CTRL-D on a Windows). All superclasses are merged into a single equivalent class - you will see this move in the description view
- Select or create a Spicy_pizza
- Add a superclass in the description view, has_topping some Spicy_topping
- Make it defined by pressing CMD-D or CTRL-D.
Add the definitions for other defined classes
If the definitions are more complicated, e.g. for Vegetarian Pizza, then you just have to do it the long way. It is still probably easier to add them as individual restrictions and then convert to a defined class
- Add a definition for a Cheesey_pizza, e.g. that it has at least two kinds of cheese
- Add a definition for Vegetarian Pizza, e.g. that it has no meat or fish toppings
Save, Classify and check
The ontology isn’t complete until it’s been classified and checked!
- Save your work first! In fact, if you have been wise you will have been saving your work as went along.
- Choose a reasoner from the Reasoner menu. This will automatically cause the reasoner to classify your ontology.
- If something turns red, don’t panic. It is probably a disjoint axiom. Check them first.
Making corrections
It is the disjoint axioms that are troublesome. If you are changing the class hierarchy:
- If you are moving a class, first remove its disjoint axioms. They will almost certainly be wrong for its new location
- When you are finished, go to a sibling class with disjoint axioms, remove the long disjoint axiom and press CTRL-J/CMD-J to add back the disjoint axioms on all primitive siblings.
Anything else, just fix in the usual Class Description view.
